文章目录
前言
本节就来看看,ByteBuf使用完之后的对象回收、缓存的大致流程。
如果对本文的一些基础概念、名词不是很清楚,可以参考【ByteBuf的结构、分类、核心api简介】和【内存规格、缓存&结构、chunk、arena、page、subpage等概念介绍】,本文对基础概念也不会再一一赘述了。
关于bitmap和page“树”,可参考bitmap分析和“树”。
Netty Version:4.1.6
ByteBuf的回收在哪遇到过
其实早在跟进ByteBuf相关源码之前,我就遇到过ByteBuf回收相关的代码,只是当时对ByteBuf还完全不了解,所以就没有追下去。下面,我就先把以前遇到过的都贴出来,觉得没必要回顾的话就直接跳过吧。
之前博客inbound事件传播和outbound事件传播分别提到HeadContext和TailContext的收尾工作,而这个收尾工作对于ByteBuf来说其实就是回收其对象、缓存内存。
inbound事件回收
依旧拿channelRead举例子,inbound事件最终会传播到TailContext对象,即来到如下代码:
io.netty.channel.DefaultChannelPipeline.TailContext#channelRead
        @Override
        public void channelRead(ChannelHandlerContext ctx, Object msg) throws Exception {
            // 假设这里的msg是ByteBuf对象
            onUnhandledInboundMessage(msg);
        }
跟进onUnhandledInboundMessage方法:
io.netty.channel.DefaultChannelPipeline#onUnhandledInboundMessage
    protected void onUnhandledInboundMessage(Object msg) {
        try {
            logger.debug(
                    "Discarded inbound message {} that reached at the tail of the pipeline. " +
                            "Please check your pipeline configuration.", msg);
        } finally {
            ReferenceCountUtil.release(msg);
        }
    }
跟进release方法:
io.netty.util.ReferenceCountUtil#release(java.lang.Object)
    public static boolean release(Object msg) {
        // ByteBuf实现了此接口,返回true
        if (msg instanceof ReferenceCounted) {
            // 回收Bytebuf对象,缓存内存
            return ((ReferenceCounted) msg).release();
        }
        return false;
    }
outbound事件回收
依旧拿write举例子,outbound事件传播最终会传播到HeadContext对象,即来到如下代码:
io.netty.channel.DefaultChannelPipeline.HeadContext#write
        @Override
        public void write(ChannelHandlerContext ctx, Object msg, ChannelPromise promise) throws Exception {
            // 假设msg是ByteBuf对象
            unsafe.write(msg, promise);
        }
跟进write方法:
        @Override
        public final void write(Object msg, ChannelPromise promise) {
            assertEventLoop();

            ChannelOutboundBuffer outboundBuffer = this.outboundBuffer;
            if (outboundBuffer == null) {
                safeSetFailure(promise, WRITE_CLOSED_CHANNEL_EXCEPTION);
                // release message now to prevent resource-leak
                ReferenceCountUtil.release(msg);
                return;
            }

            int size;
            try {
                msg = filterOutboundMessage(msg);
                size = pipeline.estimatorHandle().size(msg);
                if (size < 0) {
                    size = 0;
                }
            } catch (Throwable t) {
                safeSetFailure(promise, t);
                ReferenceCountUtil.release(msg);
                return;
            }

            outboundBuffer.addMessage(msg, size, promise);
        }
- 无论是当前还是继续跟下去,最终都和上面inbound的“收尾”工作一样,调用ByteBuf的release方法。
实验代码
虽说事件传播最终也会回收ByteBuf对象等,但是从事件传播追起那可太麻烦了,所以还是手动写个实验代码触发比较方便。
testRelease.java
import io.netty.buffer.ByteBuf;
import io.netty.buffer.PooledByteBufAllocator;

/**
 * @author WenJie
 */
public class testRelease{
    public static void main(String[] args) {
        int page = 1024 * 8;
        // 获取PooledByteBufAllocator实例。
        PooledByteBufAllocator allocator = PooledByteBufAllocator.DEFAULT;

        // 创建一个ByteBuf,申请16KB内存
        ByteBuf byteBuf1 = allocator.directBuffer(2 * page);

        // 回收ByteBuf、缓存内存
        byteBuf1.release();
    }
}
跟进源码
开始追踪
启动main方法,跟进release方法:
io.netty.buffer.AbstractReferenceCountedByteBuf#release()
    @Override
    public boolean release() {
        // 1表示减少数量为1
        return release0(1);
    }
跟进release0方法:
io.netty.buffer.AbstractReferenceCountedByteBuf#release0
    private boolean release0(int decrement) {
        for (;;) {
            // ByteBuf对象计数器,默认为1,<1表示已失效
            // 如果这个ByteBuf是合并成的,就>1(其实ByteBuf还有合并类型)
            int refCnt = this.refCnt;

            if (refCnt < decrement) {
                throw new IllegalReferenceCountException(refCnt, -decrement);
            }
            // cas更新状态
            if (refCntUpdater.compareAndSet(this, refCnt, refCnt - decrement)) {
                if (refCnt == decrement) {
                    // 回收、缓存等。
                    deallocate();
                    return true;
                }
                return false;
            }
        }
    }
跟进deallocate方法,此处【坐标1】:
io.netty.buffer.PooledByteBuf#deallocate
    @Override
    protected final void deallocate() {
        if (handle >= 0) {
            // page在“树”中的index
            final long handle = this.handle;
            // 重置当前bytebuf的偏移量
            this.handle = -1;
            // 内存对象置空
            memory = null;
            // 根据内存偏移量回收并缓存
            chunk.arena.free(chunk, handle, maxLength, cache);
            // 如果上面的内存不能被缓存,则标记内存为可用。
            // 最后还会回收ByteBuf对象以便于下次复用。
            recycle();
        }
    }
将内存加入缓存
跟进上面的free方法,此处【坐标2】:
io.netty.buffer.PoolArena#free
    void free(PoolChunk<T> chunk, long handle, int normCapacity, PoolThreadCache cache) {
        // unpooled类型的ByteBuf是调用jdk底层清理的,有兴趣的可以自己跟下
        if (chunk.unpooled) {
            int size = chunk.chunkSize();
            destroyChunk(chunk);
            activeBytesHuge.add(-size);
            deallocationsHuge.increment();
        }
        // 由于实验代码创建的是pooled类型的ByteBuf,所以会进入下面代码
        else {
            // 获取内存规格
            SizeClass sizeClass = sizeClass(normCapacity);
            // 尝试缓存
            if (cache != null && cache.add(this, chunk, handle, normCapacity, sizeClass)) {
                // cached so not free it.
                return;
            }
            // 如果缓存失败,标记内存为可用(相当于释放内存)
            freeChunk(chunk, handle, sizeClass);
        }
    }
跟进add方法:
io.netty.buffer.PoolThreadCache#add
    boolean add(PoolArena<?> area, PoolChunk chunk, long handle, int normCapacity, SizeClass sizeClass) {
        // 获取符合内存规格的缓存块
        MemoryRegionCache<?> cache = cache(area, normCapacity, sizeClass);
        if (cache == null) {
            return false;
        }
        // 将内存缓存到cache中,成功返回true,失败返回false
        return cache.add(chunk, handle);
    }
先跟进cache方法看看:
io.netty.buffer.PoolThreadCache#cache(io.netty.buffer.PoolArena<?>, int, io.netty.buffer.PoolArena.SizeClass)
    private MemoryRegionCache<?> cache(PoolArena<?> area, int normCapacity, SizeClass sizeClass) {
        switch (sizeClass) {
        case Normal:
            // 取normal规格&符合大小的MemoryRegionCache
            return cacheForNormal(area, normCapacity);
        case Small:
            // 取small规格&符合大小的MemoryRegionCache
            return cacheForSmall(area, normCapacity);
        case Tiny:
            // 取tiny规格&符合大小的MemoryRegionCache
            return cacheForTiny(area, normCapacity);
        default:
            throw new Error();
        }
    }
因为实验代码是16KB,所以跟进cacheForNormal方法:
io.netty.buffer.PoolThreadCache#cacheForNormal
    private MemoryRegionCache<?> cacheForNormal(PoolArena<?> area, int normCapacity) {
        if (area.isDirect()) {
            // 计算出对应缓存块大小的坐标
            int idx = log2(normCapacity >> numShiftsNormalDirect);
            // 根据坐标拿到缓存块
            return cache(normalDirectCaches, idx);
        }
        // 断点结果idx=1
        int idx = log2(normCapacity >> numShiftsNormalHeap);
        return cache(normalHeapCaches, idx);
    }
继续跟进cache方法:
io.netty.buffer.PoolThreadCache#cache(io.netty.buffer.PoolThreadCache.MemoryRegionCache
    private static <T> MemoryRegionCache<T> cache(MemoryRegionCache<T>[] cache, int idx) {
        if (cache == null || idx > cache.length - 1) {
            return null;
        }
        return cache[idx];
    }
- 要是忘记MemoryRegionCache是怎么初始化的,可以参考【传送门】。
下面再画个图形象表示下cache方法所做的事情:
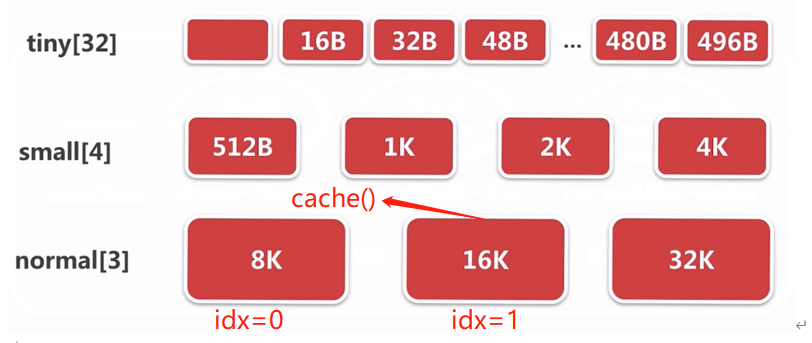
- 可见就是去到符合要求的MemoryRegionCache块。
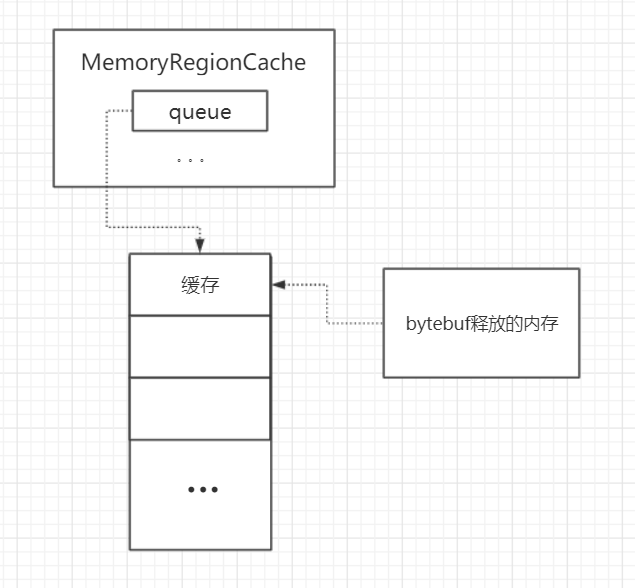
去到这个块之后,还需要将内存信息压入MemoryRegionCache的queue中,也就是以下要追踪的代码。
视角转回上面的add方法,现在我们已经知道这个cache方法是取回符合大小的MemoryRegionCache对象了:
io.netty.buffer.PoolThreadCache#add
    boolean add(PoolArena<?> area, PoolChunk chunk, long handle, int normCapacity, SizeClass sizeClass) {
        // 获取符合内存规格的缓存块
        MemoryRegionCache<?> cache = cache(area, normCapacity, sizeClass);
        if (cache == null) {
            return false;
        }
        // 将内存缓存到cache中,成功返回true,失败返回false
        return cache.add(chunk, handle);
    }
现在跟进cache.add方法:
        public final boolean add(PoolChunk<T> chunk, long handle) {
            // 拿到MemoryRegionCache内部类Entry对象。
            // Entry对象可能是一个复用对象,只是重置了chunk和handle
            Entry<T> entry = newEntry(chunk, handle);
            // 封装完以后将内存信息放进queue就算是完成了,底层是jdk的safe操作。
            boolean queued = queue.offer(entry);
            // 如果缓存失败了就回收Entry对象。
            if (!queued) {
                // If it was not possible to cache the chunk, immediately recycle the entry
                entry.recycle();
            }

            return queued;
        }
- 这里的newEntry,其实逻辑有点类似于之前讲过的bytebuf复用。
- 关于命中缓存、对象复用,都可以参考【命中缓存的分配流程】。
上面流程再画张图就是这样:
无法缓存,则标记为可用
返回到【坐标2】的free方法:
io.netty.buffer.PoolArena#free
    void free(PoolChunk<T> chunk, long handle, int normCapacity, PoolThreadCache cache) {
        // unpooled类型的ByteBuf是调用jdk底层清理的,有兴趣的可以自己跟下
        if (chunk.unpooled) {
            int size = chunk.chunkSize();
            destroyChunk(chunk);
            activeBytesHuge.add(-size);
            deallocationsHuge.increment();
        }
        // 由于实验代码创建的是pooled类型的ByteBuf,所以会进入下面代码
        else {
            // 获取内存规格
            SizeClass sizeClass = sizeClass(normCapacity);
            // 尝试缓存
            if (cache != null && cache.add(this, chunk, handle, normCapacity, sizeClass)) {
                // cached so not free it.
                return;
            }
            // 如果缓存失败,标记内存为可用(相当于释放内存)
            freeChunk(chunk, handle, sizeClass);
        }
    }
加入cache缓存失败,则会进入freeChunk方法,跟进去看看:
io.netty.buffer.PoolArena#freeChunk
    void freeChunk(PoolChunk<T> chunk, long handle, SizeClass sizeClass) {
        final boolean destroyChunk;
        synchronized (this) {
            switch (sizeClass) {
            case Normal:
                ++deallocationsNormal;
                break;
            case Small:
                ++deallocationsSmall;
                break;
            case Tiny:
                ++deallocationsTiny;
                break;
            default:
                throw new Error();
            }
            // 标记内存为可用并移动chunk
            destroyChunk = !chunk.parent.free(chunk, handle);
        }
        if (destroyChunk) {
            // destroyChunk not need to be called while holding the synchronized lock.
            // 不可用,销毁chunk。
            destroyChunk(chunk);
        }
    }
跟进free方法:
io.netty.buffer.PoolChunkList#free
    boolean free(PoolChunk<T> chunk, long handle) {
        // 标记handle指向的内存为可用
        chunk.free(handle);
        // chunkList满了,将当前chunk移动到其它对应的chunkList
        if (chunk.usage() < minUsage) {
            remove(chunk);
            // Move the PoolChunk down the PoolChunkList linked-list.
            return move0(chunk);
        }
        return true;
    }
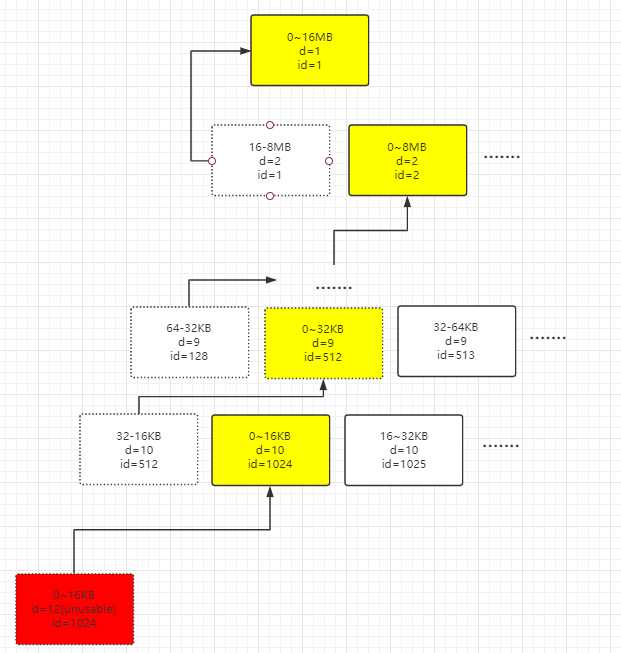
继续跟进free方法:
    void free(long handle) {
        // page在“树”中的index,也可以理解为page相对于chunk的偏移量。
        int memoryMapIdx = memoryMapIdx(handle);
        // subpage相对于page的偏移量。
        int bitmapIdx = bitmapIdx(handle);

        if (bitmapIdx != 0) { // free a subpage
            PoolSubpage<T> subpage = subpages[subpageIdx(memoryMapIdx)];
            assert subpage != null && subpage.doNotDestroy;

            PoolSubpage<T> head = arena.findSubpagePoolHead(subpage.elemSize);
            synchronized (head) {

                if (subpage.free(head, bitmapIdx & 0x3FFFFFFF)) {
                    return;
                }
            }
        }
        // chunk剩余内存
        freeBytes += runLength(memoryMapIdx);
        // 节点复位
        setValue(memoryMapIdx, depth(memoryMapIdx));
        // 跟新父节点状态
        updateParentsFree(memoryMapIdx);
    }
- 这里的free方法其实就是和前面bitmap分析的操作反过来,也这里的free就是将底层二进制对应位置的1换成0,表示subpage级别的内存已经可用了。
最后三行其实就是将【page级别分配】提到的流程倒过来,下面再画了一张图:
完成了内存的 缓存 or 标记可用 or 销毁后,Netty还需要将ByteBuf对象放进一个对象池,省去以后需要ByteBuf时从0构建的时间,下面就开始讲这个。
将ByteBuf对象放进对象池
现在将视角重新拉回【坐标1】的deallocate方法:
io.netty.buffer.PooledByteBuf#deallocate
    @Override
    protected final void deallocate() {
        if (handle >= 0) {
            // page在“树”中的index
            final long handle = this.handle;
            // 重置当前bytebuf的偏移量
            this.handle = -1;
            // 内存对象置空
            memory = null;
            // 根据内存偏移量回收并缓存
            chunk.arena.free(chunk, handle, maxLength, cache);
            // 如果上面的内存不能被缓存,则标记内存为可用。
            // 最后还会回收ByteBuf对象以便于下次复用。
            recycle();
        }
    }
跟进recycle方法:
io.netty.buffer.PooledByteBuf#recycle
    private void recycle() {
        recyclerHandle.recycle(this);
    }
继续跟进recycle方法:
io.netty.util.Recycler.DefaultHandle#recycle
        @Override
        public void recycle(Object object) {
            if (object != value) {
                throw new IllegalArgumentException("object does not belong to handle");
            }
            // 放入对象池,如果对象池满了就会删除。
            stack.push(this);
        }
到这里,整个回收的流程就走完了。
那对象池的对象(stack)、缓存的内存(queue)再哪复用呢?这在我前面的学习记录【对象池复用ByteBuf】和【命中缓存】都有跟进过源码,这里就不再赘述了。