文章目录
前言
本节来看看PooledByteBufAllocator命中缓存时的分配内存流程,依旧是选择分配direct类型内存。因为分配heap类型或Unpooled类型的源码逻辑大同小异且时间有限,我就不每个都追一遍了。
如果对一些基础概念不是很清楚,可以参考【ByteBuf的结构、分类、核心api简介】和【内存规格、缓存&结构、chunk、arena、page、subpage等概念介绍】,本文对基础概念也不会再一一赘述了。
另外本文会还会提及ByteBuf对象的复用,后面的博客就不再对这一块重复讲解了。
Netty Version:4.1.6
实验代码
TestCache.java
import io.netty.buffer.ByteBuf;
import io.netty.buffer.PooledByteBufAllocator;

/**
 * @author WenJie
 */
public class TestCache{
    public static void main(String[] args) {
        int page = 1024 * 8;
        // 获取PooledByteBufAllocator实例。
        PooledByteBufAllocator allocator = PooledByteBufAllocator.DEFAULT;

        // 先创建一个ByteBuf,申请16kb内存,即两个页
        ByteBuf byteBuf1 = allocator.directBuffer(2 * page);
        // 回收ByteBuf,这一步会缓存内存、将ByteBuf对象扔进对象池,详细等后边博客更新。
        byteBuf1.release();

        // 再次获取ByteBuf,申请同样大小的内存,就可以触发缓存了
        // 我们要追的就是这行代码。
        ByteBuf byteBuf2 = allocator.directBuffer(2 * page);
        byteBuf2.release();

    }
}
- 关于ByteBuf如何对象池和内存如何被缓存等问题,会在后面几篇博客更新,暂时只需要知道创建byteBuf2会复用对象池对象、缓存就可以了。
跟进源码
从以下代码开始跟进:

跟进directBuffer方法:
io.netty.buffer.AbstractByteBufAllocator#directBuffer(int)
    @Override
    public ByteBuf directBuffer(int initialCapacity) {
        return directBuffer(initialCapacity, Integer.MAX_VALUE);
    }
继续跟进directBuffer方法:
io.netty.buffer.AbstractByteBufAllocator#directBuffer(int, int)
    @Override
    public ByteBuf directBuffer(int initialCapacity, int maxCapacity) {
        if (initialCapacity == 0 && maxCapacity == 0) {
            return emptyBuf;
        }
        // 参数验证
        validate(initialCapacity, maxCapacity);
        return newDirectBuffer(initialCapacity, maxCapacity);
    }
跟进newDirectBuffer方法:
io.netty.buffer.PooledByteBufAllocator#newDirectBuffer
    @Override
    protected ByteBuf newDirectBuffer(int initialCapacity, int maxCapacity) {
        PoolThreadCache cache = threadCache.get();
        PoolArena<ByteBuffer> directArena = cache.directArena;

        ByteBuf buf;
        if (directArena != null) {
            buf = directArena.allocate(cache, initialCapacity, maxCapacity);
        } else {
            if (PlatformDependent.hasUnsafe()) {
                buf = UnsafeByteBufUtil.newUnsafeDirectByteBuf(this, initialCapacity, maxCapacity);
            } else {
                buf = new UnpooledDirectByteBuf(this, initialCapacity, maxCapacity);
            }
        }

        return toLeakAwareBuffer(buf);
    }
- directArena默认是不为null的,在上一节有讲过它的初始化。
跟进directArena.allocate,此处【坐标1】:
io.netty.buffer.PoolArena#allocate(io.netty.buffer.PoolThreadCache, int, int)
    PooledByteBuf<T> allocate(PoolThreadCache cache, int reqCapacity, int maxCapacity) {
        // 尝试从对象池中拿到ByteBuf,拿不到会创建新的
        PooledByteBuf<T> buf = newByteBuf(maxCapacity);
        // 给ByteBuf分配内存并完成初始化工作
        allocate(cache, buf, reqCapacity);
        return buf;
    }
对象池复用ByteBuf
这里先跟上面的进newByteBuf方法:
io.netty.buffer.PoolArena.DirectArena#newByteBuf
        @Override
        protected PooledByteBuf<ByteBuffer> newByteBuf(int maxCapacity) {
            // 一般情况下都能拿到jdk底层的unsafe对象
            if (HAS_UNSAFE) {
                return PooledUnsafeDirectByteBuf.newInstance(maxCapacity);
            } else {
                return PooledDirectByteBuf.newInstance(maxCapacity);
            }
        }
跟进PooledUnsafeDirectByteBuf.newInstance:
io.netty.buffer.PooledUnsafeDirectByteBuf#newInstance
    static PooledUnsafeDirectByteBuf newInstance(int maxCapacity) {
        PooledUnsafeDirectByteBuf buf = RECYCLER.get();
        buf.reuse(maxCapacity);
        return buf;
    }
先来看看这个RECYCLER是什么
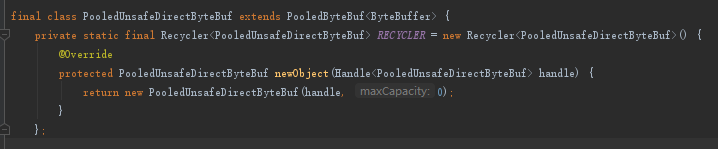
- 请记住它的newObject方法,等下就会遇到。
跟进RECYCLER.get()方法:
io.netty.util.Recycler#get
    public final T get() {
        if (maxCapacityPerThread == 0) {
            return newObject((Handle<T>) NOOP_HANDLE);
        }
        // 这个stack就是对象池,注意这个Stack不是jdk的。
        // stack也可以是存储其它类对象的对象池。
        Stack<T> stack = threadLocal.get();
        // 对象池中弹出TestCache.java中回收的ByteBuf包装对象。
        DefaultHandle<T> handle = stack.pop();
        // 如果对象池中没有,则调用newObject创建一个新的ByteBuf。
        if (handle == null) {
            handle = stack.newHandle();
            handle.value = newObject(handle);
        }
        // 返回ByteBuf对象。
        return (T) handle.value;
    }
- 由于我们的TestCache.java中回收了一个ByteBuf对象,所这里的对象池是能去到ByteBuf对象的。
拿到ByteBuf对象后,怎么证明它就是复用之前的对象呢?我们不妨来看看断点的调试结果:

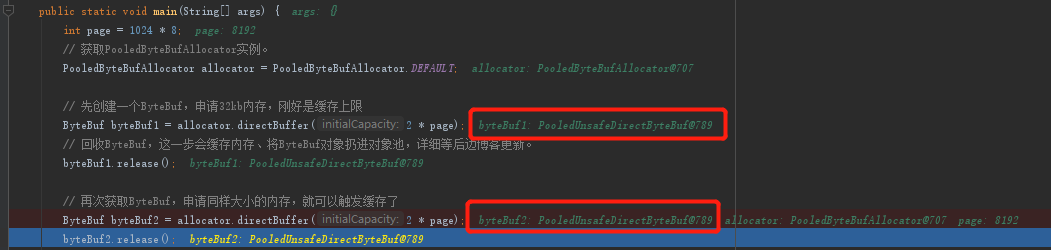
对象引用是一样的,说明确实是复用了。
命中缓存流程
返回ByteBuf对象后,返回到【坐标1】的代码,然后跟进allocate方法:
io.netty.buffer.PoolArena#allocate(io.netty.buffer.PoolThreadCache, io.netty.buffer.PooledByteBuf
        final int normCapacity = normalizeCapacity(reqCapacity);
        ...(略),因为我们申请的是2 * pageSize大小的内存,属于normal级别,所以最终来到如下代码
        if (normCapacity <= chunkSize) {
            // 尝试从缓存中获取满足需求大小的内存块。
            if (cache.allocateNormal(this, buf, reqCapacity, normCapacity)) {
                // was able to allocate out of the cache so move on
                return;
            }
            // 缓存分配失败则到Arena中申请内存。
            allocateNormal(buf, reqCapacity, normCapacity);
        } else {
            // Huge allocations are never served via the cache so just call allocateHuge
            // 大于chunkSize的内存申请是不会走缓存的,也不会被缓存。
            allocateHuge(buf, reqCapacity);
        }
normalizeCapacity其实就是将内存大小规格化:
io.netty.buffer.PoolArena#normalizeCapacity
    int normalizeCapacity(int reqCapacity) {
        if (reqCapacity < 0) {
            throw new IllegalArgumentException("capacity: " + reqCapacity + " (expected: 0+)");
        }
        // >=chunkSize的不属于任何规格
        if (reqCapacity >= chunkSize) {
            return reqCapacity;
        }
        // 如果不是tiny规格,就按照normal的规格进行规格化
        if (!isTiny(reqCapacity)) { // >= 512
            // Doubled

            int normalizedCapacity = reqCapacity;
            normalizedCapacity --;
            normalizedCapacity |= normalizedCapacity >>>  1;
            normalizedCapacity |= normalizedCapacity >>>  2;
            normalizedCapacity |= normalizedCapacity >>>  4;
            normalizedCapacity |= normalizedCapacity >>>  8;
            normalizedCapacity |= normalizedCapacity >>> 16;
            normalizedCapacity ++;

            if (normalizedCapacity < 0) {
                normalizedCapacity >>>= 1;
            }

            return normalizedCapacity;
        }
        // 不是normal规格就按照tiny规格进行规格化
        // Quantum-spaced
        if ((reqCapacity & 15) == 0) {
            return reqCapacity;
        }

        return (reqCapacity & ~15) + 16;
    }
- 规格化可以理解为,将要申请的内存大小,强制转换为规格中含有的大小。
如果以上注释看得懵逼,建议看看前言中提到的两篇博客。
返回allocate方法中的代码,由于TestCache.java中已经缓存了2 * pageSize的内存,所以这里的缓存分配是返回true的,跟进cache.allocateNormal:
此处【坐标2】
io.netty.buffer.PoolThreadCache#allocateNormal
    boolean allocateNormal(PoolArena<?> area, PooledByteBuf<?> buf, int reqCapacity, int normCapacity) {
        return allocate(cacheForNormal(area, normCapacity), buf, reqCapacity);
    }
先跟进cacheForNormal方法看看:
io.netty.buffer.PoolThreadCache#cacheForSmall
    private MemoryRegionCache<?> cacheForSmall(PoolArena<?> area, int normCapacity) {
        // 获取内存在Caches中的“偏移量”
        int idx = PoolArena.smallIdx(normCapacity);
        // 我们实验代码是申请direct内存,所以会进入下面的if代码块
        if (area.isDirect()) {
            // 根据计算出的“偏移量”,到缓存中中取内存
            return cache(smallSubPageDirectCaches, idx);
        }
        return cache(smallSubPageHeapCaches, idx);
    }
跟进cache方法:
io.netty.buffer.PoolThreadCache#cache(io.netty.buffer.PoolThreadCache.MemoryRegionCache
    private static <T> MemoryRegionCache<T> cache(MemoryRegionCache<T>[] cache, int idx) {
        if (cache == null || idx > cache.length - 1) {
            return null;
        }
        // 根据下标获取MemoryRegionCache对象。
        return cache[idx];
    }
现在拿到MemoryRegionCache缓存对象了,返回【坐标2】的代码中,跟进allocate方法:
io.netty.buffer.PoolThreadCache#allocate
    @SuppressWarnings({ "unchecked", "rawtypes" })
    private boolean allocate(MemoryRegionCache<?> cache, PooledByteBuf buf, int reqCapacity) {
        if (cache == null) {
            // no cache found so just return false here
            return false;
        }
        boolean allocated = cache.allocate(buf, reqCapacity);
        if (++ allocations >= freeSweepAllocationThreshold) {
            allocations = 0;
            trim();
        }
        return allocated;
    }
跟进cache.allocate方法:
io.netty.buffer.PoolThreadCache.MemoryRegionCache#allocate
        public final boolean allocate(PooledByteBuf<T> buf, int reqCapacity) {
            Entry<T> entry = queue.poll();
            if (entry == null) {
                return false;
            }
            // 拿到缓存内存后初始化ByteBuf
            initBuf(entry.chunk, entry.handle, buf, reqCapacity);
            // entry对象使用完后重新丢进对象池以便于复用
            entry.recycle();

            // allocations is not thread-safe which is fine as this is only called from the same thread all time.
            ++ allocations;
            // 返回ByteBuf初始化成功
            return true;
        }
- 如果不记得这个queue、handle是什么,建议看看【这一节】提到的缓存结构,也有提及源码&来源。
- 这里只需要知道queue弹出的就是内存缓存就可以了,内存是如何被缓存的放到后面更新的博客。
初始化ByteBuf
持续跟进initBuf,来到如下代码:
io.netty.buffer.PoolChunk#initBuf
    void initBuf(PooledByteBuf<T> buf, long handle, int reqCapacity) {
        // memoryMapIdx 和 bitmapIdx 最终是用于计算chunk的偏移量的
        int memoryMapIdx = memoryMapIdx(handle);
        int bitmapIdx = bitmapIdx(handle);
        // 对于page级别,bitmapIdx 必定等于0,因为bitmapIdx是用于计算page中subpage的偏移量的。
        if (bitmapIdx == 0) {
            byte val = value(memoryMapIdx);
            assert val == unusable : String.valueOf(val);
            buf.init(this, handle, runOffset(memoryMapIdx), reqCapacity, runLength(memoryMapIdx),
                     arena.parent.threadCache());
        } else {
            initBufWithSubpage(buf, handle, bitmapIdx, reqCapacity);
        }
    }
跟进init方法:
io.netty.buffer.PooledUnsafeDirectByteBuf#init
    @Override
    void init(PoolChunk<ByteBuffer> chunk, long handle, int offset, int length, int maxLength,
              PoolThreadCache cache) {
        // 调用父类的init方法初始化
        super.init(chunk, handle, offset, length, maxLength, cache);
        // unsafe特有,需要记录内存地址。
        initMemoryAddress();
    }
继续跟进init方法
io.netty.buffer.PooledByteBuf#init
    void init(PoolChunk<T> chunk, long handle, int offset, int length, int maxLength, PoolThreadCache cache) {
        assert handle >= 0;
        assert chunk != null;

        this.chunk = chunk;
        this.handle = handle;
        memory = chunk.memory;
        this.offset = offset;
        this.length = length;
        this.maxLength = maxLength;
        tmpNioBuf = null;
        this.cache = cache;
    }
- 保存属性,ByteBuf构造完成。
至此,复用ByteBuf对象、分配缓存内存、初始化ByteBuf的过程就走完了,最后就是把构造好的ByteBuf返回给客户端读写数据。