文章目录
前言
本节来看看在没有命中缓存的情况下,subpage级别的内存是如何分配的,还会提及subpage级别的数据结构。命中缓存的分配流程可参考【PooledByteBufAllocator命中缓存的分配流程】。
如果对本文的一些基础概念、名词不是很清楚,可以参考【ByteBuf的结构、分类、核心api简介】和【内存规格、缓存&结构、chunk、arena、page、subpage等概念介绍】,本文对基础概念也不会再一一赘述了。
因为subpage在申请内存时,还是会经过page界别的,所以关于如page“树”等名词,则请参考上一节的【树图】
Netty Version:4.1.6
实验代码
TestSubpage.java
/**
 * @author WenJie
 */
public class TestSubpage{
    public static void main(String[] args) {
        // 获取PooledByteBufAllocator实例。
        PooledByteBufAllocator allocator = PooledByteBufAllocator.DEFAULT;

        // 先创建一个ByteBuf,申请2KB内存
        ByteBuf byteBuf1 = allocator.directBuffer(2048);
        // 接着创建多个ByteBuf,同样是2KB内存。(目的是测试bitmap偏移量)
        ByteBuf byteBuf2 = allocator.directBuffer(2048);
        ByteBuf byteBuf3 = allocator.directBuffer(2048);
        ByteBuf byteBuf4 = allocator.directBuffer(2048);
        // 回收ByteBuf,这一步会缓存内存、将ByteBuf对象扔进对象池,详细等后边博客更新。
        byteBuf1.release();
        byteBuf2.release();
        byteBuf3.release();
        byteBuf4.release();
    }
}
跟进源码
源码起点
在验证subpage产生偏移量之前,我们还是得跟下byteBuf1的创建流程,了解一个page是如何切分为subpage的。
启动实验代码,直接进入io.netty.buffer.PoolArena#allocate(io.netty.buffer.PoolThreadCache, io.netty.buffer.PooledByteBuf这个方法,在这之前的源码追踪请看【上一节】,为了方便,下面还是贴一下allocate方法的源码:
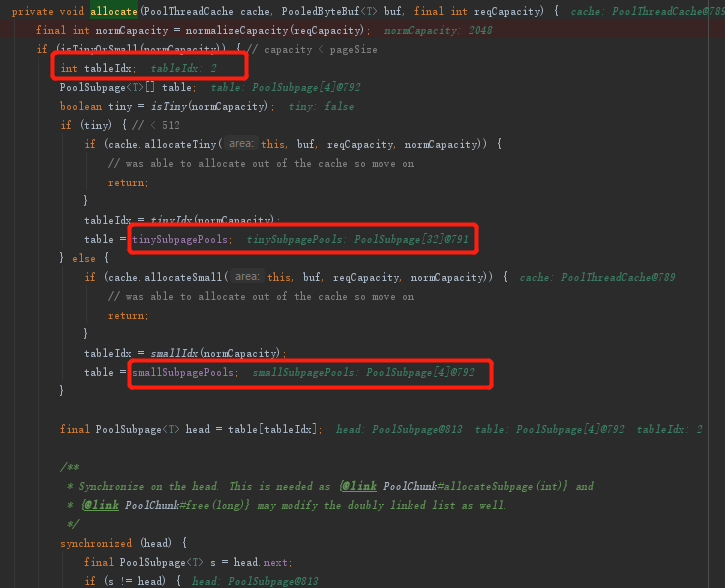
此处【坐标1】
    private void allocate(PoolThreadCache cache, PooledByteBuf<T> buf, final int reqCapacity) {
        // 数值规格化,https://wenjie.store/archives/about-bytebuf-4有跟进过
        final int normCapacity = normalizeCapacity(reqCapacity);
        // 判断是够是tiny或者small规格
        if (isTinyOrSmall(normCapacity)) { // capacity < pageSize
            int tableIdx;
            PoolSubpage<T>[] table;
            boolean tiny = isTiny(normCapacity);
            if (tiny) { // < 512
                // 尝试从tiny规格缓存拿到内存分配
                if (cache.allocateTiny(this, buf, reqCapacity, normCapacity)) {
                    // was able to allocate out of the cache so move on
                    return;
                }
                tableIdx = tinyIdx(normCapacity);
                table = tinySubpagePools;
            } else {
                // 尝试从small规格缓存拿到内存分配
                if (cache.allocateSmall(this, buf, reqCapacity, normCapacity)) {
                    // was able to allocate out of the cache so move on
                    return;
                }
                tableIdx = smallIdx(normCapacity);
                table = smallSubpagePools;
            }

            final PoolSubpage<T> head = table[tableIdx];

            /**
             * 同步锁锁住head节点,防止构造的双向链表指针覆盖
             */
            synchronized (head) {
                // 获取头结点的下一个节点。
                // 如果双向链表中只有head节点,那head节点就是指向自己
                final PoolSubpage<T> s = head.next;
                // 如果双向链表不止head一个元素。
                if (s != head) {
                    assert s.doNotDestroy && s.elemSize == normCapacity;
                    // 拿到内存“偏移量”
                    long handle = s.allocate();
                    assert handle >= 0;
                    // subpage级别内存分配
                    // 实验代码创建bytebuf2的时候就进这里。
                    s.chunk.initBufWithSubpage(buf, handle, reqCapacity);

                    // 计数器计数
                    if (tiny) {
                        allocationsTiny.increment();
                    } else {
                        allocationsSmall.increment();
                    }
                    return;
                }
            }
            // page、subpage级别内存分配(前提是small规格)
            // 实验代码创建bytebuf1的时候就进这里。
            allocateNormal(buf, reqCapacity, normCapacity);
            return;
        }
        // 由于我们的代码申请的内存规格是normal
        // 所以会来到一下代码。
        if (normCapacity <= chunkSize) {
            // 尝试从normal规格缓存分配内存
            // 由于我们代码是第一次,所以不会有缓存,返回false
            if (cache.allocateNormal(this, buf, reqCapacity, normCapacity)) {
                // was able to allocate out of the cache so move on
                return;
            }
            // 通过Arena分配page级别内存
            allocateNormal(buf, reqCapacity, normCapacity);
        } else {
            // Huge allocations are never served via the cache so just call allocateHuge
            allocateHuge(buf, reqCapacity);
        }
    }
- 特别留意tinySubpagePools是长度为32的数组,smallSubpagePools是长度为4的数组。
上一篇博客在讲page级别内存分配的时候,其实是跳过了上述代码的前大半段,因为当时没用上所以没讲,而现在subpage级别用上了且很关键,现在就来简单讲解下前半段。
首先来看看几个重要的参数值:
- 相信有看过前言中提到的博客的人,肯定立马就能反映过来这是啥。
不知道也没关系,这里再放一次之前的图,然后来解析一下上面红框的参数都是什么意思。
Subpage级别内存结构
subpage内存结构如下图所示(和缓存用的同一张图,但底层数据结构不一样的):
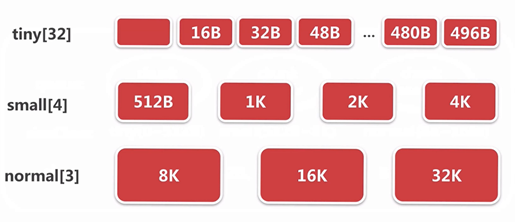
- 这里面的的每个红心节点均为head节点,head节点是无效节点。
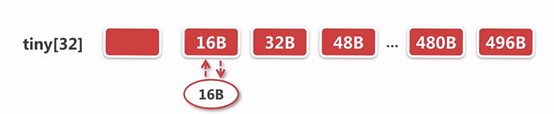
假设我现在要申请16B内存,那上面源码的table就=tinySubpagePools,tableIdx就等于1了,意思就是取到tiny[1]的16B节点。
之后成功申请到内存后tinySubpagePools变为如下,此处【坐标2】:
回到我们上面的源码截图中,我们需要申请2KB内存,属于small规格,table=smallSubpagePools,tableIdx=2,其实就是取到small[2]的2KB节点,成功申请到内存后变化同tiny。
Subpage级别内存的初始化
跟进[【坐标1】]代码中的allocateNormal方法,最终来到如下方法(中间过程在上一节已经讲得够清楚了)
io.netty.buffer.PoolChunk#allocate
    long allocate(int normCapacity) {
        if ((normCapacity & subpageOverflowMask) != 0) { // >= pageSize
            // page级别
            return allocateRun(normCapacity);
        } else {
            // subpage级别
            return allocateSubpage(normCapacity);
        }
    }
跟进allocateSubpage方法,此处【坐标3】:
io.netty.buffer.PoolChunk#allocateSubpage
    private long allocateSubpage(int normCapacity) {
        /**
         * 同步锁锁住head节点,防止构造的双向链表指针覆盖
         */
        PoolSubpage<T> head = arena.findSubpagePoolHead(normCapacity);
        synchronized (head) {
            // 获取符合内存需求的“树”的层数
            // 默认为11
            int d = maxOrder;
            // 从“树”的第11层选择可使用的节点
            // 2048,即第11层的最左节点
            int id = allocateNode(d);
            if (id < 0) {
                return id;
            }

            final PoolSubpage<T>[] subpages = this.subpages;
            final int pageSize = this.pageSize;
            // 即便只是分配一个subpage,也要申请一个page的大小
            freeBytes -= pageSize;

            // 位运算获取偏移量
            int subpageIdx = subpageIdx(id);
            // 根据偏移量获取到对应的page
            PoolSubpage<T> subpage = subpages[subpageIdx];
            if (subpage == null) {
                // 对page进行切割(初始化),切割成多个subpage
                subpage = new PoolSubpage<T>(head, this, id, runOffset(id), pageSize, normCapacity);
                subpages[subpageIdx] = subpage;
            } else {
                subpage.init(head, normCapacity);
            }
            // 标记已使用的subpage,并返回偏移量
            return subpage.allocate();
        }
    }
跟进 new PoolSubpage方法看看:
io.netty.buffer.PoolSubpage#PoolSubpage(io.netty.buffer.PoolSubpage
    PoolSubpage(PoolSubpage<T> head, PoolChunk<T> chunk, int memoryMapIdx, int runOffset, int pageSize, int elemSize) {
        // 保存所属chunk
        this.chunk = chunk;
        // 保存page在chunk中的偏移量
        this.memoryMapIdx = memoryMapIdx;
        // 保存subpage在page中的偏移量
        this.runOffset = runOffset;
        // 保存页面大小
        this.pageSize = pageSize;

        // subpage重点关注参数
        // 用于记录page中subpage的使用情况,将值转换成二进制后,0为未使用,1已使用
        bitmap = new long[pageSize >>> 10]; // pageSize / 16 / 64
        // elemSize就是实验代码申请的内存大小,即2048
        init(head, elemSize);
    }
- 关于bitmap的作用,等下就会解析。
跟进init方法:
    void init(PoolSubpage<T> head, int elemSize) {
        doNotDestroy = true;
        // 每块大小,即实验代码申请的2048
        this.elemSize = elemSize;
        if (elemSize != 0) {
            // page拆分成的份数
            // 结合实验代码这里maxNumElems = 4,每一份为2048B。
            maxNumElems = numAvail = pageSize / elemSize;
            nextAvail = 0;
            // 需要bitmap的位数/64-1
            // 结合实验代码,bitmapLength = 0;
            bitmapLength = maxNumElems >>> 6;
            // maxNumElems < 64 则 bitmapLength + 1
            if ((maxNumElems & 63) != 0) {
                bitmapLength ++;
            }

            for (int i = 0; i < bitmapLength; i ++) {
                // 初始化为0(底层是64位的0)
                bitmap[i] = 0;
            }
        }
        // 添加到双向链表
        addToPool(head);
    }
- addToPool(head)其实就是【坐标2】类似的操作。
当初始化完subpage之后,我们还要将当前分配出去的subpage标记为"已使用",即更改bitmap的值。
bitmap分析
回到【坐标3】的allocateSubpage方法,找到如下语句:
...(略)
return subpage.allocate();
跟进allocate方法:
io.netty.buffer.PoolSubpage#allocate
    long allocate() {
        if (elemSize == 0) {
            return toHandle(0);
        }

        if (numAvail == 0 || !doNotDestroy) {
            return -1;
        }
        // 获取bitmap底层二进制位中非1的下标。
        // 假如bitmap[0]中的64位都被标记为1了,bitmap[1]中的第1位是0,则返回65。
        final int bitmapIdx = getNextAvail();
        // 获取可用二进制位在bitmap的下标
        // 假设bitmapIdx是65,那么它就在bitmap[1]中,以此类推。
        int q = bitmapIdx >>> 6;
        // 64位对应二进制位的下标(从0开始,即第一位为0,第二位为1)
        // 假设bitmapIdx是65,那么就返回1,表示bitmap[1]底层二进制的第一位
        int r = bitmapIdx & 63;
        assert (bitmap[q] >>> r & 1) == 0;
        // 标记page中已使用的subpage
        bitmap[q] |= 1L << r;

        // 此page不能容纳更多subpage了,将其从subpage池中移除
        if (-- numAvail == 0) {
            removeFromPool();
        }
        // 高位运算,返回偏移量
        return toHandle(bitmapIdx);
    }
- 不要忘了bitmap是long数组。
下面先通过打断点直观感受下:

- 1转换成低位二进制就是:0001,表示此page已经有1/4的内存被使用了。

- 3转换成低位二进制就是:0011,表示此page已经有2/4的内存被使用了。

- 7转换成低位二进制就是:0111,表示此page已经有3/4的内存被使用了。

- 15转换成低位二进制就是:1111,表示此page已经被用完了。
结论:bitmap转化成二进制后,0表示subpage未使用,1表示subpage已使用。subpage最小单位为16kb,所以bitmap数组长度为8192(页大小)/16/64(long的字节数)。
完成了subpage的内存分配后,就剩ByteBuf的初始化了。
ByteBuf初始化
在subpage级别的内存分配下,最终都会来到initBufWithSubpage方法,这个方法的入口有很多,我就不一一赘述了,下面直接来看源码:
io.netty.buffer.PoolChunk#initBufWithSubpage(io.netty.buffer.PooledByteBuf
    private void initBufWithSubpage(PooledByteBuf<T> buf, long handle, int bitmapIdx, int reqCapacity) {
        assert bitmapIdx != 0;
        // 计算chunk中page的偏移量
        int memoryMapIdx = memoryMapIdx(handle);

        // 根据偏移量获取page
        PoolSubpage<T> subpage = subpages[subpageIdx(memoryMapIdx)];
        assert subpage.doNotDestroy;
        assert reqCapacity <= subpage.elemSize;

        // ByteBuf初始化
        buf.init(
            this, handle,
            runOffset(memoryMapIdx) + (bitmapIdx & 0x3FFFFFFF) * subpage.elemSize, reqCapacity, subpage.elemSize,
            arena.parent.threadCache());
    }
- 注意这里的handle和bitmapIdx都是经过高位运算后的,并不是前面看到的原始值。
- runOffset(memoryMapIdx) + (bitmapIdx & 0x3FFFFFFF) * subpage.elemSize就是计算内存的偏移量,断点测试如下:


- 第3、4次以此类推。
跟进init方法:
io.netty.buffer.PooledUnsafeDirectByteBuf#init
    @Override
    void init(PoolChunk<ByteBuffer> chunk, long handle, int offset, int length, int maxLength,
              PoolThreadCache cache) {
        super.init(chunk, handle, offset, length, maxLength, cache);
        // unsafe类型独有,保存基础内存地址。
        initMemoryAddress();
    }
继续跟进init方法:
io.netty.buffer.PooledByteBuf#init
    void init(PoolChunk<T> chunk, long handle, int offset, int length, int maxLength, PoolThreadCache cache) {
        assert handle >= 0;
        assert chunk != null;
        // 保存所属chunk
        this.chunk = chunk;
        // 总体偏移量
        this.handle = handle;
        // 内存对象
        memory = chunk.memory;
        // subpage相对于page的偏移量
        this.offset = offset;
        // 申请的内存大小
        this.length = length;
        // 实际申请到的subpage内存大小
        this.maxLength = maxLength;
        tmpNioBuf = null;
        // 保存所属PoolThreadCache
        this.cache = cache;
    }
构建完毕后,最终返回ByteBuf对象,整个流程就完成了。
小结
- 总体流程跟page级别的内存分配其实大同小异,最大的区别在于subpage级别需要将page拆分成相同大小的多份,并依靠额外记录相对于page的偏移量来确定subpage的内存地址。
- page级别只需记录相对于chunk的的偏移量+内存基础地址就能定位一块连续内存。而subpage则不仅需要所属page相对于chunk的偏移量,还需要subpage本身相对于所属page的偏移量,因为每次向chunk申请内存依旧是以page为单位的。