前言
其实在前面的【创建客户端channel】以及【创建服务端channel】中,都有经过pipeline初始化这一步,只是当初的重点不在于此,所以简单经过之后就略了。现在,则要回去填坑,因为pipeline形成的"链",对我们以后添加handler、事件传播、异常传播等都起到重要的参考依据。
这一节主要讲解以下内容:
- pipeline的初始化
- ChannelIn/OutboundInvoker和ChannelIn/OutboundHandler方法意义区别
- HeadContext和TailContext实现区别。
Netty Version:4.1.6
pipeline的初始化
首先,要回忆起,我们在创建channel的时候,其实就顺带创建了pipeline了:
io.netty.channel.AbstractChannel#AbstractChannel(io.netty.channel.Channel)
    protected AbstractChannel(Channel parent) {
        this.parent = parent;
        id = newId();
        unsafe = newUnsafe();
        pipeline = newChannelPipeline();
    }
- 如果忘记怎么进入这个方法的,可以回顾【创建客户端channel】或【创建服务端channel】其中一节。
跟进newChannelPipeline方法,最终来到如下代码:
io.netty.channel.DefaultChannelPipeline#DefaultChannelPipeline
    protected DefaultChannelPipeline(Channel channel) {
        this.channel = ObjectUtil.checkNotNull(channel, "channel");
        succeededFuture = new SucceededChannelFuture(channel, null);
        voidPromise =  new VoidChannelPromise(channel, true);

        tail = new TailContext(this);
        head = new HeadContext(this);

        head.next = tail;
        tail.prev = head;
    }
- 在这一步主要就是创建了TailContext实例和HeadContext实例。
- 并且从代码逻辑和属性命名上看,很容易就意识到:head和tail之间的数据结构就是双向链表,并且以后可能要在head和tail之间添加些什么。
- head和tail属性都使用了volatile关键字修饰,我个人猜测是防止并发时回环的产生。
HeadContext和TailContext前置知识
上面我们知道了pipeline在初始化的时候,默认就会添加两个节点,分别是HeadContext和TaildContext。那么这两节点有啥不一样吗?我们不妨先来看看它们的关系图(经过一定简化):
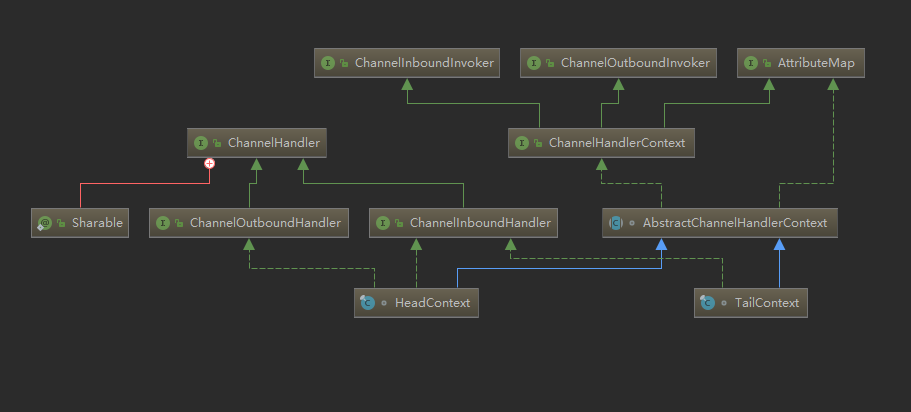
这里先说一些我个人悟到的一些总结性知识,此处【坐标EX】:
- 左边的ChannelIn/OutboundHandler接口是事件传播方法(回调下一个节点的同名方法)。
- 右边的ChannelIn/OutboundInvoker接口是发起事件传播方法(或称为发起回调方法)。
- 发起传播方法一般会把事件先传给head或tail节点,然后通过事件传播方法一路回调,达到"传播"的目的。
- 事件传播不一定就是从head传到tail或者反过来,主要取决于拿到事件的节点,是否会继续调用事件传播方法(或称为回调方法)。
下面讲的东西在知道上面四点小总结后,应该会容易理解很多。
ChannelInboundInvoker
首先来看看ChannelInboundInvoker接口,来看看它的方法:

根据前面的学习经历再看到这些方法,很容易就得出以下结论:
- ChannelInboundInvoker接口的方法主要都是Channel状态发生变化时调用的发起传播方法。
ChannelOutboundInvoker
继续来看看ChannelOutboundInvoker接口,也是先看看它的方法:
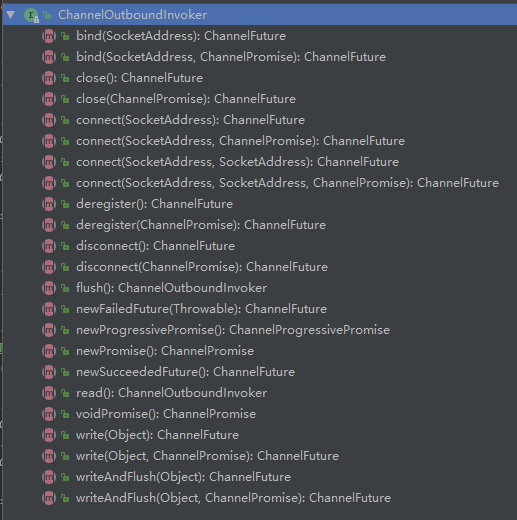
同样根据前面的学习经历再看到这些方法,能得出以下结论:
- ChannelOutboundInvoker的接口的方法主要是发起绑定、连接、注册、写事件等的回调。
温馨提示:请不要忽略上文中“发起”一词,因为方法的作用真的就是发起,最终是通过回调真正执行的。同【坐标EX】的总结,是我花了很长时间才理解到的。
AttributeMap
这个类很简单,直接看源代码:
public interface AttributeMap {
    /**
     * Get the {@link Attribute} for the given {@link AttributeKey}. This method will never return null, but may return
     * an {@link Attribute} which does not have a value set yet.
     */
    <T> Attribute<T> attr(AttributeKey<T> key);

    /**
     * Returns {@code} true if and only if the given {@link Attribute} exists in this {@link AttributeMap}.
     */
    <T> boolean hasAttr(AttributeKey<T> key);
}
- 实现了这个接口,就表示实现类能拥有属性,可以设置属性、判断属性是否存在。
ChannelHandlerContext
从上面的类图,我们不难看出ChannelHandlerContext聚合了AttributeMap, ChannelInboundInvoker, ChannelOutboundInvoker,实际上它还扩展了自己的一些抽象,下面来看看它的方法:
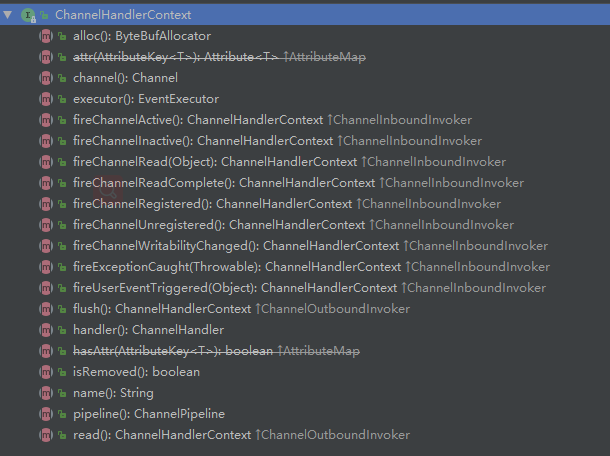
- 其中channel(),executor(),name(),handler(),pipeline(),alloc()都是扩展的。其余几乎都是"照抄一遍"父接口改了改返回类型而已,换汤不换药。
大致理解一下扩展方法:
- channel():返回当前节点所属Channel实例。
- executor():返回当前节点所属的NioEventLoop实例。
- handler():返回当前节点所属的handler实例。(很可能就是返回节点本身)
- name():返回handler的名字。
- pipeline():返回当前节点所属的pipeline。
- alloc():返回一个ByteBuf选择器。
如果有留意以前博客经过的handler()方法,会发现,它们都是返回this,即节点(context)本身就是handler,HeadContext和TailContex也是如此,因为它们是ctx的同时也是handler。
AbstractChannelHandlerContext
AbstractChannelHandlerContext实现了ChannelHandlerContext接口,并且扩展了很多属性。
我们来看看它的构造方法,从上文的类图也不难得知HeadContext和TailContext最终都会调用到的这个构造方法,此处【坐标1】:
    AbstractChannelHandlerContext(DefaultChannelPipeline pipeline, EventExecutor executor, String name,
                                  boolean inbound, boolean outbound) {
        this.name = ObjectUtil.checkNotNull(name, "name");
        this.pipeline = pipeline;
        this.executor = executor;
        this.inbound = inbound;
        this.outbound = outbound;
        // Its ordered if its driven by the EventLoop or the given Executor is an instanceof OrderedEventExecutor.
        ordered = executor == null || executor instanceof OrderedEventExecutor;
    }
- 其实就是保存相关属性。
除了上述属性,为了实现双向链表结构,也有还有如下核心属性:
    volatile AbstractChannelHandlerContext next;
    volatile AbstractChannelHandlerContext prev;
本来想大概看一下其余的所有方法,但是无奈是在太多了,这里就随便挑一个方法,证明ChannelIn/OutboundInvoker仅仅是“发起”,最终还是调用ChannelIn/OutboundHandler达到“传播”。
看看其中一个bind方法:
io.netty.channel.AbstractChannelHandlerContext#bind(java.net.SocketAddress)
    @Override
    public ChannelFuture bind(SocketAddress localAddress) {
        return bind(localAddress, newPromise());
    }
继续跟进bind方法:
io.netty.channel.AbstractChannelHandlerContext#bind(java.net.SocketAddress, io.netty.channel.ChannelPromise)
    public ChannelFuture bind(final SocketAddress localAddress, final ChannelPromise promise) {
        if (localAddress == null) {
            throw new NullPointerException("localAddress");
        }
        if (!validatePromise(promise, false)) {
            // cancelled
            return promise;
        }

        final AbstractChannelHandlerContext next = findContextOutbound();
        EventExecutor executor = next.executor();
        if (executor.inEventLoop()) {
            next.invokeBind(localAddress, promise);
        } else {
            safeExecute(executor, new Runnable() {
                @Override
                public void run() {
                    next.invokeBind(localAddress, promise);
                }
            }, promise, null);
        }
        return promise;
    }
跟进invokeBind:
io.netty.channel.AbstractChannelHandlerContext#invokeBind
    public ChannelFuture bind(final SocketAddress localAddress, final ChannelPromise promise) {
        if (localAddress == null) {
            throw new NullPointerException("localAddress");
        }
        if (!validatePromise(promise, false)) {
            // cancelled
            return promise;
        }

        final AbstractChannelHandlerContext next = findContextOutbound();
        EventExecutor executor = next.executor();
        if (executor.inEventLoop()) {
            next.invokeBind(localAddress, promise);
        } else {
            safeExecute(executor, new Runnable() {
                @Override
                public void run() {
                    next.invokeBind(localAddress, promise);
                }
            }, promise, null);
        }
        return promise;
    }
跟进这里的bind方法,就会进入ChannelOutboundHandler的bind方法,即真正的事件传播方法:
io.netty.channel.ChannelOutboundHandler#bind
ChannelIn/OutboundInvoker和ChannelIn/OutboundHandler方法意义区别
- 以上一小段源码追踪就证明了ChannelIn/OutboundInvoker接口的方法仅仅是发起,最终它会调用ChannelIn/OutboundHandler接口方法的实现达到真正的事件传播(或称为回调)。
ChannelHandler
如果有前面博客的调试经验,相信这个接口都不用多说了,不过这里还是来看看它的一些方法:
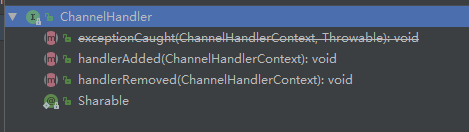
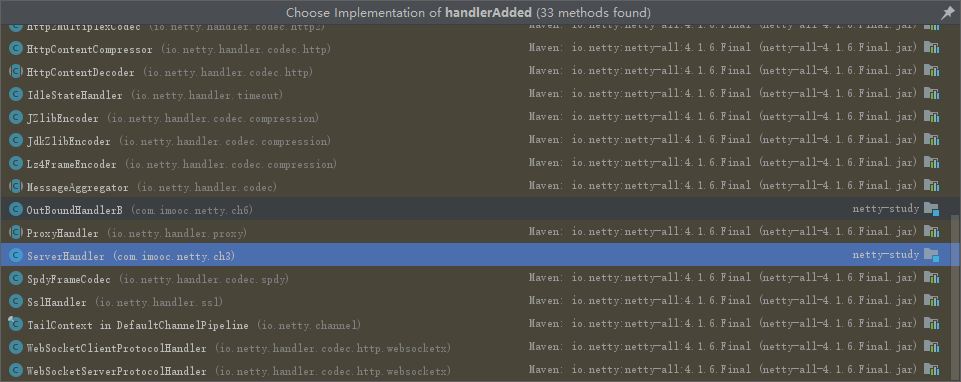
- handlerAdded方法可以说是相当熟悉了,最终会调用到如这篇中ServerHandler.java中实现的handlerAdded方法。
- @Sharable注解的作用就是标识当前节点(或handler)能否共享给多个pipeline。
最终会调用到如下实现:
剩余的ChannelIn/OutboundHandler的方法就不一一看了,其实就是对应处理ChannelIn/OutboundInvoker的“发起”,有兴趣的自己看看吧。
HeadContext和TailContext的异同
为了方便,这里再放一次类、接口的关系图:
从类图中获取到如下信息:
- HeadContext和TailContext都有发起事件传播的能力(然而实际上只是收尾工作)。
- TailContext只能处理发起的Inbound事件,并且被标记为inbound,而HeadContext则In/Outbound都能处理,但实际上只被标记为outbound。
inbound和outbound标记其实就是指【坐标1】中AbstractChannelHandlerContext的inbound和outbound属性,它们是boolen类型的,如果inbound属性值为true,则说明被标记为inbound。
其实这个in/outbound标记,我一开始是以为值为true就表示这个节点有能力处理对应的ChannelIn/OutboundInvoker发起的事件传播,但看过代码后发现并不是这样的,目前只能找到这两标记是用于遍历双向链表时停止的标识。
HeadContext和TailContext的异同
TailContext
首先来看看TailContext的代码,代码不算很长,这里就全贴出来:
    final class TailContext extends AbstractChannelHandlerContext implements ChannelInboundHandler {

        TailContext(DefaultChannelPipeline pipeline) {
            super(pipeline, null, TAIL_NAME, true, false);
            setAddComplete();
        }

        @Override
        public ChannelHandler handler() {
            return this;
        }

        @Override
        public void channelRegistered(ChannelHandlerContext ctx) throws Exception { }

        @Override
        public void channelUnregistered(ChannelHandlerContext ctx) throws Exception { }

        @Override
        public void channelActive(ChannelHandlerContext ctx) throws Exception { }

        @Override
        public void channelInactive(ChannelHandlerContext ctx) throws Exception { }

        @Override
        public void channelWritabilityChanged(ChannelHandlerContext ctx) throws Exception { }

        @Override
        public void handlerAdded(ChannelHandlerContext ctx) throws Exception { }

        @Override
        public void handlerRemoved(ChannelHandlerContext ctx) throws Exception { }

        @Override
        public void userEventTriggered(ChannelHandlerContext ctx, Object evt) throws Exception {
            ReferenceCountUtil.release(evt);
        }

        @Override
        public void exceptionCaught(ChannelHandlerContext ctx, Throwable cause) throws Exception {
            onUnhandledInboundException(cause);
        }

        @Override
        public void channelRead(ChannelHandlerContext ctx, Object msg) throws Exception {
            onUnhandledInboundMessage(msg);
        }

        @Override
        public void channelReadComplete(ChannelHandlerContext ctx) throws Exception { }
    }
- 构造函数的super就是调用上文【坐标1】的AbstractChannelHandlerContext构造函数,并且inbound=true,outbound=false。
- 虽说是实现了ChannelInboundHandler接口,但大部分方法都是空实现,即便是有实现的,也是诸如释放对象、打印日志等收尾性质的工作。
- TailContext的handler()返回的是自身实例,HeadContext其实也一样。
HeadContext
由于代码比较多,这里就大概浏览下它的构造方法及其余方法列表。
先来看看它的构造方法和属性:
    final class HeadContext extends AbstractChannelHandlerContext
            implements ChannelOutboundHandler, ChannelInboundHandler {

        private final Unsafe unsafe;

        HeadContext(DefaultChannelPipeline pipeline) {
            super(pipeline, null, HEAD_NAME, false, true);
            unsafe = pipeline.channel().unsafe();
            setAddComplete();
        }

        @Override
        public void close(ChannelHandlerContext ctx, ChannelPromise promise) throws Exception {
            unsafe.close(promise);
        }

        @Override
        public void deregister(ChannelHandlerContext ctx, ChannelPromise promise) throws Exception {
            unsafe.deregister(promise);
        }

        @Override
        public void read(ChannelHandlerContext ctx) {
            unsafe.beginRead();
        }
...(略)
- HeadContext实现了大部分接口方法,比TailContext多实现了ChannelOutboundHandler。
- HeadContext比TailContext属性多了一个Unsafe。
- 看其它方法的实现,发现实际上都是在调用unsafe的方法。
- 也就是说,HeadContext处理Invoker"发起"的事件的能力是完全依托于unsafe的。
关于unsafe,如果不记得是什么,可以参考小总结。
小结
- pipeline的创建、初始化除了保存一些必要的属性外,核心就在于创建了HeadContext和TailContext。
- 每个pipeline中的HeadContext和TailContext实例一开始是双向链表结构,使用这种结构主要是因为后面添加的节点,都在head和tail之间。
- TailContext只实现了少数接口方法,方法的实现也都是收尾性质的工作,如释放对象、打印异常警告等。
- HeadContext比TailConText多实现了ChannelOutboundHandler接口、多保存了unsafe实例,虽然HeadContext实现了绝大多数接口方法,获得了能对invoker“发起”的事件传播的处理能力,但对于HeadContext而言,这个能力完全是依赖unsafe的。
- ChannelIn/OutboundInvoker接口的方法仅仅是发起,最终它会调用ChannelIn/OutboundHandler接口方法的实现达到真正的事件传播(或成为回调)。
- 学习两个类的关系时,最好从类图下手。