前言
本文就来来记录一下我们在启动Netty时,底层大概都做了哪些事情。不过因为我对Netty还只是刚刚入门,可能会跳过某些细节,也有可能会有写错的地方,如果漏了或错了,日后发现会进行补充或改正。
我将Netty启动简单分为了四个阶段,每一篇记录一个。
Netty version:4.1.6
先贴下代码
Server
import io.netty.bootstrap.ServerBootstrap;
import io.netty.channel.*;
import io.netty.channel.nio.NioEventLoopGroup;
import io.netty.channel.socket.SocketChannel;
import io.netty.channel.socket.nio.NioServerSocketChannel;
import io.netty.util.AttributeKey;

public final class Server {

    public static void main(String[] args) throws Exception {
        // 两大线程
        // 对应Socket中Server的启动监听线程
        EventLoopGroup bossGroup = new NioEventLoopGroup(1);
        // 对应Socket中Client中主函数的线程
        EventLoopGroup workerGroup = new NioEventLoopGroup();

        try {
            // 辅助类
            ServerBootstrap server = new ServerBootstrap();
            // 装配线程
            server.group(bossGroup, workerGroup)
                    // 设置Channel的类型
                    .channel(NioServerSocketChannel.class)
                    // 给每个客户端的连接设置一些tcp的基本属性
                    .childOption(ChannelOption.TCP_NODELAY, true)
                    // 每次创建客户端时,绑定一些基本的属性
                    .childAttr(AttributeKey.newInstance("childAttr"), "childAttrValue")
                    // 服务端启动时做的逻辑
                    .handler(new ServerHandler())
                    // 给pipeline配置handler,Channel发生某种变化时对应的处理逻辑,todo 幕信里就写了一条链
                    .childHandler(new ChannelInitializer<SocketChannel>() {
                        @Override
                        public void initChannel(SocketChannel ch) {
                            // 往pipeline中添加Handler
                            //ch.pipeline().addLast(new AuthHandler());
                        }
                    });

            // 辅助类,绑定端口,这里使用了同步
            ChannelFuture future = server.bind(8888).sync();
            // 关闭
            future.channel().closeFuture().sync();
        } finally {
            bossGroup.shutdownGracefully();
            workerGroup.shutdownGracefully();
        }
    }
}
代码中的ServerHandler可以无视,因为追踪时暂时不会用到,所以暂时不贴。
下面的代码分析记录都是根据上面的代码。
启动的四个阶段
- 创建服务端Channel(<--本篇)
- 创建服务端Channel
- 注册selector
- 端口绑定、通知
创建服务端Channel
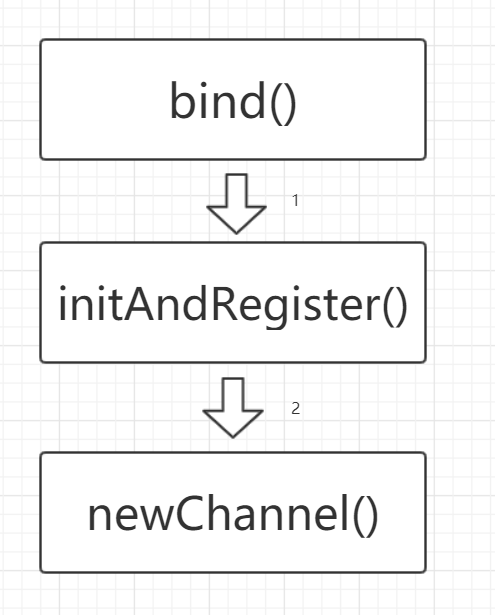
大致流程:

从上面Server代码中的bind()这一段开始追踪:
ChannelFuture future = server.bind(8888).sync();
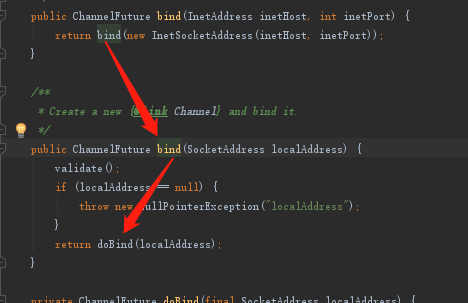
进入bind()函数后,连跳,看到doBind():

进入doBind(),看到第一行如下,找到了流程第二步:
final ChannelFuture regFuture = initAndRegister();
再进入initAndRegister(),找到如下一段,这段就是创建Channel的核心:
channel = channelFactory.newChannel();
再进入newChannel(ReflectiveChannelFactory),发现底层是通过反射调用无参构造函数的:
return clazz.newInstance();
虽然知道是通过反射构造的,但具体是哪个类呢?其实这个在我们写代码的时候自定义了,视角回到上面的Server的一段代码:
.channel(NioServerSocketChannel.class)
我们进入channel(),可以看到:
public B channel(Class<? extends C> channelClass) {
    if (channelClass == null) {
        throw new NullPointerException("channelClass");
    }
    return channelFactory(new ReflectiveChannelFactory<C>(channelClass));
}
可以看到:
- 其实是将我们设置的类,经几度包装最终返回一个channelFactory,也就是上面使用反射时构造的类。
- channelFactory()函数没有什么特别操作,就是转下类型,所以我们应该将重点放到ReflectiveChannelFactory的构造函数上。
服务端创建Channel其实到反射调用构造那里就已经结束了,下面只是继续探究ReflectiveChannelFactory的构造函数到底做了什么。
ReflectiveChannelFactory构造函数
先展示一下大致流程:

图中的方法暂时先忽略参数。
现在,我们先进入NioServerSocketChannel的构造函数:
public NioServerSocketChannel() {
    this(newSocket(DEFAULT_SELECTOR_PROVIDER));
}
再进入上面的newSocket()函数:
    private static ServerSocketChannel newSocket(SelectorProvider provider) {
        try {
            return provider.openServerSocketChannel();
        } catch (IOException e) {
            throw new ChannelException(
                    "Failed to open a server socket.", e);
        }
    }
可以看到方法参数是SelectorProvider,返回值是ServerSocketChannel,这两是jdk的类,说明此处Netty是调用jdk的接口去创建类的,只是后来再进一步封装。(两个class都是jdk 1.4后引入的nio)
现在将视角转回最初的NioServerSocketChannel无参构造函数,进入this(),我们可以看见config类NioServerSocketChannelConfig,由于我们上面的Server代码设置了tcp,所以这里的配置类会帮我们初始化tcp的一些参数:
    /**
     * 位置:io.netty.channel.socket.nio.NioServerSocketChannel#NioServerSocketChannel(java.nio.channels.ServerSocketChannel)
     **/
    public NioServerSocketChannel(ServerSocketChannel channel) {
        super(null, channel, SelectionKey.OP_ACCEPT);
        config = new NioServerSocketChannelConfig(this, javaChannel().socket());
    }
然后,我们进入super函数:
    protected AbstractNioMessageChannel(Channel parent, SelectableChannel ch, int readInterestOp) {
        super(parent, ch, readInterestOp);
    }
继续super:
    protected AbstractNioChannel(Channel parent, SelectableChannel ch, int readInterestOp) {
        // parent为null,parent是给客户端channel存储服务端channel的
        super(parent);
        this.ch = ch;
        this.readInterestOp = readInterestOp;
        try {
            // nio关键,就是这里设置了非阻塞I/O
            ch.configureBlocking(false);
        } catch (IOException e) {
            try {
                ch.close();
            } catch (IOException e2) {
                if (logger.isWarnEnabled()) {
                    logger.warn(
                            "Failed to close a partially initialized socket.", e2);
                }
            }

            throw new ChannelException("Failed to enter non-blocking mode.", e);
        }
    }
其中ch.configureBlocking(false);就是负责配置非阻塞I/O。
再super,可以看到此处最终完成了AbstractChannel的构造:
    protected AbstractChannel(Channel parent) {
        // parent为null,如果是客户端channel则不同
        this.parent = parent;
        id = newId();
        // 返回NioMessageUnsafe(服务端),如果是构造客户端channel,则返回NioSocketChannelUnsafe
        unsafe = newUnsafe();
        pipeline = newChannelPipeline();
    }
以上就是Netty服务端创建Channel的过程了,虽然暂时忽略了一些细节,不过算是对流程有一个大概的认识,如果之后有更多参考资料,会继续补全。
关于提到的客户端channel,其实就是是NioSocketChannel,有兴趣的可以自己追下它的构造方法,我会在后面遇到的时候再写博客记录。