回顾
启动的四个阶段
- 创建服务端Channel(<--上一节)
- 初始化服务端Channel(<--本篇)
- 注册selector
- 端口绑定、通知
Netty version:4.1.6
为了方便,再把上一节的Server.java再贴一次:
import io.netty.bootstrap.ServerBootstrap;
import io.netty.channel.*;
import io.netty.channel.nio.NioEventLoopGroup;
import io.netty.channel.socket.SocketChannel;
import io.netty.channel.socket.nio.NioServerSocketChannel;
import io.netty.util.AttributeKey;
/**
* @author cwj
*/
public final class Server {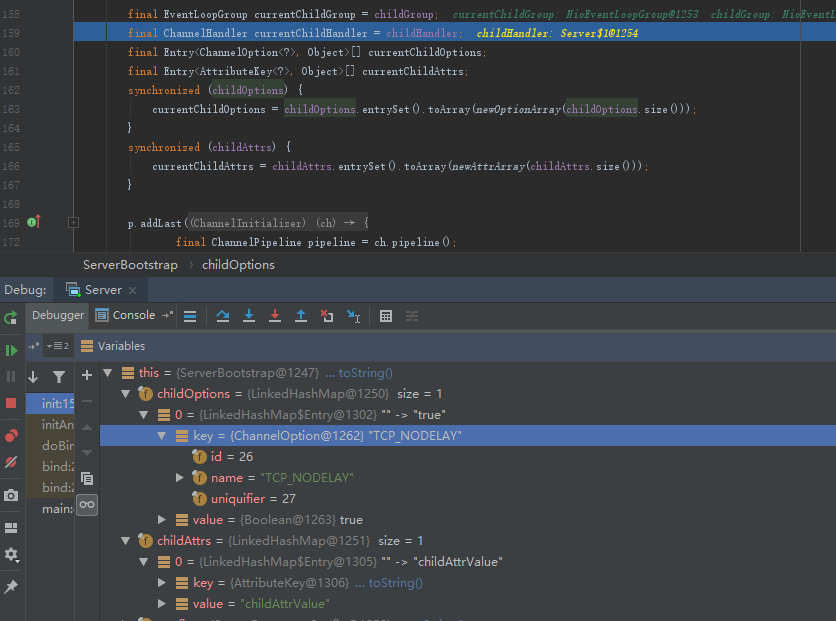
public static void main(String[] args) throws Exception {
// 两大线程
// 对应Socket中Server的启动监听线程
EventLoopGroup bossGroup = new NioEventLoopGroup(1);
// 对应Socket中Client中主函数的线程
EventLoopGroup workerGroup = new NioEventLoopGroup();
try {
// 辅助类
ServerBootstrap server = new ServerBootstrap();
// 装配线程
server.group(bossGroup, workerGroup)
// 设置Channel的类型
.channel(NioServerSocketChannel.class)
// 给每个客户端的连接设置一些tcp的基本属性
.childOption(ChannelOption.TCP_NODELAY, true)
.option(ChannelOption.TCP_NODELAY, true)
// 每次创建客户端时,绑定一些基本的属性
.childAttr(AttributeKey.newInstance("childAttr"), "childAttrValue")
.attr(AttributeKey.newInstance("Attr"), "AttrValue")
// 服务端启动时做的逻辑
.handler(new ServerHandler())
// 给pipeline配置handler,Channel发生某种变化时对应的处理逻辑
.childHandler(new ChannelInitializer<SocketChannel>() {
@Override
public void initChannel(SocketChannel ch) {
//ch.pipeline().addLast(new AuthHandler());
}
});
// 辅助类,绑定端口,这里使用了同步
ChannelFuture future = server.bind(8888).sync();
// 关闭
future.channel().closeFuture().sync();
} finally {
bossGroup.shutdownGracefully();
workerGroup.shutdownGracefully();
}
}
}
注意上面代码多了.option函数和.attr函数,这节验证某些东西时用到。
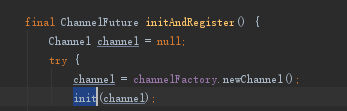
这次的起点其实就在上一节的initAndRegister函数中,整段代码是这样的:
    /**
     * 位置:io.netty.bootstrap.AbstractBootstrap#initAndRegister
     **/
    final ChannelFuture initAndRegister() {
        Channel channel = null;
        try {
            channel = channelFactory.newChannel();
            // 本篇入口
            init(channel);
        } catch (Throwable t) {
            if (channel != null) {
                // channel can be null if newChannel crashed (eg SocketException("too many open files"))
                channel.unsafe().closeForcibly();
            }
            // as the Channel is not registered yet we need to force the usage of the GlobalEventExecutor
            return new DefaultChannelPromise(channel, GlobalEventExecutor.INSTANCE).setFailure(t);
        }

        ChannelFuture regFuture = config().group().register(channel);
        if (regFuture.cause() != null) {
            if (channel.isRegistered()) {
                channel.close();
            } else {
                channel.unsafe().closeForcibly();
            }
        }

        return regFuture;
    }
上面的init函数就是本篇的入口。
如果不记得是怎么进入initAndRegister函数的,就看看上一节吧,这里就不再赘述了。
初始化服务端Channel
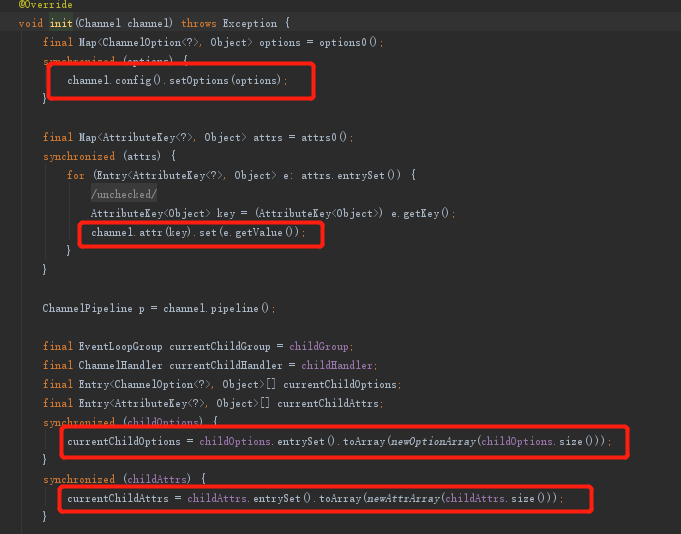
视角移至init函数:
进入init函数实现,实现类选ServerBootstrap:

进入该函数后,我们就可以看到配置属性的代码了:
这里我们可以验证一下代码到底是不是如我们想象般工作,我们在Server.java代码中已经设置了attr和option,这里直接打断点看看即可:
attr和option
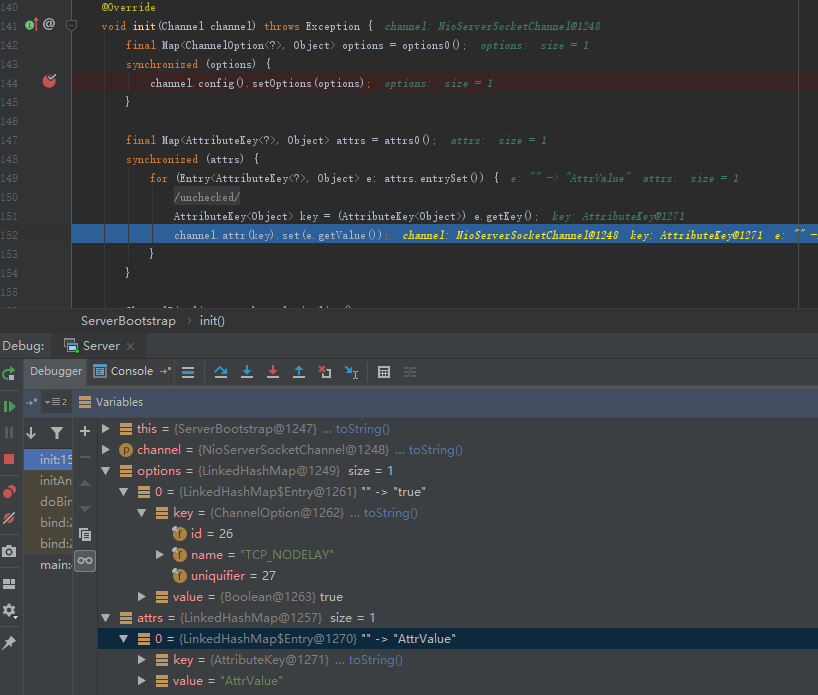
childAttr和childOption

handler
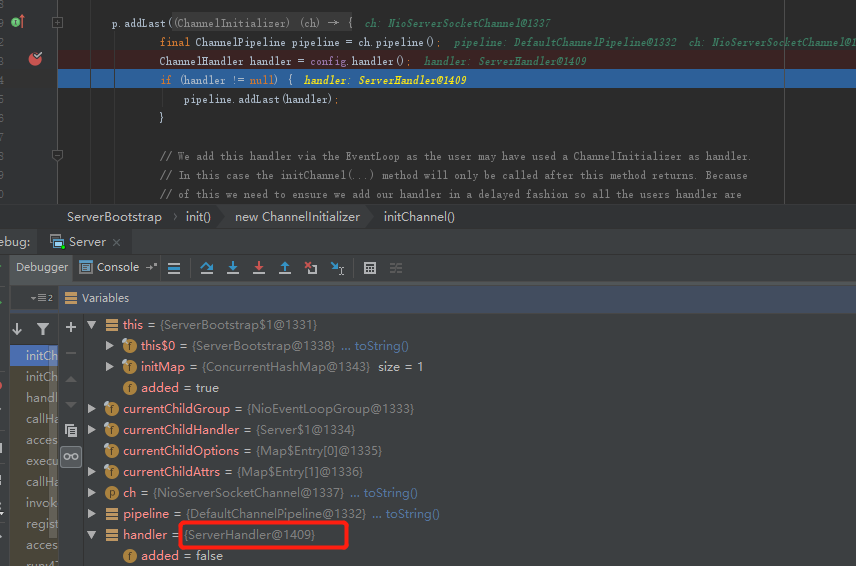
从断点看到的结果来看,这段代码确实就是负责装配attr和option、handler。
补充:attr()函数设置的是服务端Channel的属性,而childAttr()函数设置的是客户端Channel的属性,之后的博客跟到还会补充。
服务端channel是指AbstractNioMessageChannel,客户端channel是指AbstractNioByteChannel。
添加连接器
最后,视角还是在上面的init函数里面,我们来看看最后一部分代码:
        final EventLoopGroup currentChildGroup = childGroup;
        final ChannelHandler currentChildHandler = childHandler;

        ...(中间略)

        p.addLast(new ChannelInitializer<Channel>() {
            @Override
            public void initChannel(Channel ch) throws Exception {
                final ChannelPipeline pipeline = ch.pipeline();
                // 配置handler
                ChannelHandler handler = config.handler();
                if (handler != null) {
                    pipeline.addLast(handler);
                }
                ch.eventLoop().execute(new Runnable() {
                    @Override
                    public void run() {
                        pipeline.addLast(new ServerBootstrapAcceptor(
                                currentChildGroup, currentChildHandler, currentChildOptions, currentChildAttrs));
                    }
                });
            }
        });
上面代码除了配置我们自定义的handler外,还有就是添加连接器,即ServerBootstrapAcceptor,关于连接器我现在知道的不多,等之后再补全。
不过除了连接器,我们还需要注意上面代码的两参数:currentChildGroup, currentChildHandler,我们不妨再看看断点:

可以发现currentChildGroup其实就是我们在Server.java中的.group()设置的,包括currentChildHandler也一样,只不过我在这里没有设置而已。
到此,初始化服务端Channel就完成了。