文章目录
前言
Netty为了减少频繁new对象的性能损耗,引进了一个通用的对象池,它就是Recycler。
在前面讲bytebuf的时候的时候就遇到过。不过它可不仅仅可以存bytebuf,用户也可以用来构造属于自己的对象池,这一节就来看看如何使用Recycler。
另外,因为Recycler是基于FastThreadLocal实现的,所以下面遇到诸如FastThreadLocal#get等方法将不再赘述,想知道详情的请看上一节【FastThreadLocal】
Netty Version:4.1.6
实验代码:
同样拿Netty的单元测试进行微调:
RecycleTest.java
import io.netty.util.Recycler;
import io.netty.util.concurrent.FastThreadLocalThread;

public class RecycleTest {
    private static final Recycler<User> RECYCLER = new Recycler<User>() {

        @Override
        protected User newObject(Handle<User> handle) {
            return new User(handle);
        }
    };

    private static class User {
        private final Recycler.Handle<User> handle;

        public User(Recycler.Handle<User> handle) {
            this.handle = handle;
        }

        public void recycle() {
            handle.recycle(this);
        }
    }

    public static void main(String[] args) {
        FastThreadLocalThread task = new FastThreadLocalThread() {
            @Override
            public void run() {
                // 对象池为空则创建对象
                User user = RECYCLER.get();

                user.recycle();
                RECYCLER.get().recycle();

                // 对象池不为空则复用对象
                User user1 = RECYCLER.get();

                // 输出true
                System.out.println(user1 == user);
            }
        };
        task.start();
    }
}
输出结果:
true
- 说明两个对象指向的引用都相同。
跟进源码
Recycler内部类简介
直接上图:
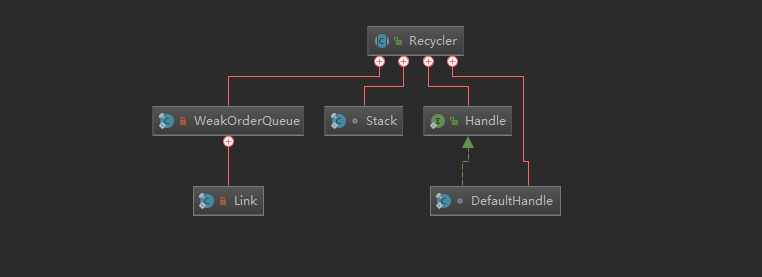
下面再简单介绍下,详细的等遇到就懂了:
- DefaultHandle:保存着对象,对象调用的recycle方法就在此类实现的。
- Stack:就是对象池,里面存放这DefaultHandle数组、WeakOrderQueue链表等信息。
- WeakOrderQueue:当thread2回收thread1的对象时,回收的对象就会暂时放到这里面。
- Link:WeakOrderQueue内部是由一个个Link链表组成的,一个Link默认能存储16个对象。
Recycler的创建及部分属性
先从无参构造看起:
io.netty.util.Recycler#Recycler()
    protected Recycler() {
        // DEFAULT_MAX_CAPACITY_PER_THREAD默认值为32768
        this(DEFAULT_MAX_CAPACITY_PER_THREAD);
    }
继续跟进this:
io.netty.util.Recycler#Recycler(int)
    protected Recycler(int maxCapacityPerThread) {
        //MAX_SHARED_CAPACITY_FACTOR默认值为2
        this(maxCapacityPerThread, MAX_SHARED_CAPACITY_FACTOR);
    }
继续跟进this:
io.netty.util.Recycler#Recycler(int, int)
    protected Recycler(int maxCapacityPerThread, int maxSharedCapacityFactor) {
        // RATIO默认值8,用于控制回收频率
        // MAX_DELAYED_QUEUES_PER_THREAD默认值跟NioEventLoop一样,等于 cpu核心数*2
        this(maxCapacityPerThread, maxSharedCapacityFactor, RATIO, MAX_DELAYED_QUEUES_PER_THREAD);
    }
继续跟进this:
io.netty.util.Recycler#Recycler(int, int, int, int)
    protected Recycler(int maxCapacityPerThread, int maxSharedCapacityFactor,
                       int ratio, int maxDelayedQueuesPerThread) {
        // 默认值为7
        ratioMask = safeFindNextPositivePowerOfTwo(ratio) - 1;
        if (maxCapacityPerThread <= 0) {
            this.maxCapacityPerThread = 0;
            this.maxSharedCapacityFactor = 1;
            this.maxDelayedQueuesPerThread = 0;
        } else {
            this.maxCapacityPerThread = maxCapacityPerThread;
            this.maxSharedCapacityFactor = max(1, maxSharedCapacityFactor);
            this.maxDelayedQueuesPerThread = max(0, maxDelayedQueuesPerThread);
        }
    }
再回首这些属性:
    // 对象池容量,默认值为32768
    private final int maxCapacityPerThread;
    // 默认值为2,用于控制当前Recycler能存储多少其它线程的对象
    private final int maxSharedCapacityFactor;
    // 用于控制回收频率,默认值为7
    private final int ratioMask;
    // 默认等于 cpu核心数*2 其实是WeakOrderQueue数量
    private final int maxDelayedQueuesPerThread;
- 现在不是很清楚含义也不要紧,后面都会遇到。
从Recycler获取对象
跟进Recycler的get方法,此处【坐标1】:
io.netty.util.Recycler#get
    public final T get() {
        // maxCapacityPerThread意味着不用回收
        if (maxCapacityPerThread == 0) {
            return newObject((Handle<T>) NOOP_HANDLE);
        }
        // 获取当前线程的stack
        Stack<T> stack = threadLocal.get();
        // 从stack中弹出一个对象
        DefaultHandle<T> handle = stack.pop();
        // 如果对象为空则创建并初始化
        if (handle == null) {
            handle = stack.newHandle();
            // 跳到实验代码的实现中创建对象
            handle.value = newObject(handle);
        }
        // 返回对象
        return (T) handle.value;
    }
- 如果你不清楚threadLocal.get()、到底做了什么,请参考前言的提到博客。
- newObject就是调用实验代码中覆写的代码。
Stack创建及部分属性
如果FastThreadLocal中没有Stack,那么threadLocal.get()就会构造一个,而Stack构造时的参数也很关键,下面就来看看:
    // 每个线程维护一个stack
    private final FastThreadLocal<Stack<T>> threadLocal = new FastThreadLocal<Stack<T>>() {
        @Override
        protected Stack<T> initialValue() {
            return new Stack<T>(Recycler.this, Thread.currentThread(), maxCapacityPerThread, maxSharedCapacityFactor,
                    ratioMask, maxDelayedQueuesPerThread);
        }
    };
- 后4个参数上面都讲过了。
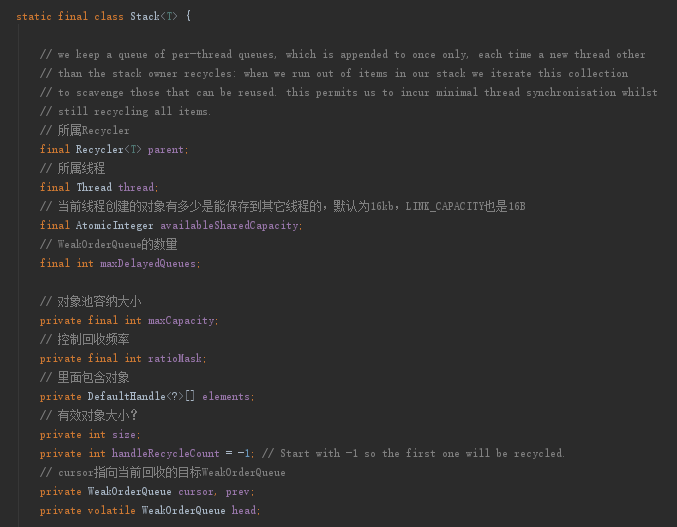
跟进构造方法,又是一大堆属性:
io.netty.util.Recycler.Stack#Stack
        Stack(Recycler<T> parent, Thread thread, int maxCapacity, int maxSharedCapacityFactor,
              int ratioMask, int maxDelayedQueues) {
            // 保存所属Recycler
            this.parent = parent;
            // 保存所属线程
            this.thread = thread;
            // 对象池大小
            this.maxCapacity = maxCapacity;
            // 当前线程创建的对象有多少是能保存到其它线程的,默认为16,384,LINK_CAPACITY则是16
            // 说白了至少是16
            availableSharedCapacity = new AtomicInteger(max(maxCapacity / maxSharedCapacityFactor, LINK_CAPACITY));
            // 里面就包含了对象,默认初始大小为16,不够会扩容
            elements = new DefaultHandle[min(INITIAL_CAPACITY, maxCapacity)];
            // 控制回收频率(并不是每次都回收),默认值为7,每8次回收就丢掉一个
            this.ratioMask = ratioMask;
            // WeakOrderQueue数量
            this.maxDelayedQueues = maxDelayedQueues;
        }
- 同样,这些属性等下都会遇到,还有些属性等遇到的时候再讲,都很简单。
这里再补充个整体属性图,便于预先了解一些数据结构:
好了,了解完Stack的这些属性,我们可以继续往下走了。
pop弹出对象
pop方法会在没有对象时自动创建,有的话就是从数组里面返回了,还有其它的一些复杂逻辑等铺垫好了再讲。
视角转回【坐标1】的get方法,跟进pop方法:
io.netty.util.Recycler.Stack#pop
        @SuppressWarnings({ "unchecked", "rawtypes" })
        DefaultHandle<T> pop() {
            // 有效对象数量
            int size = this.size;
            if (size == 0) {
                // 对象可能被其它线程回收了,回去把它们捞回来
                // 这个方法后面会分析
                if (!scavenge()) {
                    return null;
                }
                size = this.size;
            }
            size --;
            // 获取到DefaultHandle,里面就存储着对象等
            DefaultHandle ret = elements[size];
            // 取到有效对象之后将原来的位置置空
            elements[size] = null;
            if (ret.lastRecycledId != ret.recycleId) {
                throw new IllegalStateException("recycled multiple times");
            }
            // 对象已经被取走了,回收id=0
            ret.recycleId = 0;
            ret.lastRecycledId = 0;
            // 保存对象池有效对象数量
            this.size = size;
            return ret;
        }
- scavenge方法等讲了异线程回收之后再看,暂时放着不影响理解。
以上就是pop获取对象的流程,其实就是根据下标获取到对象,跟喝水一样简单,相信不用我多说了,如果返回null,则在返回到上面的get方法后自动创建。
回收对象到Recycler
比起从Recycler获取对象,将对象回收到Recycler(异线程回收)可就复杂多了。
同线程回收
跟进实验代码的recycle方法:
io.netty.util.Recycler.DefaultHandle#recycle
        @Override
        public void recycle(Object object) {
            if (object != value) {
                throw new IllegalArgumentException("object does not belong to handle");
            }
            // 将对象放入对象池
            stack.push(this);
        }
跟进push方法,此处【坐标2】:
io.netty.util.Recycler.Stack#push
        void push(DefaultHandle<?> item) {
            // 取到当前线程
            Thread currentThread = Thread.currentThread();
            if (thread == currentThread) {
                // The current Thread is the thread that belongs to the Stack, we can try to push the object now.
                // 同线程回收
                pushNow(item);
            } else {
                // The current Thread is not the one that belongs to the Stack, we need to signal that the push
                // happens later.
                // 异线程回收
                pushLater(item, currentThread);
            }
        }
- 同线程回收:Thread1产出的Object1,回收的时候也是在Thread1中回收。
- 同线程回收:Thread1产出的Object1,回收的时候是在其它线程中执行。
这里先跟进pushNow方法:
io.netty.util.Recycler.Stack#pushNow
        private void pushNow(DefaultHandle<?> item) {
            // 若!=0则说明这个对象已经是被回收状态
            if ((item.recycleId | item.lastRecycledId) != 0) {
                throw new IllegalStateException("recycled already");
            }
            // 设置回收id,表示对象已被回收了
            item.recycleId = item.lastRecycledId = OWN_THREAD_ID;

            // 获取有效对象的数量
            int size = this.size;
            // 已经放不下了 || 检测频率
            if (size >= maxCapacity || dropHandle(item)) {
                // Hit the maximum capacity or should drop - drop the possibly youngest object.
                return;
            }
            // 扩容
            if (size == elements.length) {
                elements = Arrays.copyOf(elements, min(size << 1, maxCapacity));
            }

            // 保存对象
            elements[size] = item;
            this.size = size + 1;
        }
以上就是同线程回收的流程,也很简单,就是保存对象到数组,然后打上各种标记更新各种计数器。
控制频率
其中dropHandle方法就是控制频率,跟进去看看:
io.netty.util.Recycler.Stack#dropHandle
        boolean dropHandle(DefaultHandle<?> handle) {
            if (!handle.hasBeenRecycled) {
                // 频率太高了,不保存对象
                // handleRecycleCount 从-1开始,ratioMask = 7,第一个对象回收
		// 到后面只有 handleRecycleCount等于8的倍数,8,16才回收,其它都不回收
                if ((++handleRecycleCount & ratioMask) != 0) {
                    // Drop the object.
                    return true;
                }
                handle.hasBeenRecycled = true;
            }
            return false;
        }
异线程回收
开始跟进
视角转回到【坐标2】的push方法:
io.netty.util.Recycler.Stack#push
        void push(DefaultHandle<?> item) {
            // 取到当前线程
            Thread currentThread = Thread.currentThread();
            if (thread == currentThread) {
                // The current Thread is the thread that belongs to the Stack, we can try to push the object now.
                // 同一个线程就同步回收
                pushNow(item);
            } else {
                // The current Thread is not the one that belongs to the Stack, we need to signal that the push
                // happens later.
                // 非当前线程创造的对象则异步回收
                pushLater(item, currentThread);
            }
        }
跟进pushLater方法,此处【坐标3】:
io.netty.util.Recycler.Stack#pushLater
        private void pushLater(DefaultHandle<?> item, Thread thread) {
            // we don't want to have a ref to the queue as the value in our weak map
            // so we null it out; to ensure there are no races with restoring it later
            // we impose a memory ordering here (no-op on x86)

            // 从DELAYED_RECYCLED(FastThreadLocal)中获取WeakOrderQueue的Map
            Map<Stack<?>, WeakOrderQueue> delayedRecycled = DELAYED_RECYCLED.get();
            // 根据stack取到WeakOrderQueue
            WeakOrderQueue queue = delayedRecycled.get(this);
            // queue=null表示当前线程从未回收过其它线程的对象
            if (queue == null) {
                // 如果当前WeakOrderQueue数量大于最大值
                if (delayedRecycled.size() >= maxDelayedQueues) {
                    // Add a dummy queue so we know we should drop the object
                    // 打上虚拟标记
                    delayedRecycled.put(this, WeakOrderQueue.DUMMY);
                    return;
                }
                // Check if we already reached the maximum number of delayed queues and if we can allocate at all.
                // 创建WeakOrderQueue
                if ((queue = WeakOrderQueue.allocate(this, thread)) == null) {
                    // drop object
                    return;
                }
                delayedRecycled.put(this, queue);
            } else if (queue == WeakOrderQueue.DUMMY) {
                // drop object
                return;
            }
            // 将对象放至队列中
            queue.add(item);
        }
- DELAYED_RECYCLED.get()实际上就是FastThreadLocal的get方法,不懂的可以参考前言中的博客。
- 异线程回收的对象(Handle)就是存放在WeakOrderQueue的Link中的
先跟进WeakOrderQueue.allocate方法,其中有很重要的概念:
io.netty.util.Recycler.WeakOrderQueue#allocate
        static WeakOrderQueue allocate(Stack<?> stack, Thread thread) {
            // We allocated a Link so reserve the space
            // 判断对象所属stack还能不能分配LINK_CAPACITY内存,能就分配,不能就返回null
            return reserveSpace(stack.availableSharedCapacity, LINK_CAPACITY)
                    ? new WeakOrderQueue(stack, thread) : null;
        }
继续跟进reserveSpace方法:
io.netty.util.Recycler.WeakOrderQueue#reserveSpace
        private static boolean reserveSpace(AtomicInteger availableSharedCapacity, int space) {
            assert space >= 0;
            for (;;) {
                // 获取剩余可用空间
                int available = availableSharedCapacity.get();
                // 可用空间 < 16
                if (available < space) {
                    return false;
                }
                if (availableSharedCapacity.compareAndSet(available, available - space)) {
                    return true;
                }
            }
        }
上面两段代码说明:每次构建一个WeakOrderQueue,都至少保证有LINK_CAPACITY的剩余量,同以前讲到的内存page分配或mysql的page分配,LINK_CAPACITY就是每次申请的最小单位。
WeakOrderQueue构造
我们再来看看WeakOrderQueue的构造:
io.netty.util.Recycler.WeakOrderQueue#WeakOrderQueue(io.netty.util.Recycler.Stack<?>, java.lang.Thread)
        private WeakOrderQueue(Stack<?> stack, Thread thread) {
            // 一个Link默认大小是16
            head = tail = new Link();
            owner = new WeakReference<Thread>(thread);
            synchronized (stack) {
                next = stack.head;
                stack.head = this;
            }

            // Its important that we not store the Stack itself in the WeakOrderQueue as the Stack also is used in
            // the WeakHashMap as key. So just store the enclosed AtomicInteger which should allow to have the
            // Stack itself GCed.
            availableSharedCapacity = stack.availableSharedCapacity;
        }
- 下面画出各个类关系结构图后,顺便补上这一块的指针变化。
Link构造
跟进Link的构造方法(整体源码):
        private static final class Link extends AtomicInteger {
            // 默认一个Link可以存储16个对象
            private final DefaultHandle<?>[] elements = new DefaultHandle[LINK_CAPACITY];

            private int readIndex;
            private Link next;
        }
- 可见:Link就是每次向WeakOrderQueue申请空间的最小单位。
- 为什么要这么做呢?因为如果没有Link实现Handle的批量存储,那么再每一次申请存储一个Handle时,都要校验Stack、WeakOrderQueue是否“爆满”了。很浪费性能。而使用Link,则是一次性申请16个Handle,并且只是一次校验,省下了频繁校验的性能损耗。
- 该思想类似于bytebuf的内存申请以及mysql的内存申请。
Stack、WeakOrderQueue、Link的关系与结构
在上面的不同类中,已经遇到不少prev、next、head等指针一样的属性了,但是都没讲到具体数据结构,主要是因为累积还不够多,现在累计足够多的了,直接来看整体会更舒服。
下面就是三者整体的数据结构:
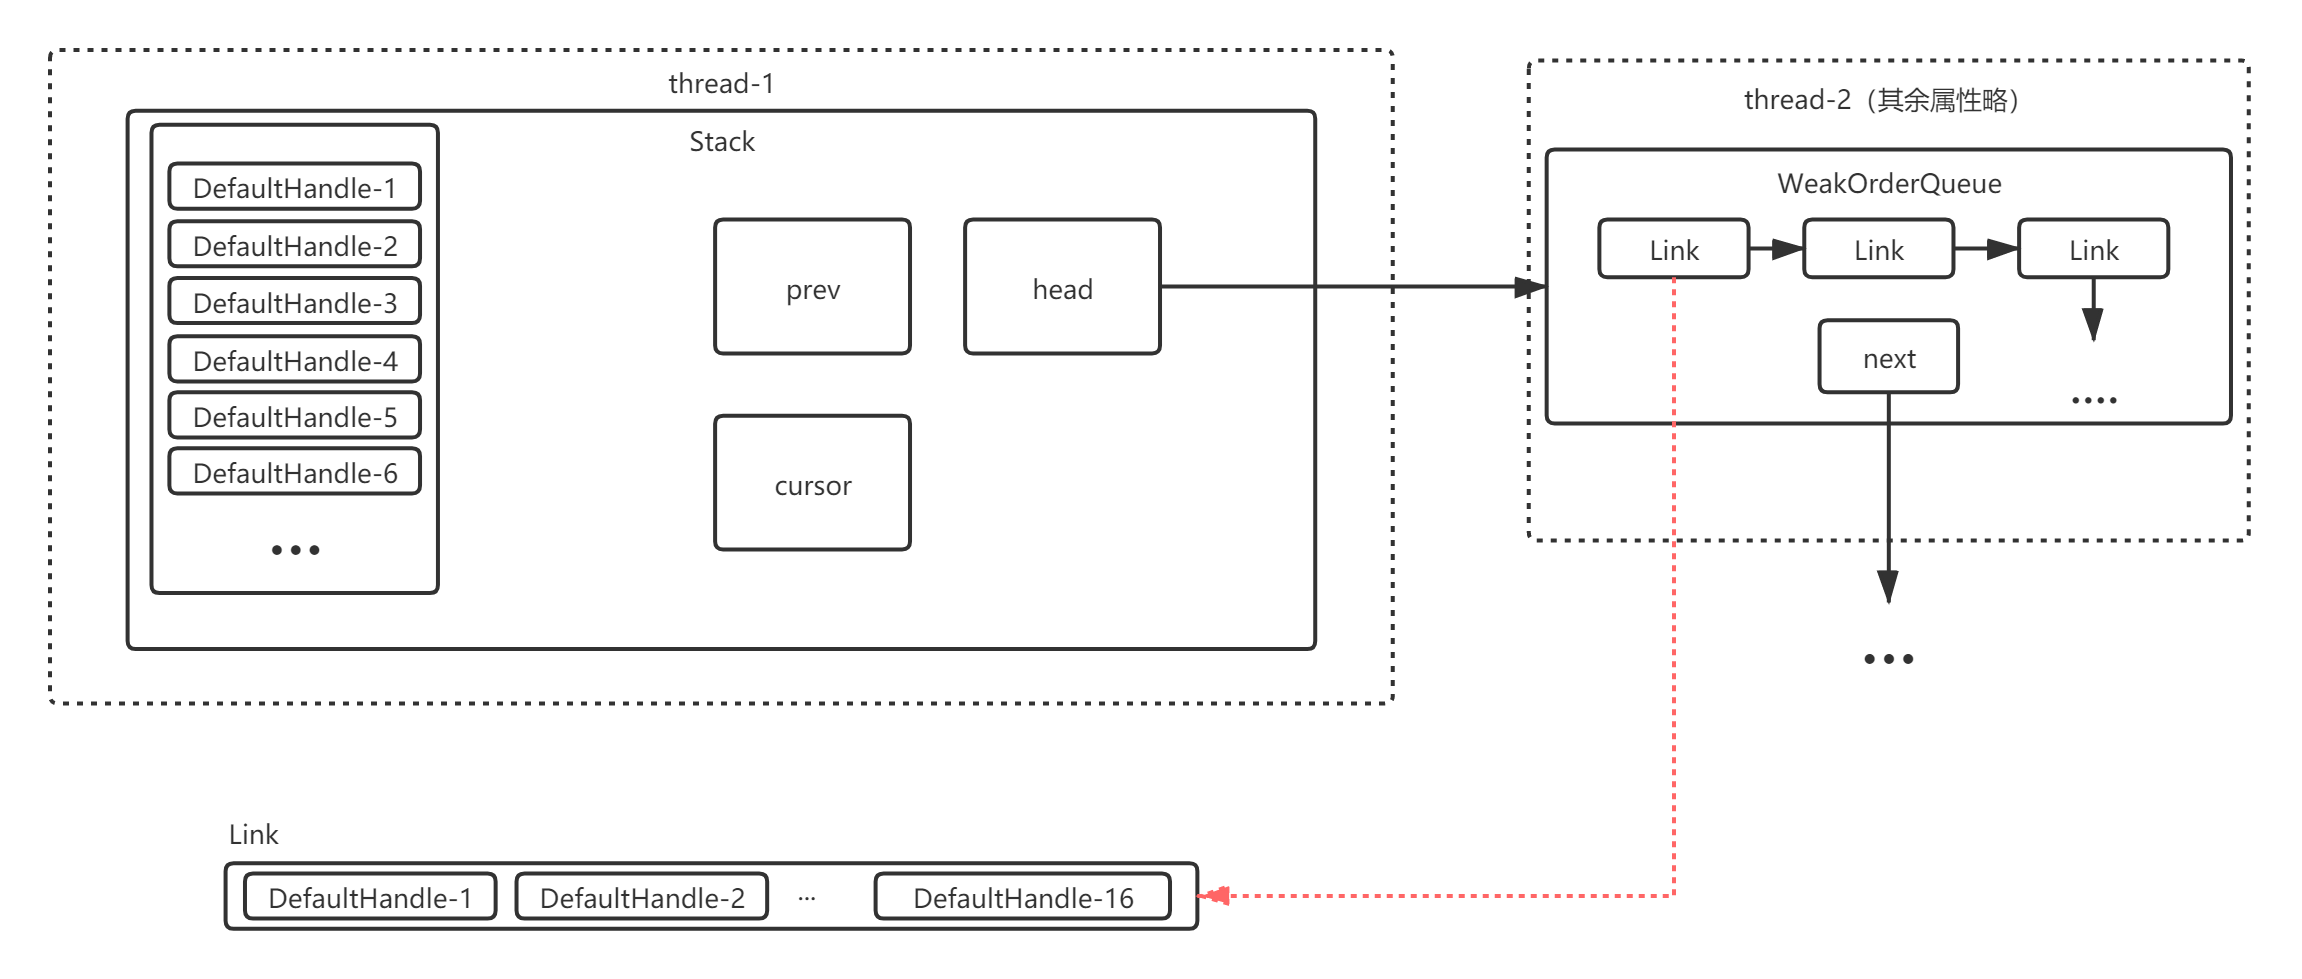
- 当然,为了避免混乱,图中省略了部分指针,如head、tail这种每个节点都有的指针我就省略了。
在了解完结构后,视角转回上面的WeakOrderQueue构造代码。假设现在来了个thread-3,并且它也回收了thread1线程的对象,上面的结构图就会变成下面这个样子:
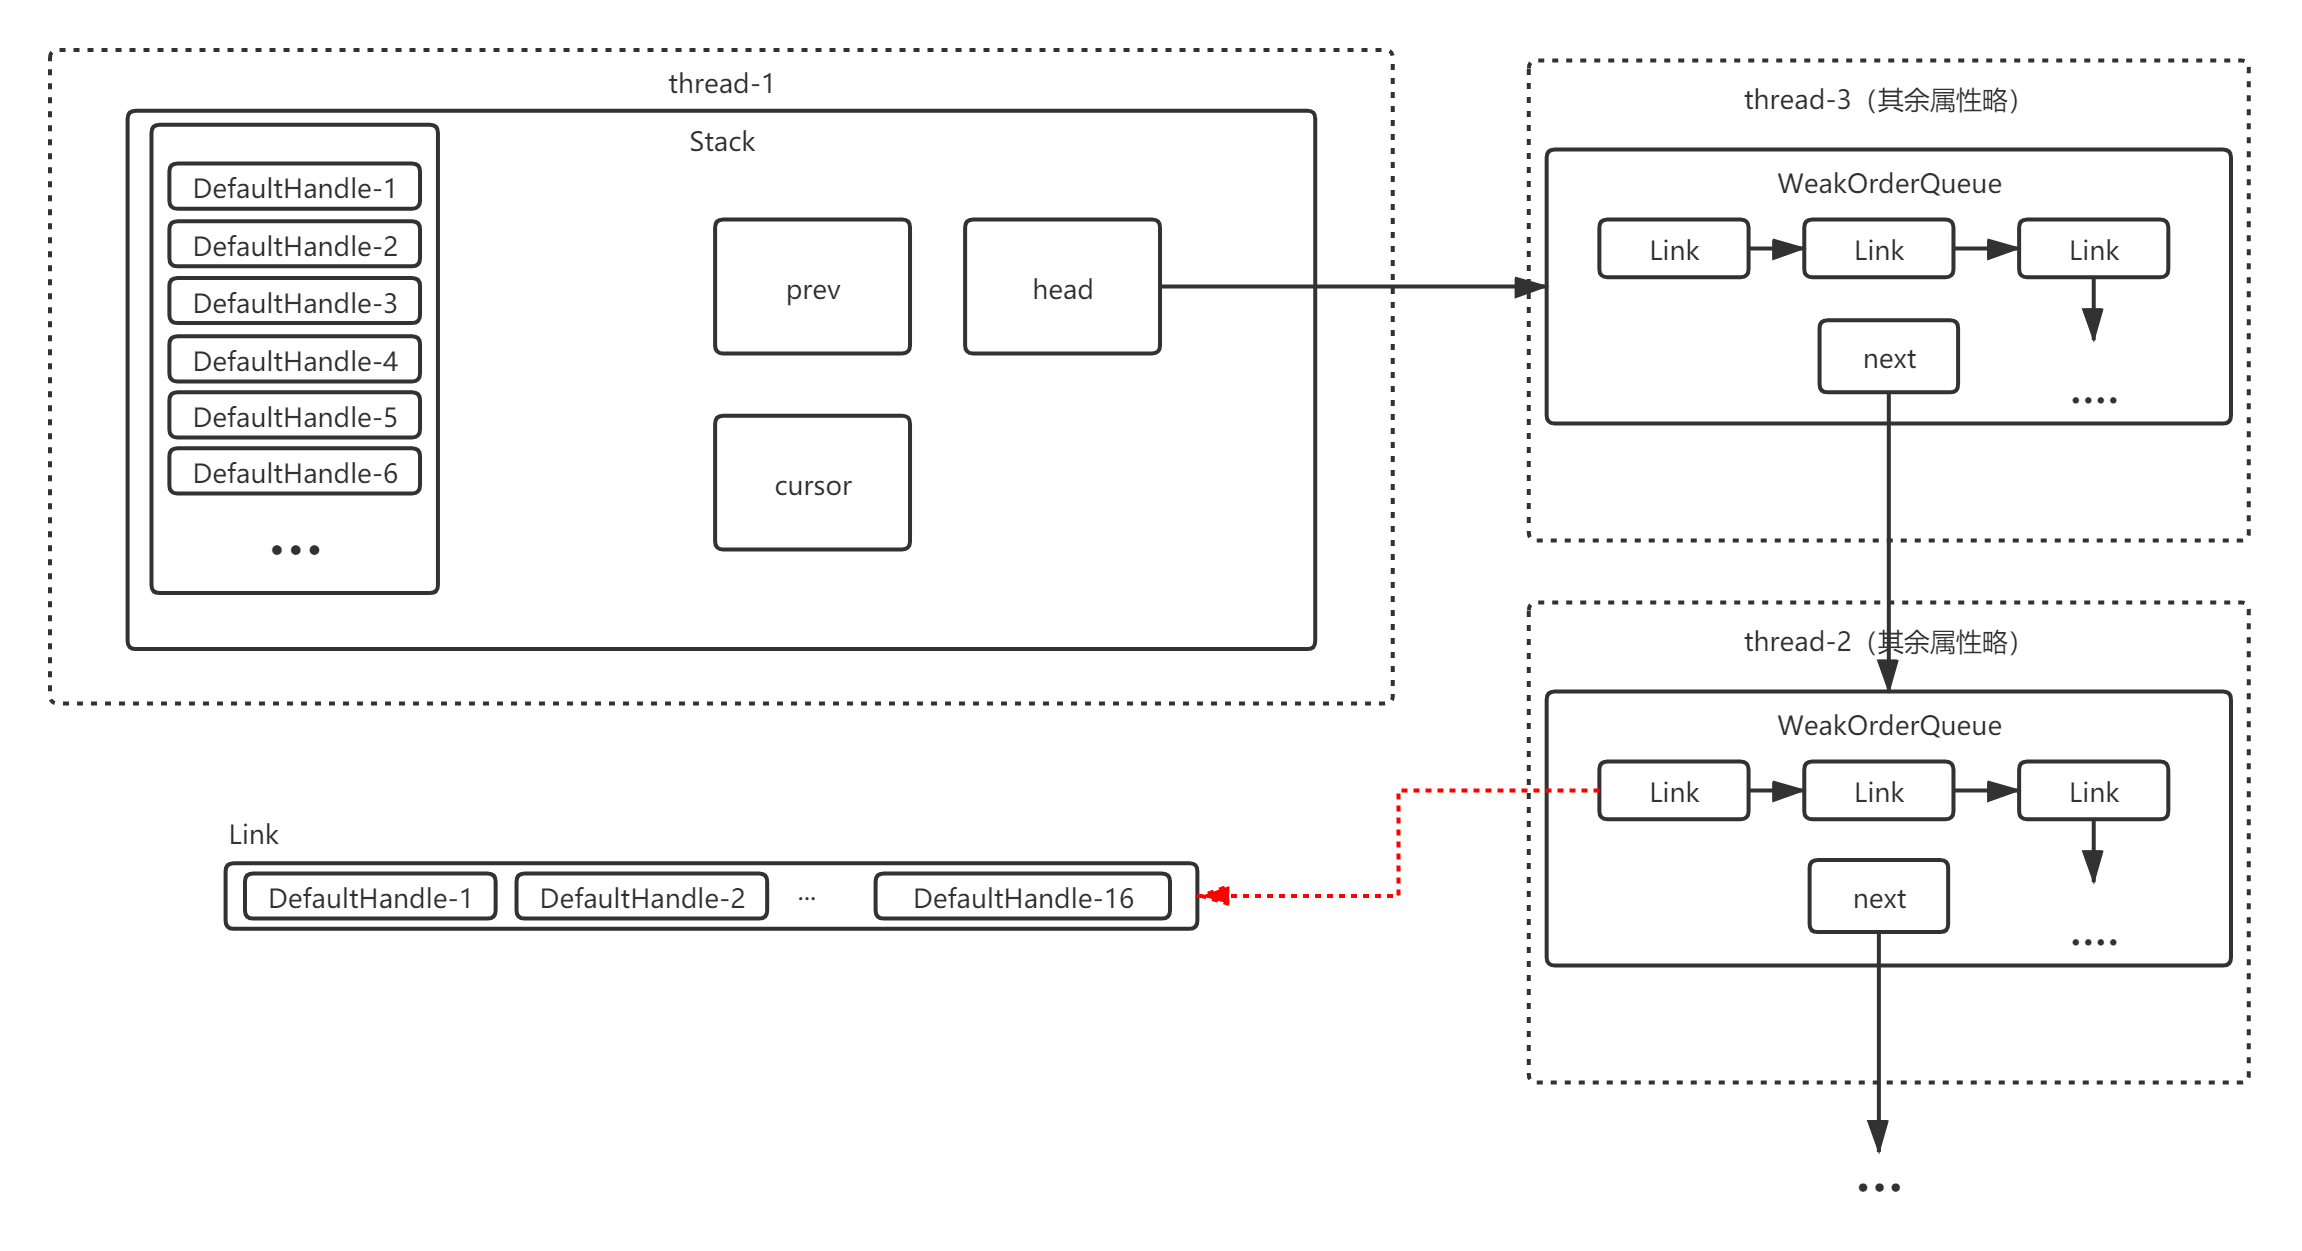
- 说白了,head指向的节点就是最近添加进来的WeakOrderQueue节点。
将对象保存到WeakOrderQueue
在了解了相应的属性和结构之后,将视角转回【坐标3】的pushLater方法,找到如下代码:
io.netty.util.Recycler.Stack#pushLater
queue.add(item);
跟进add方法:
io.netty.util.Recycler.WeakOrderQueue#add
        void add(DefaultHandle<?> handle) {
            handle.lastRecycledId = id;

            Link tail = this.tail;
            int writeIndex;
            // 如果Link满了
            if ((writeIndex = tail.get()) == LINK_CAPACITY) {
                // “申请空间”,新建Link
                if (!reserveSpace(availableSharedCapacity, LINK_CAPACITY)) {
                    // Drop it.
                    return;
                }
                // We allocate a Link so reserve the space
                this.tail = tail = tail.next = new Link();

                writeIndex = tail.get();
            }
            // 对象池存储对象
            tail.elements[writeIndex] = handle;
            handle.stack = null;
            // we lazy set to ensure that setting stack to null appears before we unnull it in the owning thread;
            // this also means we guarantee visibility of an element in the queue if we see the index updated
            tail.lazySet(writeIndex + 1);
        }
- 若Link没满,就往Link的尾部空余空间添加元素,这个过程只是数组赋值,也是跟喝水一样简单,没什么好说的。
- 如果Link满了,则去申请新的Link,并更新tail指针,然后往新的Link中对象赋值。
- reserveSpace()再上面已经看过了,就是向WeakOrderQueue“申请空间”。
好了,现在已经了解到异线程是如何回收对象的了,那么当原线程的Stack取不到Handle时,就会尝试从head节点开始,尝试从异线程的WeakOrderQueue链中把属于自己的对象捞回来,下面来看看这个过程。
从WeakOrderQueue链中捞回对象
视角转移回到上面pop方法,为了方便此处再贴一次代码:
io.netty.util.Recycler.Stack#pop
        DefaultHandle<T> pop() {
            // 有效对象数量
            int size = this.size;
            if (size == 0) {
                // 对象可能被其它线程回收了,回去把它们捞回来
                // 这个方法后面会分析
                if (!scavenge()) {
                    return null;
                }
                size = this.size;
            }
            size --;
            // 获取到DefaultHandle,里面就存储着对象等
            DefaultHandle ret = elements[size];
            // 取到有效对象之后将原来的位置置空
            elements[size] = null;
            if (ret.lastRecycledId != ret.recycleId) {
                throw new IllegalStateException("recycled multiple times");
            }
            // 对象已经被取走了,回收id=0
            ret.recycleId = 0;
            ret.lastRecycledId = 0;
            // 保存对象池有效对象数量
            this.size = size;
            return ret;
        }
其中scavenge方法就是尝试从其它线程捞回对象,跟进这个方法:
io.netty.util.Recycler.Stack#scavenge
        boolean scavenge() {
            // continue an existing scavenge, if any
            if (scavengeSome()) {
                return true;
            }

            // 若没有可捞回对象则重置指针
            prev = null;
            cursor = head;
            return false;
        }
继续跟进scavengeSome():
io.netty.util.Recycler.Stack#scavengeSome
        boolean scavengeSome() {
            // cursor指向当前回收的目标WeakOrderQueue
            WeakOrderQueue cursor = this.cursor;
            //cursor == null表示其它线程没有回收当前stack产出的对象
            if (cursor == null) {
                cursor = head;
                if (cursor == null) {
                    return false;
                }
            }

            boolean success = false;
            WeakOrderQueue prev = this.prev;
            // 根据游标遍历其它WeakOrderQueue循环回收
            do {
                // 尝试捞回当前stack(this)产出的对象,每次捞回一个Link大小
                if (cursor.transfer(this)) {
                    success = true;
                    break;
                }

                WeakOrderQueue next = cursor.next;
                // 如果当前 WeakOrderQueue 的线程为null,则说明线程已经不存在了,但WeakOrderQueue对象还在
                if (cursor.owner.get() == null) {
                    // If the thread associated with the queue is gone, unlink it, after
                    // performing a volatile read to confirm there is no data left to collect.
                    // We never unlink the first queue, as we don't want to synchronize on updating the head.
                    // 如果此 WeakOrderQueue 还有数据,则尝试捞回这些对象
                    if (cursor.hasFinalData()) {
                        for (;;) {
                            if (cursor.transfer(this)) {
                                success = true;
                            } else {
                                break;
                            }
                        }
                    }
                    if (prev != null) {
                        // cursor、prev、next都是指向WeakOrderQueue
                        // 下面代码就是释放cursor
                        /*
                         * prev(thread-4) -> cursor(killed) -> next(thread-2)-> ...
                         *
                         * prev(thread-4) -> next(thread-2)-> ...
                         */
                        prev.next = next;
                    }
                } else {
                    prev = cursor;
                }

                cursor = next;

            } while (cursor != null && !success);

            this.prev = prev;
            this.cursor = cursor;
            return success;
        }
最后跟进transfer方法,我们就能看见是如何捞回对象的了(每次只捞回一个Link,捞回多少个由指针决定):
io.netty.util.Recycler.WeakOrderQueue#transfer
        boolean transfer(Stack<?> dst) {
            Link head = this.head;
            if (head == null) {
                return false;
            }

            // 如果Link满了
            if (head.readIndex == LINK_CAPACITY) {
                // 如果没有下一个Link了
                if (head.next == null) {
                    return false;
                }
                // 指向下一个Link
                this.head = head = head.next;
            }

            // 获取开始坐标readIndex
            final int srcStart = head.readIndex;
            // 获取Link一共有多少个对象
            int srcEnd = head.get();
            // 可以捞回的对象总数
            final int srcSize = srcEnd - srcStart;
            if (srcSize == 0) {
                return false;
            }

            final int dstSize = dst.size;
            // 把对象捞回来之后占用的大小
            final int expectedCapacity = dstSize + srcSize;

            // 如果大小不够
            if (expectedCapacity > dst.elements.length) {
                // 扩容
                final int actualCapacity = dst.increaseCapacity(expectedCapacity);
                srcEnd = min(srcStart + actualCapacity - dstSize, srcEnd);
            }

            if (srcStart != srcEnd) {
                final DefaultHandle[] srcElems = head.elements;
                final DefaultHandle[] dstElems = dst.elements;
                int newDstSize = dstSize;
                // 遍历Link的数组元素到当前stack
                for (int i = srcStart; i < srcEnd; i++) {
                    DefaultHandle element = srcElems[i];
                    if (element.recycleId == 0) {
                        element.recycleId = element.lastRecycledId;
                    } else if (element.recycleId != element.lastRecycledId) {
                        throw new IllegalStateException("recycled already");
                    }
                    srcElems[i] = null;

                    // 控制频率,前面讲过
                    if (dst.dropHandle(element)) {
                        // Drop the object.
                        continue;
                    }
                    element.stack = dst;
                    dstElems[newDstSize ++] = element;
                }

                // 当前Link回收完了,且后面还有Link
                if (srcEnd == LINK_CAPACITY && head.next != null) {
                    // Add capacity back as the Link is GCed.
                    // 说明当前Link已经空了,释放剩余容量
                    reclaimSpace(LINK_CAPACITY);

                    // 指向下一个Link
                    this.head = head.next;
                }

                head.readIndex = srcEnd;
                // 说明没有上面的for循环被跳过了,即没有传输任何对象
                if (dst.size == newDstSize) {
                    return false;
                }
                // 更新stack中有效对象数量
                dst.size = newDstSize;
                return true;
            } else {
                // The destination stack is full already.
                return false;
            }
        }
- 上面的for循环就是将Link中的元素一个个拉回到Stack的DefaultHandle数组。
Link变化如下图:
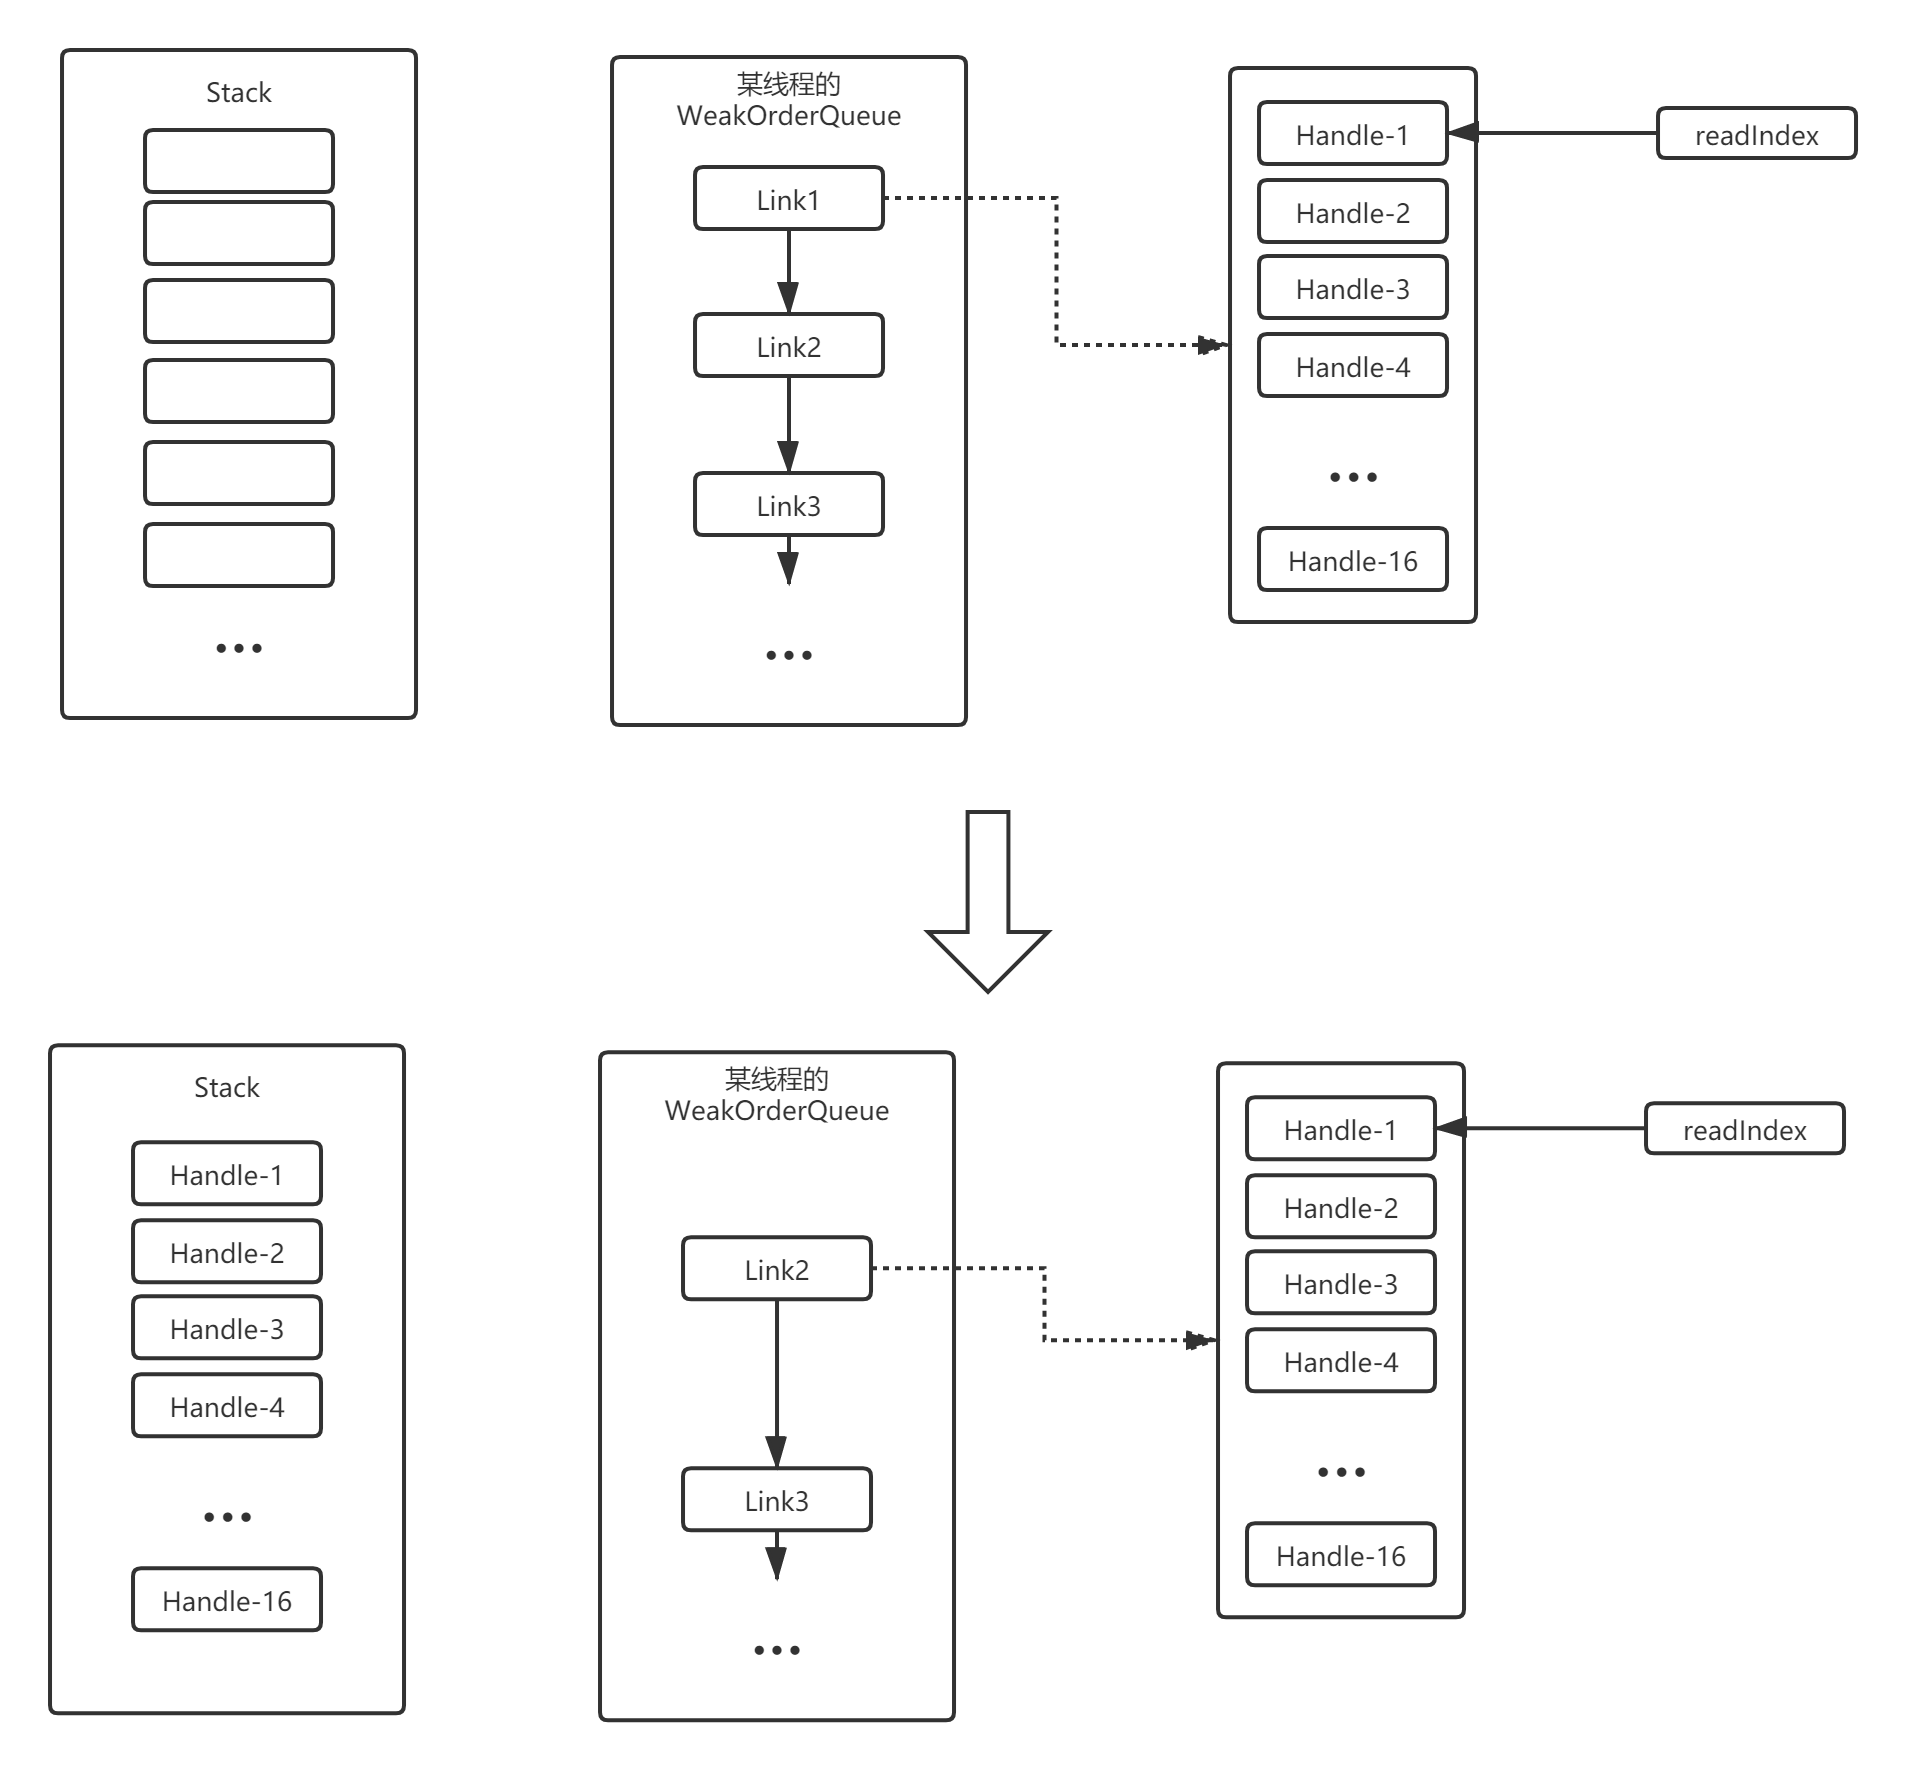
好了,常用的api暂时就分析到这。
可能需要注意的点
- Recycler在构建/获取Stack的时候,使用的是FastThreadLocal,而在上一篇博客分析FastThreadLocal的时候,有一条很重要的规则:要使用FastThreadLocal,必须保证线程类型是FastThreadLocalThread。
- 这条规则意味着:我们在使用Recycler的时候,也应该尽量保证线程类型为FastThreadLocalThread,这样就能间接的优化Recycler获取Stack的时间复杂度。