文章目录
前言
本节就来看看Netty解码的通用抽象ByteToMessageDecoder、以及Netty中最简单的定长解码器FixedLengthFrameDecoder。
在看之前尽量保证有一定的ByteBuf基础,如必须知道readerIndex和,writerIndex等,可以参考我前面的博客记录【ByteBuf简介】。
Netty Version:4.1.6
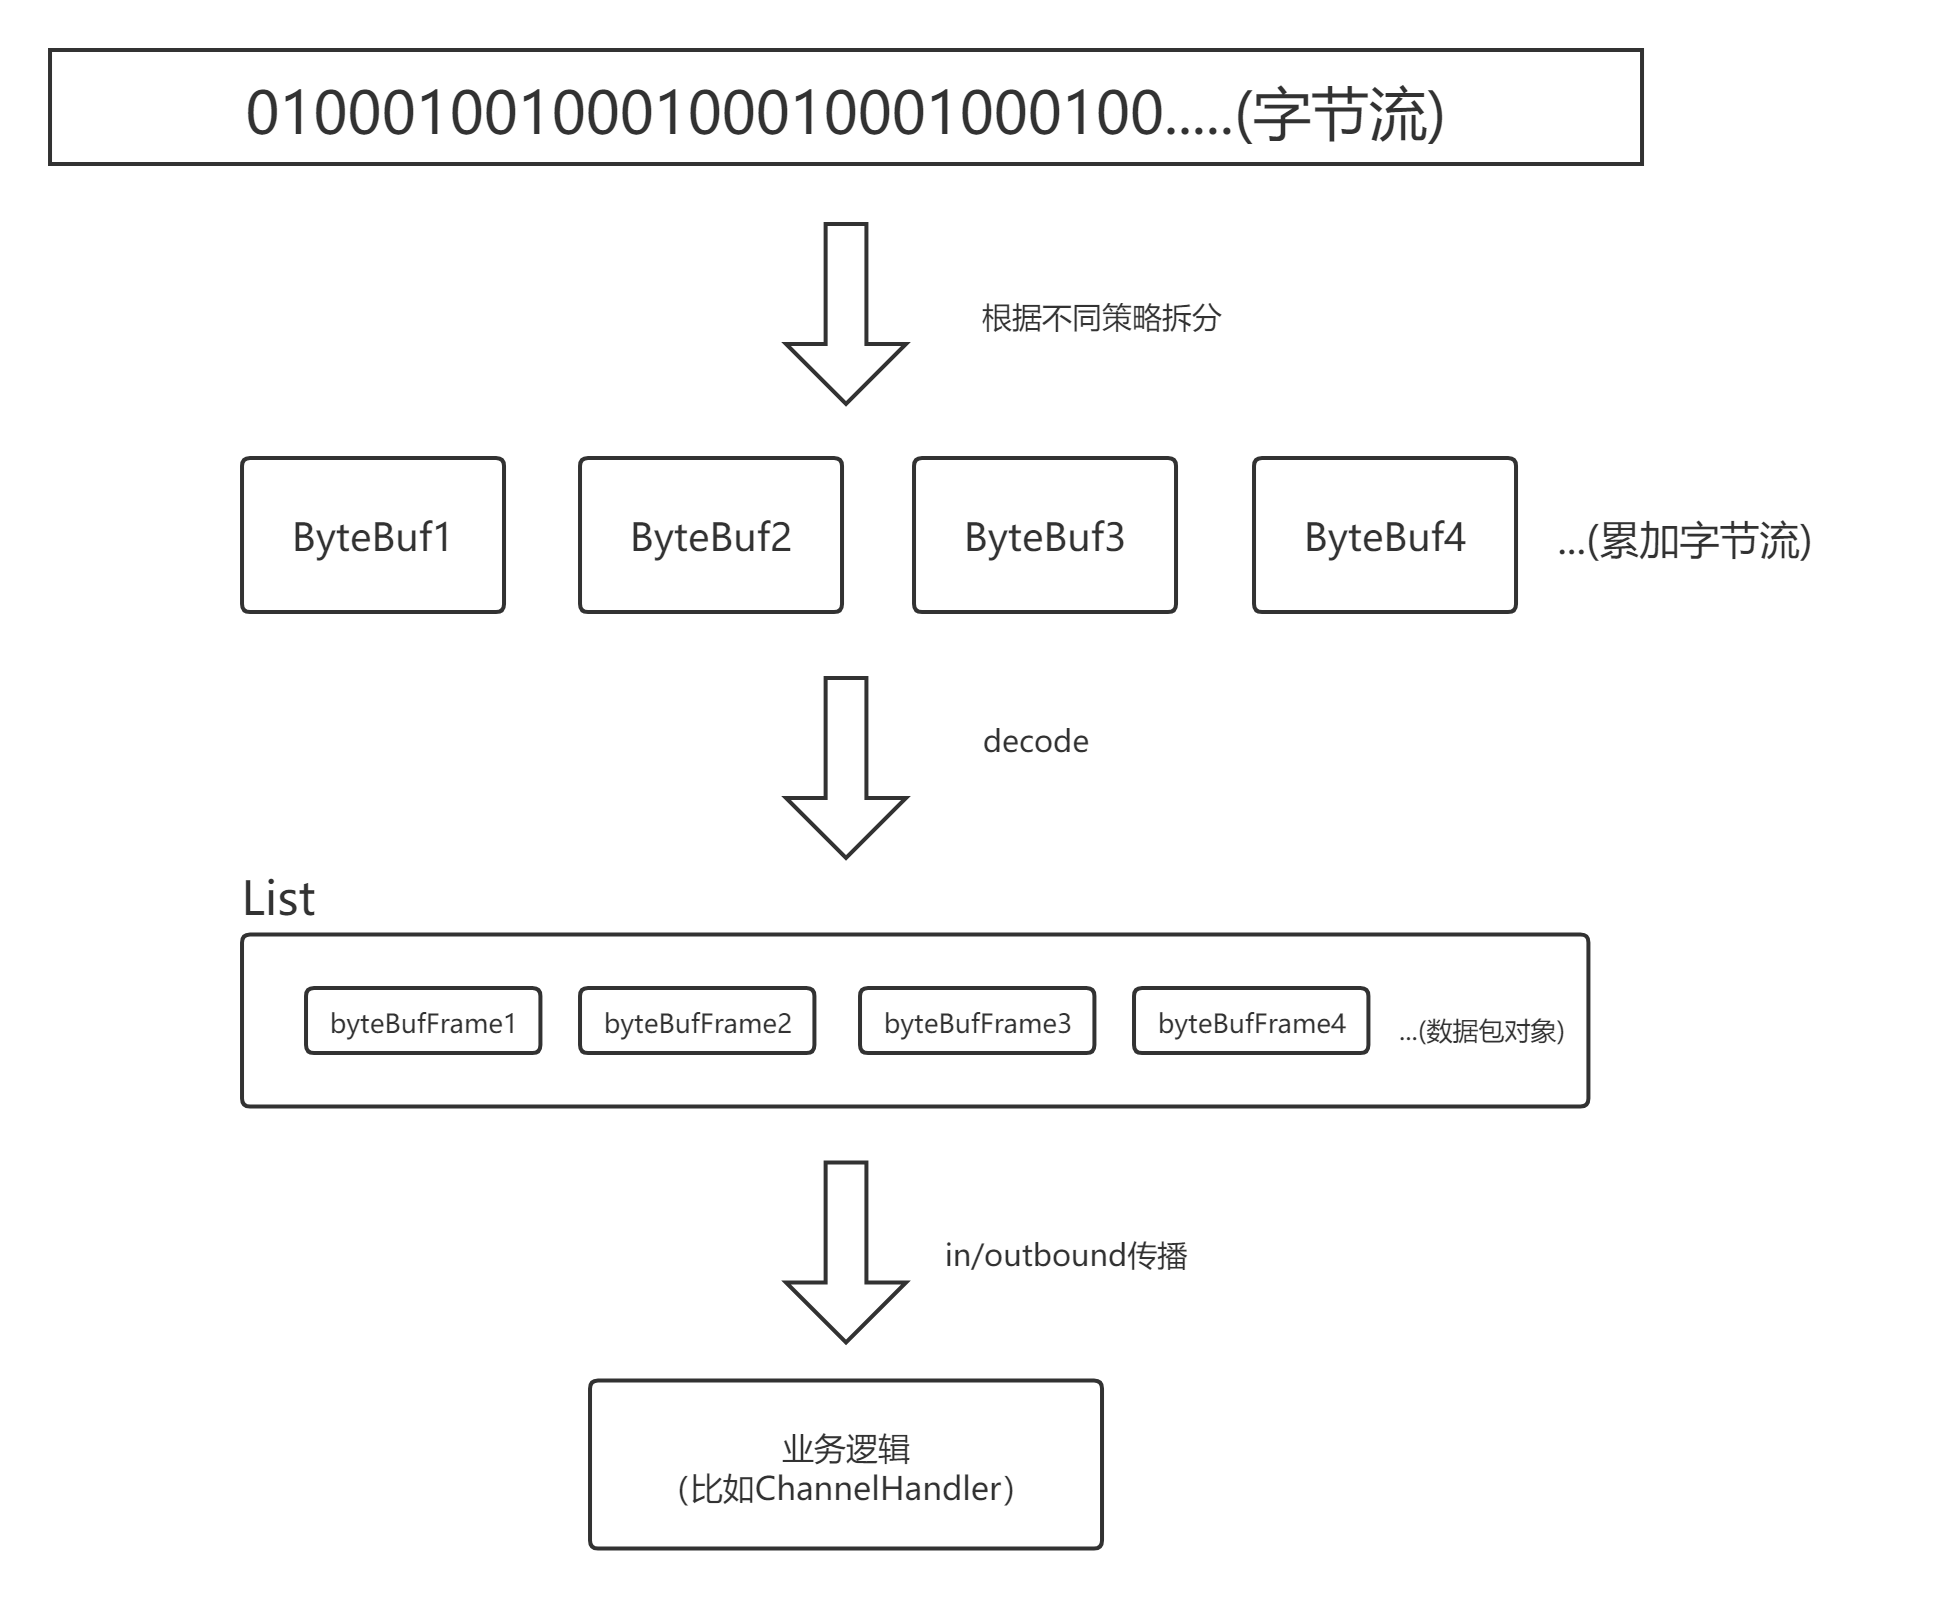
解码的大致流程
画个流程图表示:

ByteToMessageDecoder
ByteToMessageDecoder继承关系、意义
看完上面的流程图,现在来看看Netty的ByteToMessageDecoder是如何体现这一流程的。
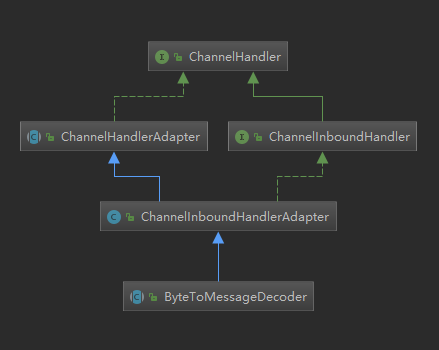
首先看一下ByteToMessageDecoder的继承关系简单预测它能做什么:

- 关于图中的几个类,我在【inbound和oubound事件区别】提到过。
从上面的类图,再结合之前pipeline的学习经历,不难发现,我们其实可以把ByteToMessageDecoder以及它的实现当成ChannelHandler,也就是说解码其实是事件传播、处理中的其中一环。用代码表示就是类似下面这个样子:
    // 略
    .childHandler(new ChannelInitializer<SocketChannel>() {
        @Override
        public void initChannel(SocketChannel ch) {
            ch.pipeline().addLast(new Base64Decoder());
            ch.pipeline().addLast(new FixedLengthFrameDecoder(3));
            ch.pipeline().addLast(new LineBasedFrameDecoder(10, false, false));
       }
知道了ByteToMessageDecoder的继承关系和意义之后,不妨再来看看它的源码是如何体现上面讲到的解码流程的。
解码流程的代码体现
首先,一般都是服务端接受到客户端的数据才会需要解码的,而服务端读数据并传播的方法就是channelRead,所以现在找到ByteToMessageDecoder的channelRead方法,顺便把用到的属性分析下:
此处【坐标1】:
io.netty.handler.codec.ByteToMessageDecoder#channelRead
    @Override
    public void channelRead(ChannelHandlerContext ctx, Object msg) throws Exception {
        if (msg instanceof ByteBuf) {
            // 暂时未知具体作用,根据类文档,当成ArrayList就可以了,或者自己根据类图简单分析下
            // 视频说是存储解析到的对象的list
            CodecOutputList out = CodecOutputList.newInstance();
            try {
                ByteBuf data = (ByteBuf) msg;
                // 判断是否第一次从IO流读取数据
                first = cumulation == null;
                if (first) {
                    // 如果是第一次读取,则累加器直接=data
                    cumulation = data;
                } else {
                    // 否则将当前累加器的数据和新读到的数据进行累加
                    // 下文会继续跟进cumulator,它是累加器实现
                    cumulation = cumulator.cumulate(ctx.alloc(), cumulation, data);
                }
                // 调用子类的decode方法进行解码
                callDecode(ctx, cumulation, out);
            } catch (DecoderException e) {
                throw e;
            } catch (Throwable t) {
                throw new DecoderException(t);
            } finally {
                if (cumulation != null && !cumulation.isReadable()) {
                    // 没东西可读了,释放累加器bytebuf
                    numReads = 0;
                    cumulation.release();
                    cumulation = null;
                } else if (++ numReads >= discardAfterReads) {
                    // We did enough reads already try to discard some bytes so we not risk to see a OOME.
                    // See https://github.com/netty/netty/issues/4275
                    numReads = 0;
                    discardSomeReadBytes();
                }
                // 获取到解析到的对象的数量
                int size = out.size();
                decodeWasNull = !out.insertSinceRecycled();
                // 将解析到的对象向下传播
                fireChannelRead(ctx, out, size);
                // 最终回收out对象至对象池以便于复用对象
                out.recycle();
            }
        }
        // 不是ByteBuf则往下传播
        else {
            ctx.fireChannelRead(msg);
        }
    }
累加字节流
下面再来看看字节流累加器是如何实现的,也就是上面遇到的cumulator.cumulate方法,追到源头看看:
io.netty.handler.codec.ByteToMessageDecoder#MERGE_CUMULATOR
    /**
     * Cumulate {@link ByteBuf}s by merge them into one {@link ByteBuf}'s, using memory copies.
     */
    public static final Cumulator MERGE_CUMULATOR = new Cumulator() {
        @Override
        public ByteBuf cumulate(ByteBufAllocator alloc, ByteBuf cumulation, ByteBuf in) {
            ByteBuf buffer;
            // 这个if其实就是判断cumulation有没有空闲空间写,如果返回true就说明扩容的意思
            // 结构可参考:https://wenjie.store/archives/about-bytebuf-1
            if (cumulation.writerIndex() > cumulation.maxCapacity() - in.readableBytes()
                    || cumulation.refCnt() > 1) {
                // 制造一个更大的ByteBuf就是扩容,并包含cumulation数据,扩容机制有兴趣的可以课后追下
                buffer = expandCumulation(alloc, cumulation, in.readableBytes());
            } else {
                // 不需要扩容
                buffer = cumulation;
            }
            //将in这个bytebuf的数据写进buffer,也就是合并数据
            buffer.writeBytes(in);
            // 回收旧的ByteBuf,前面的博客讲过
            in.release();
            // 返回合并后的对象
            return buffer;
        }
    };
调用子类的decode方法解码
视角转回到【坐标1】的channelRead方法,找到callDecode方法,跟进去看看:
io.netty.handler.codec.ByteToMessageDecoder#callDecode
    protected void callDecode(ChannelHandlerContext ctx, ByteBuf in, List<Object> out) {
        try {
            // 循环遍历累加器
            while (in.isReadable()) {
                int outSize = out.size();
                // 判断list里面是否有对象了,如果有就向下传播(inbound)
                if (outSize > 0) {
                    // 向下传播
                    fireChannelRead(ctx, out, outSize);
                    // 清空list
                    out.clear();

                    // Check if this handler was removed before continuing with decoding.
                    // If it was removed, it is not safe to continue to operate on the buffer.
                    //
                    // See:
                    // - https://github.com/netty/netty/issues/4635
                    if (ctx.isRemoved()) {
                        break;
                    }
                    outSize = 0;
                }

                // 记录当前可读的字节数
                int oldInputLength = in.readableBytes();
                // 调用子类实现的解码器
                decode(ctx, in, out);

                // Check if this handler was removed before continuing the loop.
                // If it was removed, it is not safe to continue to operate on the buffer.
                //
                // See https://github.com/netty/netty/issues/1664
                if (ctx.isRemoved()) {
                    break;
                }

                // 说明可能读到数据了(没有执行上面的clear())
                if (outSize == out.size()) {
                    // 说明并没有从in中读取数据(数据不足以拼装成一个完整的数据包)
                    if (oldInputLength == in.readableBytes()) {
                        // 数据不足退出循环(等待下次合并?)
                        break;
                    } else {
                        // 已经读到数据了,但是还不足以拼装成一个对象,继续读取。
                        continue;
                    }
                }

                // 解析器没有解析字节流,说明没有合适的解析器
                if (oldInputLength == in.readableBytes()) {
                    throw new DecoderException(
                            StringUtil.simpleClassName(getClass()) +
                            ".decode() did not read anything but decoded a message.");
                }

                // 默认为false,表示多次读取。
                if (isSingleDecode()) {
                    break;
                }

                // 能到这里就是解析到一个完整的数据包了
            }
        } catch (DecoderException e) {
            throw e;
        } catch (Throwable cause) {
            throw new DecoderException(cause);
        }
    }
- decode方法在之后会继续跟进。
- 解码成功后,解码出的对象都会在out中,在之后会被继续传播具体的业务逻辑中处理。
以上就是ByteToMessageDecoder解码的抽象过程,了解到它的抽象过程之后,我们不妨马上来热热身,看看Netty中最简单的decode实现:FixedLengthFrameDecoder。
FixedLengthFrameDecoder定长解码
解码流程
FixedLengthFrameDecoder是一种定长解码器,它会将一串字节流按固定长度解码成数据包,画个流程“图”大概就像下面这样:
   假设指定长度为3

   解码前:
   假设下面的是累加器中的字节流,一字母表示一字节
  +---+----+------+-----+
  | A | BC | DEFG | HIJ |
  +---+----+------+-----+

   解码后:
   封装的数据包list
  +-----+-----+-----+
  | ABC | DEF | GHI |
  +-----+-----+-----+
   累加器中剩余的字节
  +---+
  | J |
  +-- +

  由于I后面的数据长度不足3,所以会继续保存在累加器中,
  等待下次和别的数据一起被解码并封装成数据包。
接下来简单看看decode的源码实现。
decode实现
找到FixedLengthFrameDecoder的decode方法:
io.netty.handler.codec.FixedLengthFrameDecoder#decode(io.netty.channel.ChannelHandlerContext, io.netty.buffer.ByteBuf, java.util.List<java.lang.Object>)
    @Override
    protected final void decode(ChannelHandlerContext ctx, ByteBuf in, List<Object> out) throws Exception {
        // 定长解码
        Object decoded = decode(ctx, in);
        if (decoded != null) {
            // 解码出的对象添加到out中,交给ByteToMessageDecoder传播
            out.add(decoded);
        }
    }
继续跟进decode方法:
io.netty.handler.codec.FixedLengthFrameDecoder#decode(io.netty.channel.ChannelHandlerContext, io.netty.buffer.ByteBuf)
     */
    protected Object decode(@SuppressWarnings("UnusedParameters") ChannelHandlerContext ctx, ByteBuf in) throws Exception {
        // 可读字节 < 指定要读取的长度则返回null(等待下次累加)
        if (in.readableBytes() < frameLength) {
            return null;
        } else {
            // 解码长度frameLength字节的对象
            return in.readRetainedSlice(frameLength);
        }
    }
跟进readRetainedSlice方法:
io.netty.buffer.AbstractByteBuf#readRetainedSlice
    @Override
    public ByteBuf readRetainedSlice(int length) {
        // 读取定长数据
        ByteBuf slice = retainedSlice(readerIndex, length);
        // 移动读指针
        readerIndex += length;
        // 返回读取到的数据包
        return slice;
    }
到这里,其实就完成了定长字节的数据包读取,只是我对于这段代码仍然有些疑问,所以就继续追了下去,不敢兴趣的就可以直接跳过下面这一段了。
为什么不在读取定长数据的时候就移动读指针readIndex呢?不是都把readerIndex传进做参数了吗?
为了解答这个问题,需要继续跟进retainedSlice方法:
io.netty.buffer.AbstractByteBuf#retainedSlice(int, int)
    @Override
    public ByteBuf retainedSlice(int index, int length) {
        return slice(index, length).retain();
    }
- retain()方法只是更新一个计数器,无需太过关注。
继续跟进slice方法:
io.netty.buffer.AbstractByteBuf#slice(int, int)
    @Override
    public ByteBuf slice(int index, int length) {
        // 基于现有的ByteBuf创建一个新的ByteBuf
        return new UnpooledSlicedByteBuf(this, index, length);
    }
- 创建一个新的ByteBuf存储读到的数据,新的ByteBuf它仅仅只会维护自己的readIndex和writeIndex,所以上面原始的ByteBuf仍然需要自己更新读指针。
至此,定长解码器的大致逻辑就讲完了,后续会继续记录学习到的几种解码器。