文章目录
前言
在前面的博客,介绍了SpringBoot的初始化器,它可以在刷新上下文之前,做一些初始化工作,如自定义一些上下文属性等。但初始化器只能在刷新上下文之前被回调,假如用户想在系统的其它阶段嵌入自定义操作呢?我们不难想到观察者模式,而SpringBoot的监听器正是利用观察者模式实现了不同阶段的事件传播+事件回调。
SpringBoot Version:2.1.7/2.1.9
温馨提示:在理解SpringBoot的监听器代码逻辑之前,最好先去了解一下设计模式中的观察者模式,因为监听器其实就是对观察者模式的实现,只要理解了观察者模式的逻辑,监听器的回调逻辑理解起来是非常简单的。
实验代码
Java代码
下面给出部分核心测试代码,之后都会围绕实验代码进行断点调试。
TestListenerApplication.java
import org.mybatis.spring.annotation.MapperScan;
import org.springframework.boot.SpringApplication;
import org.springframework.boot.autoconfigure.SpringBootApplication;

@SpringBootApplication
public class Sb2Application {

	public static void main(String[] args) {
		SpringApplication.run(TestListenerApplication.class, args);
	}
}
FirstListener.java
import org.springframework.boot.context.event.ApplicationStartingEvent;
import org.springframework.context.ApplicationListener;
import org.springframework.core.annotation.Order;


/**
 * 关注Starting事件的监听器
 */
@Order(1)
public class FirstListener implements ApplicationListener<ApplicationStartingEvent> {
    @Override
    public void onApplicationEvent(ApplicationStartingEvent event) {
        System.out.println("[myinfo] " + event.toString());
    }
}
SecondListener.java
import org.springframework.boot.context.event.ApplicationPreparedEvent;
import org.springframework.boot.context.event.ApplicationStartedEvent;
import org.springframework.context.ApplicationEvent;
import org.springframework.context.event.SmartApplicationListener;
import org.springframework.core.annotation.Order;

/**
 * 关注Started事件和上下文Prepared事件的监听器
 */
@Order(2)
public class SecondListener implements SmartApplicationListener {
    @Override
    public boolean supportsEventType(Class<? extends ApplicationEvent> eventType) {
        // 设置对两个事件感兴趣
        return ApplicationStartedEvent.class.isAssignableFrom(eventType) || ApplicationPreparedEvent.class.isAssignableFrom(eventType);
    }

    @Override
    public void onApplicationEvent(ApplicationEvent event) {
        System.out.println("[myinfo] " + event.toString());
    }
}
如果你对上面实验代码提到的事件具体处于哪一个阶段感到迷惑,可以参考【SpringBoot启动流程概览(图)】。
配置文件
application.properties
server.port=8080
spring.datasource.username=root
spring.datasource.password=123456
spring.datasource.url=jdbc:mysql://192.168.129.133:3306/test
spring.datasource.driver-class-name=com.mysql.jdbc.Driver
logging.pattern.console=[%thread] %-5level %logger{50} - %msg%n
spring.factories
org.springframework.context.ApplicationListener=com.wenjie.sb2.listener.FirstListener,com.wenjie.sb2.listener.SecondListener
- 如果对这个配置文件感到陌生,可以参考【读取spring.factories】一节。
输出结果
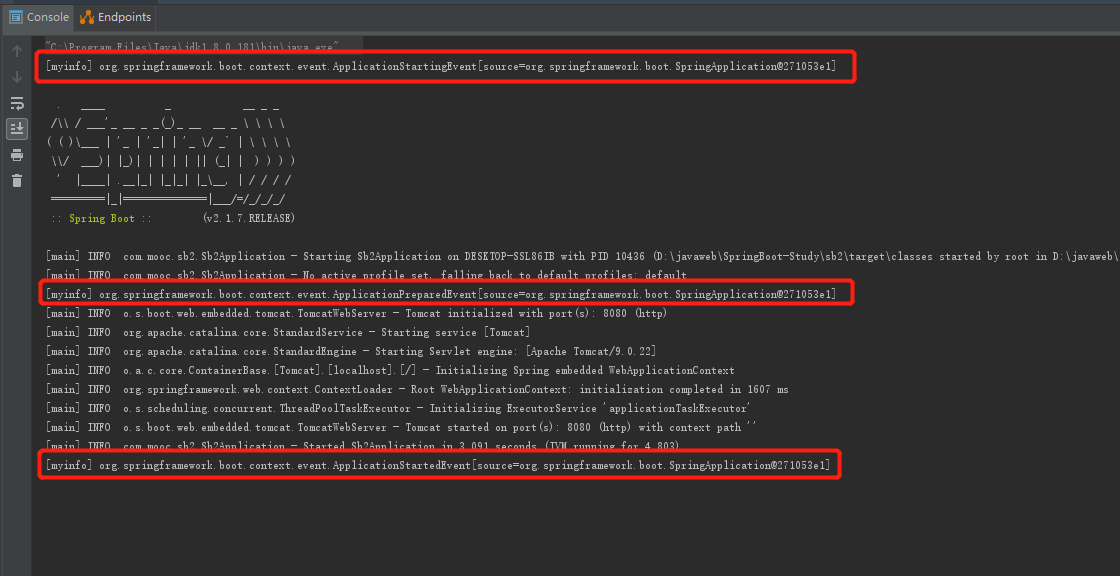
- 可见监听器正常运作了。
跟进源码
构造监听器
找到SpringApplication的构造函数:
org.springframework.boot.SpringApplication#SpringApplication(org.springframework.core.io.ResourceLoader, java.lang.Class<?>...)
	public SpringApplication(ResourceLoader resourceLoader, Class<?>... primarySources) {
		this.resourceLoader = resourceLoader;
		Assert.notNull(primarySources, "PrimarySources must not be null");
		this.primarySources = new LinkedHashSet<>(Arrays.asList(primarySources));
		this.webApplicationType = WebApplicationType.deduceFromClasspath();
		setInitializers((Collection) getSpringFactoriesInstances(ApplicationContextInitializer.class));
		setListeners((Collection) getSpringFactoriesInstances(ApplicationListener.class));
		this.mainApplicationClass = deduceMainApplicationClass();
	}
setListeners((Collection) getSpringFactoriesInstances(ApplicationListener.class));这段就是负责 读取配置文件 -> 构造监听器 -> 缓存监听器 等步骤。
构造Listener的代码从逻辑上和构造初始化器完全一致,想知道构造流程的,可以参考【构造初始化器】,我就不给自己复读了。
事件广播、监听器回调
开始跟进
视角回到实验代码,跟进SpringApplication#run方法:
org.springframework.boot.SpringApplication#run(java.lang.String...)
	public ConfigurableApplicationContext run(String... args) {
		StopWatch stopWatch = new StopWatch();
		stopWatch.start();
		ConfigurableApplicationContext context = null;
		Collection<SpringBootExceptionReporter> exceptionReporters = new ArrayList<>();
		configureHeadlessProperty();
		SpringApplicationRunListeners listeners = getRunListeners(args);
		// 广播staring事件
		listeners.starting();
		...(略)
本章就拿starting事件来分析监听器,学会之后,会发现其它事件的回调机制都换汤不换药的。
跟进starting():
org.springframework.boot.SpringApplicationRunListeners#starting
	public void starting() {
		for (SpringApplicationRunListener listener : this.listeners) {
			listener.starting();
		}
	}
继续跟进starting():
org.springframework.boot.context.event.EventPublishingRunListener#starting
	@Override
	public void starting() {
		this.initialMulticaster.multicastEvent(new ApplicationStartingEvent(this.application, this.args));
	}
- initialMulticaster就是广播器,相信有了解过观察者模式的就不用多说了。
跟进multicastEvent方法:
org.springframework.context.event.SimpleApplicationEventMulticaster#multicastEvent(org.springframework.context.ApplicationEvent)
	@Override
	public void multicastEvent(ApplicationEvent event) {
		multicastEvent(event, resolveDefaultEventType(event));
	}

```resolveDefaultEventType方法就是返回一个增强对象,具体作用可以参考官方文档。


继续跟进multicastEvent方法,此处【坐标1】<span id="tag1"></span>:
`org.springframework.context.event.SimpleApplicationEventMulticaster#multicastEvent(org.springframework.context.ApplicationEvent, org.springframework.core.ResolvableType)`
```java
	@Override
	public void multicastEvent(final ApplicationEvent event, @Nullable ResolvableType eventType) {
		ResolvableType type = (eventType != null ? eventType : resolveDefaultEventType(event));
		Executor executor = getTaskExecutor();
		for (ApplicationListener<?> listener : getApplicationListeners(event, type)) {
			if (executor != null) {
				executor.execute(() -> invokeListener(listener, event));
			}
			else {
				invokeListener(listener, event);
			}
		}
	}
上面代码有两个关键的函数,分别是getApplicationListeners和invokeListener。前者是广播事件,然后将对此事件感兴趣的监听器遍历出来。后者则是拿到遍历出来的监听器,回调监听器的方法,即实验代码覆写的onApplicationEvent。
过滤出对事件感兴趣的监听器集合
跟进getApplicationListeners方法:
org.springframework.context.event.AbstractApplicationEventMulticaster#getApplicationListeners(org.springframework.context.ApplicationEvent, org.springframework.core.ResolvableType)
	protected Collection<ApplicationListener<?>> getApplicationListeners(
			ApplicationEvent event, ResolvableType eventType) {

		Object source = event.getSource();
		Class<?> sourceType = (source != null ? source.getClass() : null);
		ListenerCacheKey cacheKey = new ListenerCacheKey(eventType, sourceType);

		// Quick check for existing entry on ConcurrentHashMap...
		ListenerRetriever retriever = this.retrieverCache.get(cacheKey);
		if (retriever != null) {
			return retriever.getApplicationListeners();
		}

		if (this.beanClassLoader == null ||
				(ClassUtils.isCacheSafe(event.getClass(), this.beanClassLoader) &&
						(sourceType == null || ClassUtils.isCacheSafe(sourceType, this.beanClassLoader)))) {
			// Fully synchronized building and caching of a ListenerRetriever
			synchronized (this.retrievalMutex) {
				retriever = this.retrieverCache.get(cacheKey);
				if (retriever != null) {
					return retriever.getApplicationListeners();
				}
				retriever = new ListenerRetriever(true);
				// 实验代码会来到这里
				Collection<ApplicationListener<?>> listeners =
						retrieveApplicationListeners(eventType, sourceType, retriever);
				this.retrieverCache.put(cacheKey, retriever);
				return listeners;
			}
		}
		else {
			// No ListenerRetriever caching -> no synchronization necessary
			return retrieveApplicationListeners(eventType, sourceType, null);
		}
	}
- 跟初始化器类似,也会先从缓存下手。
上面代码中最核心的就是retrieveApplicationListeners方法,跟进它:
``
		List<ApplicationListener<?>> allListeners = new ArrayList<>();
		Set<ApplicationListener<?>> listeners;
		Set<String> listenerBeans;
		synchronized (this.retrievalMutex) {
			// 获取到前面构造、注册的Listener集合
			listeners = new LinkedHashSet<>(this.defaultRetriever.applicationListeners);
			listenerBeans = new LinkedHashSet<>(this.defaultRetriever.applicationListenerBeans);
		}
		// 遍历监听器,将对此事件感兴趣的监听器添加到allListeners集合中
		for (ApplicationListener<?> listener : listeners) {
			if (supportsEvent(listener, eventType, sourceType)) {
				if (retriever != null) {
					retriever.applicationListeners.add(listener);
				}
				allListeners.add(listener);
			}
		}
		...(略,遍历listenerBeans ,做的事跟上面这段代码是一样的)
                return allListeners;
跟进supportsEvent方法:
org.springframework.context.event.AbstractApplicationEventMulticaster#supportsEvent(org.springframework.context.ApplicationListener<?>, org.springframework.core.ResolvableType, java.lang.Class<?>)
	protected boolean supportsEvent(
			ApplicationListener<?> listener, ResolvableType eventType, @Nullable Class<?> sourceType) {

		GenericApplicationListener smartListener = (listener instanceof GenericApplicationListener ?
				(GenericApplicationListener) listener : new GenericApplicationListenerAdapter(listener));
		// 判断当前监听器是否对事件感兴趣
		return (smartListener.supportsEventType(eventType) && smartListener.supportsSourceType(sourceType));
	}
- 上面代码会判断当前Listener是否实现了GenericApplicationListener。
拿实验代码的两个Listener作例子,它们都没有实现GenericApplicationListener,我们跟进GenericApplicationListenerAdapter构造:
org.springframework.context.event.GenericApplicationListenerAdapter#GenericApplicationListenerAdapter
	public GenericApplicationListenerAdapter(ApplicationListener<?> delegate) {
		Assert.notNull(delegate, "Delegate listener must not be null");
		// 代理对象
		this.delegate = (ApplicationListener<ApplicationEvent>) delegate;
		// 获取到监听器感兴趣的事件
		this.declaredEventType = resolveDeclaredEventType(this.delegate);
	}
跟进resolveDeclaredEventType方法:
org.springframework.context.event.GenericApplicationListenerAdapter#resolveDeclaredEventType(org.springframework.context.ApplicationListener<org.springframework.context.ApplicationEvent>)
	private static ResolvableType resolveDeclaredEventType(ApplicationListener<ApplicationEvent> listener) {
                // 调用spring封装的工具类获取监听器设置的泛型
                // 比如FirstListener的ApplicationStartingEvent
		// SecondListener则是获取到父接口设置的ApplicationEvent,之后再回调supportsEventType方法判断是否是感兴趣的事件
		ResolvableType declaredEventType = resolveDeclaredEventType(listener.getClass());
		if (declaredEventType == null || declaredEventType.isAssignableFrom(ApplicationEvent.class)) {
			Class<?> targetClass = AopUtils.getTargetClass(listener);
			if (targetClass != listener.getClass()) {
				declaredEventType = resolveDeclaredEventType(targetClass);
			}
		}
		return declaredEventType;
	}
返回后,回到GenericApplicationListenerAdapter的构造方法,直接来看看返回结果:

- 可见就是拿到了我们设置的ApplicationStartingEvent
当遍历到SecondListener时,同样会进入GenericApplicationListenerAdapter构造,来看看它的declaredEventType时什么:

- 同样是拿到了设置的ApplicationEvent

拿到关注的事件类型后,返回到supportsEvent方法,我们继续跟进supportsEventType方法,这份方法就是负责"过滤":
org.springframework.context.event.GenericApplicationListenerAdapter#supportsEventType(org.springframework.core.ResolvableType)
	@Override
	@SuppressWarnings("unchecked")
	public boolean supportsEventType(ResolvableType eventType) {
		// 判断是否实现了SmartApplicationListener
		// 实验代码SecondListener实现了此接口
		if (this.delegate instanceof SmartApplicationListener) {
			Class<? extends ApplicationEvent> eventClass = (Class<? extends ApplicationEvent>) eventType.resolve();
                        // 回调SecondListener覆写的supportsEventType方法判断是否是当前监听器感兴趣的事件
			return (eventClass != null && ((SmartApplicationListener) this.delegate).supportsEventType(eventClass));
		}
		// 实验代码FirstListener就会进入这里,判断该事件是否是监听器感兴趣的事件。
		else {
			return (this.declaredEventType == null || this.declaredEventType.isAssignableFrom(eventType));
		}
	}
如果事件与监听器匹配成功,那么在retrieveApplicationListeners方法中,就会将该监听器保存到allListeners集合中,然后返回。
整个过滤的流程可以画成以下流程图:

比如对于ApplicationStartingEvent,最终就会返回如下监听器:
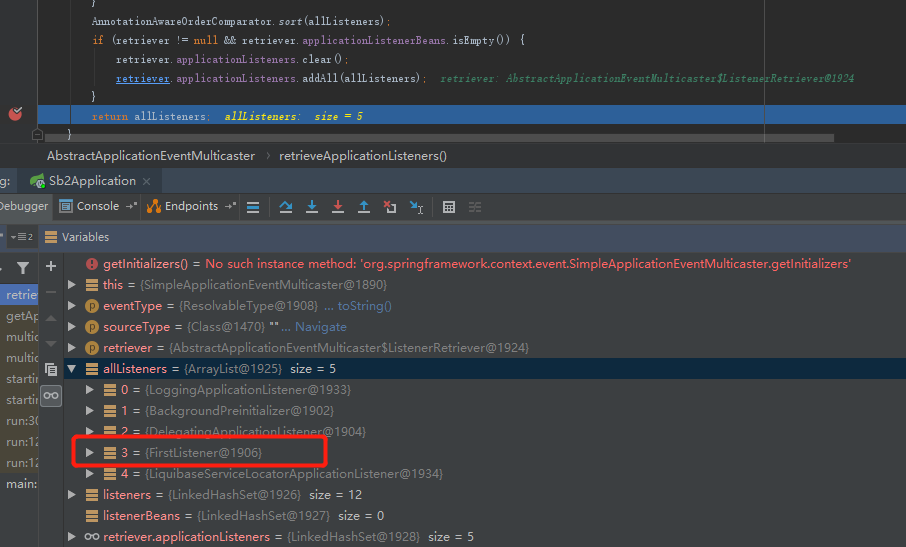
再之后就是缓存集合等操作了。
回调监听器方法
好了,上面的代码已经完成了过滤出对事件感兴趣的监听器集合,接下来就是要拿这个集合遍历回调了。
上面的代码最终会返回到multicastEvent方法,为了方便(代码也很短),这里重新贴一遍:
org.springframework.context.event.SimpleApplicationEventMulticaster#multicastEvent(org.springframework.context.ApplicationEvent, org.springframework.core.ResolvableType)
	@Override
	public void multicastEvent(final ApplicationEvent event, @Nullable ResolvableType eventType) {
		ResolvableType type = (eventType != null ? eventType : resolveDefaultEventType(event));
		Executor executor = getTaskExecutor();
		for (ApplicationListener<?> listener : getApplicationListeners(event, type)) {
			if (executor != null) {
				executor.execute(() -> invokeListener(listener, event));
			}
			else {
				invokeListener(listener, event);
			}
		}
	}
从getApplicationListeners方法出来,我们往下走,跟进invokeListener方法:
org.springframework.context.event.SimpleApplicationEventMulticaster#invokeListener
	protected void invokeListener(ApplicationListener<?> listener, ApplicationEvent event) {
		ErrorHandler errorHandler = getErrorHandler();
		// 因为我们没有设置errorHandler,所以errorHandler为null
		if (errorHandler != null) {
			try {
				doInvokeListener(listener, event);
			}
			catch (Throwable err) {
				errorHandler.handleError(err);
			}
		}
		else {
			// 实验代码会进入这里
			doInvokeListener(listener, event);
		}
	}
跟进doInvokeListener方法,到这里一切都明朗了:
``
	private void doInvokeListener(ApplicationListener listener, ApplicationEvent event) {
		try {
			// 回调FirstListener、SecondListener覆写的onApplicationEvent方法。
			// 其它监听器也会回调到对应覆写的代码。
			listener.onApplicationEvent(event);
		}
                catch(ClassCastException ex){...(略)}
至此,从监听器初始化 -> 过滤对事件感兴趣的监听器集合 -> 遍历回调
监听器 的过程就结束了。至于回调的方法具体做什么,这就根据不同监听器而不同了。
扩展
SpringBoot的监听器其实也有三种设置方式,跟初始化器的三种神似,下面就列举除实验代码外的另外两种方式:
- application.properties中配置
context.initializer.classes=com.wenjie.sb2.initializer.ThirdInitializer
- 启动函数中配置
		SpringApplication springApplication = new SpringApplication(Sb2Application.class);
		springApplication.addListeners(new SecondListener());
		springApplication.run(args);
想知道加载原理,请参考【初始化器分析】这一篇。监听器加载的代码逻辑是一样的。
小结
- 用户想自定义监听器有两种方式:实现ApplicationListener、实现SmartApplicationListener。
- 如果采用实现ApplicationListener这种方式,则只能监听一个事件,如implements ApplicationListener
就是监听ApplicationStartingEvent事件。 - 如果采用实现SmartApplicationListener这种方式,则能通过覆写其supportsEventType方法达到多事件匹配。