回顾
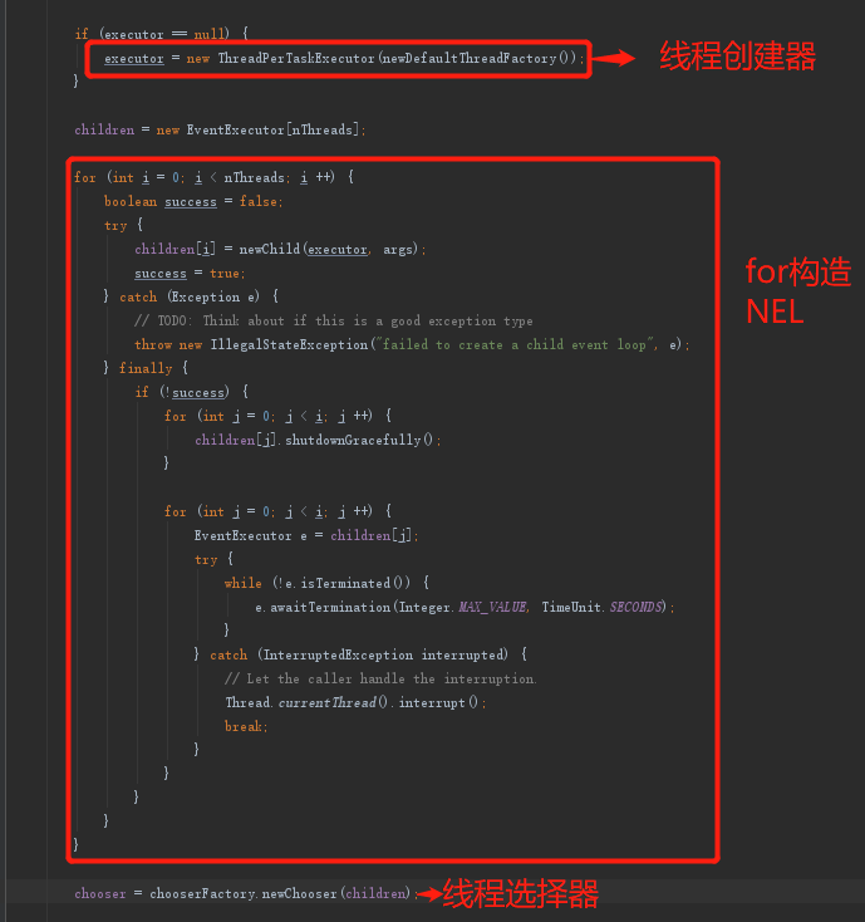
在上一小节大致了解了ThreadPerTaskExcutor的创建流程及作用,但是这仅仅只是构建出一个执行器而已,还未真正使用到,因为在使用前,我们还需要构建NioEventLoop,而本节讲的newChild方法,就是干这个事的。
同样,为了方便懒人,我再把坐标贴一下,忘记的可以看第一节:

此处【坐标1】

- for循环里面就有newChild方法。
- newChild方法就是生成NioEventLoop并将其保存到一个数组里面。
Netty Version: 4.1.6
newChild的大致流程
- newChild
- new NioEventLoop
- 保存前面创建的ThreadPerTaskExcutor
- 创建MpscQueue(任务队列)
- 创建selector
- new NioEventLoop
跟进newChilld方法
从上面的【路标1】找到newChild方法跟进去(实现类:NioEventLoopGroup):
io.netty.channel.nio.NioEventLoopGroup#newChild
    protected EventLoop newChild(Executor executor, Object... args) throws Exception {
        return new NioEventLoop(this, executor, (SelectorProvider) args[0],
            ((SelectStrategyFactory) args[1]).newSelectStrategy(), (RejectedExecutionHandler) args[2]);
    }
- 可以发现就是new NioEventLoop
跟进NioEventLoop的构造函数,此处【坐标2】:
io.netty.channel.nio.NioEventLoop#NioEventLoop
    NioEventLoop(NioEventLoopGroup parent, Executor executor, SelectorProvider selectorProvider,
                 SelectStrategy strategy, RejectedExecutionHandler rejectedExecutionHandler) {
        super(parent, executor, false, DEFAULT_MAX_PENDING_TASKS, rejectedExecutionHandler);
        if (selectorProvider == null) {
            throw new NullPointerException("selectorProvider");
        }
        if (strategy == null) {
            throw new NullPointerException("selectStrategy");
        }
        provider = selectorProvider;
        selector = openSelector();
        selectStrategy = strategy;
    }
- 此处就创建了selector,并且可以看出,每个NioEventLoop都绑定着一个selector,并且这个selector就是由provider生产的。
以下是跟进selector的优化,知道可跳到下面的【坐标3】
这里我们先不跟进super,看看openSelector方法,由于代码比较长,下面分段说明:
io.netty.channel.nio.NioEventLoop#openSelector
selector = provider.openSelector();
- 调用jdk的api创建一个selector
        if (DISABLE_KEYSET_OPTIMIZATION) {
            return selector;
        }
- 如果参数为false,则代表需要优化selector(将hashset发射变数组),否则直接返回。
final SelectedSelectionKeySet selectedKeySet = new SelectedSelectionKeySet();
上面的SelectedSelectionKeySet就是优化的数据结构,不妨跟进构造函数看看:
基本属性
    SelectionKey[] keys;
    int size;
- 不难看出,其实这个"set"底层其实就是我们熟知的数组,用来保存selectionKey(selectedKeys)。
- 注意以上是4.1.42版本的代码,如果是4.1.6则是双数组,实现稍微复杂一些,但原理差不多。
添加元素(version:4.1.42)
    public boolean add(SelectionKey o) {
        if (o == null) {
            return false;
        }

        keys[size++] = o;
        if (size == keys.length) {
            increaseCapacity();
        }

        return true;
    }
- 这里插入元素的时间复杂度是O(1),比HashSet要快。
数组扩容(version)
    private void increaseCapacity() {
        SelectionKey[] newKeys = new SelectionKey[keys.length << 1];
        System.arraycopy(keys, 0, newKeys, 0, size);
        keys = newKeys;
    }
- 每次扩充为原来的两倍
其实优化成数组,最主要的目的就是为了降低操作的时间复杂度。此处【坐标3】
通过反射获取selector的Class对象
        Object maybeSelectorImplClass = AccessController.doPrivileged(new PrivilegedAction<Object>() {
            @Override
            public Object run() {
                try {
                    return Class.forName(
                            "sun.nio.ch.SelectorImpl",
                            false,
                            PlatformDependent.getSystemClassLoader());
                } catch (ClassNotFoundException e) {
                    return e;
                } catch (SecurityException e) {
                    return e;
                }
            }
        });
关于上面这段代码,我们可以继续跟进SelectorImpl,发现如下代码:
protected Set<SelectionKey> selectedKeys = new HashSet();
- 这里就证明了,在Netty通过反射优化前,selectedKeys的数据结构就是HashSet。
看看如何通过反射替换
final SelectedSelectionKeySet selectedKeySet = new SelectedSelectionKeySet();

// ...中间的获取、校验、方法体过程略。

                    Field selectedKeysField = selectorImplClass.getDeclaredField("selectedKeys");
                    Field publicSelectedKeysField = selectorImplClass.getDeclaredField("publicSelectedKeys");

                    selectedKeysField.setAccessible(true);
                    publicSelectedKeysField.setAccessible(true);

                    selectedKeysField.set(selector, selectedKeySet);
                    publicSelectedKeysField.set(selector, selectedKeySet);
- 从上面的反射代码,就是将原来selectedKeys的HashSet替换成SelectedSelectionKeySet
现在我们回到【坐标2】的方法,进入super,此处【坐标3】:
io.netty.channel.SingleThreadEventLoop#SingleThreadEventLoop(EventLoopGroup, Executor, boolean, int, RejectedExecutionHandler)
    protected SingleThreadEventLoop(EventLoopGroup parent, Executor executor,
                                    boolean addTaskWakesUp, int maxPendingTasks,
                                    RejectedExecutionHandler rejectedExecutionHandler) {
        super(parent, executor, addTaskWakesUp, maxPendingTasks, rejectedExecutionHandler);
        tailTasks = newTaskQueue(maxPendingTasks);
    }
- 这里的newTaskQueue进入super也能看到。
先进入super:
    protected SingleThreadEventExecutor(EventExecutorGroup parent, Executor executor,
                                        boolean addTaskWakesUp, int maxPendingTasks,
                                        RejectedExecutionHandler rejectedHandler) {
        super(parent);
        this.addTaskWakesUp = addTaskWakesUp;
        this.maxPendingTasks = Math.max(16, maxPendingTasks);
        this.executor = ObjectUtil.checkNotNull(executor, "executor");
        taskQueue = newTaskQueue(this.maxPendingTasks);
        rejectedExecutionHandler = ObjectUtil.checkNotNull(rejectedHandler, "rejectedHandler");
    }
- 可以看见这里就保存了executor,在
io.netty.util.concurrent.SingleThreadEventExecutor#doStartThread中会用到。 - 这里也创建了mpsc队列,下面就会降到。
进入newTaskQueue方法(实现类:NioEventLoop):
io.netty.channel.nio.NioEventLoop#newTaskQueue
    protected Queue<Runnable> newTaskQueue(int maxPendingTasks) {
        // This event loop never calls takeTask()
        return PlatformDependent.newMpscQueue(maxPendingTasks);
    }
- 这里就调用了jdk的api去创建MpscQueue,我打了断点,最终返回的是MpscChunkedArrayQueue。
关于mpscQueue,全称是multiple producers (different threads) and a single consumer (one thread!),详细的就先不深究,文档给出的已知信息是:mpscQueue对于【多生产者-单消费者】的模式是线程安全的,且这里的主要作用是存储任务队列。
小结
- newChild其实就是在创建NioEventLoop。
- 而在创建NioEventLoop时,每个NioEventLoopGroup中的NioEventLoop都会保存同一个ThreadPerTaskExcutor。
- 每个NioEventLoop在构造过程中,也会创建对应的selector和mpscQueue。
- 每个NioEventLoop都对应一个selector。
- newChild的mpscQueue,文档说在特定(当前)情况下是线程安全的,且队列是jdk提供的,Netty没有进一步封装。
- 每个selector中都有selectorKeys,默认是HashSet存储selectionKeys,但是默认情况下被Netty替换成数组实现了,好处是降低操作元素的复杂度。
最后再补充一个有点套娃的东西:我们知道一个selector中保存着多个selectedKey,但其实selectedKey保存着selector、channel(被保存为类型Object,属性名attachment)、事件集等。
上面的听上去类似于"互相保存",有点绕,我在网上找到依据不错的话便于理解:selectionKey,可以看做selector与channel之间的桥梁。