前言
- 上一次玩最终幻想7已经是PSP的时代了(记得破解版到某个动画就固定卡死),只知道后面出了个重制版
- 不过这并不妨碍我们尝试去复现它,本篇文章依旧是看完油管的教程之后写的,因为不重新过一遍总感觉左耳进右耳出(
- 顺便说下,这次锁定敌人的效果其实跟《崩坏:星穹铁道》挺像的
PS:关于shader(写过一篇)、粒子系统、Cinemachine等基础在本文不会涉及
效果预览
先前用gif感觉不是很好,这次全换成视频了(点击播放才会加载)
简约线条版(当前编写)
极致色彩版(模仿对象)
环境同步
InputManager设置
- 原教程中【鼠标左键】能起到与【回车】相同的效果,如果要同步的话,就要在在InputManager中加入如下配置:
  - serializedVersion: 3
    m_Name: Submit
    descriptiveName:
    descriptiveNegativeName:
    negativeButton:
    positiveButton: enter
    altNegativeButton:
    altPositiveButton: mouse 0
    gravity: 1000
    dead: 0.001
    sensitivity: 1000
    snap: 0
    invert: 0
    type: 0
    axis: 0
    joyNum: 0
- 配置后效果如下:

自定义EventSystem输入模块
- 核心就是让WASD方向键变更UI选择对象+鼠标按键处理,如果现在还不理解则玩一次项目就知道了,代码如下(看起来很长,但覆写的内容不多):
MyInputModule.cs
using System;
using UnityEngine.Serialization;

/// <summary>
/// 自定义的输入模块,核心是方向键变更UI选择,还有鼠标按键处理
/// </summary>
namespace UnityEngine.EventSystems
{
    [AddComponentMenu("Event/Standalone Input Module")]
    public class MyInputModule : PointerInputModule
    {
        private float m_PrevActionTime;
        Vector2 m_LastMoveVector;
        int m_ConsecutiveMoveCount = 0;

        private Vector2 m_LastMousePosition;
        private Vector2 m_MousePosition;

        protected MyInputModule()
        { }

        [SerializeField]
        private string m_HorizontalAxis = "Horizontal";

        [SerializeField]
        private string m_VerticalAxis = "Vertical";

        [SerializeField]
        private string m_SubmitButton = "Submit";

        [SerializeField]
        private string m_CancelButton = "Cancel";

        [SerializeField]
        private float m_InputActionsPerSecond = 10;

        [SerializeField]
        private float m_RepeatDelay = 0.5f;

        [SerializeField]
        [FormerlySerializedAs("m_AllowActivationOnMobileDevice")]
        private bool m_ForceModuleActive;

        [Obsolete("allowActivationOnMobileDevice has been deprecated. Use forceModuleActive instead (UnityUpgradable) -> forceModuleActive")]
        public bool allowActivationOnMobileDevice
        {
            get { return m_ForceModuleActive; }
            set { m_ForceModuleActive = value; }
        }

        public bool forceModuleActive
        {
            get { return m_ForceModuleActive; }
            set { m_ForceModuleActive = value; }
        }

        public float inputActionsPerSecond
        {
            get { return m_InputActionsPerSecond; }
            set { m_InputActionsPerSecond = value; }
        }

        public float repeatDelay
        {
            get { return m_RepeatDelay; }
            set { m_RepeatDelay = value; }
        }

        public string horizontalAxis
        {
            get { return m_HorizontalAxis; }
            set { m_HorizontalAxis = value; }
        }

        public string verticalAxis
        {
            get { return m_VerticalAxis; }
            set { m_VerticalAxis = value; }
        }

        public string submitButton
        {
            get { return m_SubmitButton; }
            set { m_SubmitButton = value; }
        }

        public string cancelButton
        {
            get { return m_CancelButton; }
            set { m_CancelButton = value; }
        }

        /// <summary>
        /// 接受和更新鼠标位置
        /// </summary>
        public override void UpdateModule()
        {
            m_LastMousePosition = m_MousePosition;
            m_MousePosition = Input.mousePosition;
        }

        public override bool IsModuleSupported()
        {
            return m_ForceModuleActive || Input.mousePresent;
        }

        /// <summary>
        /// 判定模块是否激活
        /// </summary>
        /// <returns></returns>
        public override bool ShouldActivateModule()
        {
            if (!base.ShouldActivateModule())
                return false;

            var shouldActivate = m_ForceModuleActive;
            Input.GetButtonDown(m_SubmitButton);
            // 下列条件只要满足任意一个就激活
            shouldActivate |= Input.GetButtonDown(m_CancelButton);
            shouldActivate |= !Mathf.Approximately(Input.GetAxisRaw(m_HorizontalAxis), 0.0f);
            shouldActivate |= !Mathf.Approximately(Input.GetAxisRaw(m_VerticalAxis), 0.0f);
            shouldActivate |= (m_MousePosition - m_LastMousePosition).sqrMagnitude > 0.0f;
            shouldActivate |= Input.GetMouseButtonDown(0);
            return shouldActivate;
        }

        /// <summary>
        /// 处理激活模块事件
        /// </summary>
        public override void ActivateModule()
        {
            base.ActivateModule();
            m_MousePosition = Input.mousePosition;
            m_LastMousePosition = Input.mousePosition;

            var toSelect = eventSystem.currentSelectedGameObject;
            if (toSelect == null)
                toSelect = eventSystem.firstSelectedGameObject;

            eventSystem.SetSelectedGameObject(toSelect, GetBaseEventData());
        }

        /// <summary>
        /// 处理禁用模块事件
        /// </summary>
        public override void DeactivateModule()
        {
            base.DeactivateModule();
            ClearSelection();
        }

        /// <summary>
        /// 在每一帧,处理当前选中的对象和所有的鼠标事件(Process方法)。
        /// </summary>
        public override void Process()
        {
            // 发送事件并判断事件是否被使用
            bool usedEvent = SendUpdateEventToSelectedObject();

            // EventSystem是否允许导航事件(这里的导航不是指地图移动的导航,而是指按键,如移动、提交、取消)
            if (eventSystem.sendNavigationEvents)
            {
                // 如果事件没有被使用,则换一种方式发送
                if (!usedEvent)
                    usedEvent |= SendMoveEventToSelectedObject();

                // 换成发送Submit事件
                if (!usedEvent)
                    SendSubmitEventToSelectedObject();
            }

            ProcessMouseEvent();
        }

        /// <summary>
        /// 发送Submit/Cancel事件到选中对象
        /// </summary>
        protected bool SendSubmitEventToSelectedObject()
        {
            if (eventSystem.currentSelectedGameObject == null)
                return false;

            var data = GetBaseEventData();
            if (Input.GetButtonDown(m_SubmitButton))
                ExecuteEvents.Execute(eventSystem.currentSelectedGameObject, data, ExecuteEvents.submitHandler);

            if (Input.GetButtonDown(m_CancelButton))
                ExecuteEvents.Execute(eventSystem.currentSelectedGameObject, data, ExecuteEvents.cancelHandler);
            return data.used;
        }

        private Vector2 GetRawMoveVector()
        {
            // 根据用户输入来获取向量
            Vector2 move = Vector2.zero;
            move.x = Input.GetAxisRaw(m_HorizontalAxis);
            move.y = Input.GetAxisRaw(m_VerticalAxis);
            // 区间锁定在 -1 ~ 1 之间
            if (Input.GetButtonDown(m_HorizontalAxis))
            {
                if (move.x < 0)
                    move.x = -1f;
                if (move.x > 0)
                    move.x = 1f;
            }
            if (Input.GetButtonDown(m_VerticalAxis))
            {
                if (move.y < 0)
                    move.y = -1f;
                if (move.y > 0)
                    move.y = 1f;
            }
            return move;
        }

        /// <summary>
        /// 发送移动事件到当前选定的对象
        /// </summary>
        protected bool SendMoveEventToSelectedObject()
        {
            // 算是小小关键点之一,获取的是未经过缩放的时间(选择技能出现UI的时候是事件缩放的状态)
            float time = Time.unscaledTime;

            // 根据输入获取向量,如果判断向量都接近与0
            Vector2 movement = GetRawMoveVector();
            // Approximately的作用是判断浮点数是否近似相等
            if (Mathf.Approximately(movement.x, 0f) && Mathf.Approximately(movement.y, 0f))
            {
                // 如果向量都近似为0,则认为没有发生移送,返回
                m_ConsecutiveMoveCount = 0;
                return false;
            }

            // If user pressed key again, always allow event
            // 是否有按下方向键,有则允许发送移动事件
            bool allow = Input.GetButtonDown(m_HorizontalAxis) || Input.GetButtonDown(m_VerticalAxis);
            // movement默认值为0,等此函数执行后才会赋值
            bool similarDir = (Vector2.Dot(movement, m_LastMoveVector) > 0);
            // 如果我们没有按下按键
            if (!allow)
            {
                // 如果上一次按键的向量与当前按键的向量点击>0,则表示两次方向相同
                // 补充:角度<90点积就>0,=90°时点积为0
                if (similarDir && m_ConsecutiveMoveCount == 1)
                    allow = (time > m_PrevActionTime + m_RepeatDelay);
                // 如果两次按下的方向差距>90°(视为不是一个方向),那就看两次按下的时间差,足够大也允许
                else
                    allow = (time > m_PrevActionTime + 1f / m_InputActionsPerSecond);
            }
            // 如果不允许发送移动事件,则返回false
            if (!allow)
                return false;

            // 创建轴向数据
            var axisEventData = GetAxisEventData(movement.x, movement.y, 0.6f);
            // 在当前选中的游戏对象上执行移动处理程序
            ExecuteEvents.Execute(eventSystem.currentSelectedGameObject, axisEventData, ExecuteEvents.moveHandler);
            // 如果两次按下的方向改变了,则重置移动计数器
            if (!similarDir)
                m_ConsecutiveMoveCount = 0;
            // 移动计数器+1
            m_ConsecutiveMoveCount++;
            // 记录当前函数开始时的未缩放事件
            m_PrevActionTime = time;
            // 记录当前的按键的向量
            m_LastMoveVector = movement;
            return axisEventData.used;
        }

        protected void ProcessMouseEvent()
        {
            // 0是鼠标设备的id,这里填了0应该就适配单个鼠标的情况,表示第1个鼠标设备
            ProcessMouseEvent(0);
        }

        /// <summary>
        /// Process all mouse events.
        /// </summary>
        protected void ProcessMouseEvent(int id)
        {
            // id是鼠标的序列号,0表示系统的第1个鼠标
            var mouseData = GetMousePointerEventData(id);
            // 获取鼠标左键的数据
            var leftButtonData = mouseData.GetButtonState(PointerEventData.InputButton.Left).eventData;

            // Process the first mouse button fully
            // 处理鼠标左键的数据
            ProcessMousePress(leftButtonData); // 左键按压处理(非内置函数)
            ProcessMove(leftButtonData.buttonData); // 左键移动处理(内置函数)
            ProcessDrag(leftButtonData.buttonData); // 左键拖拽处理(内置函数)

            // Now process right / middle clicks
            // 处理鼠标中、右键
            ProcessMousePress(mouseData.GetButtonState(PointerEventData.InputButton.Right).eventData); // 右键按压处理
            ProcessDrag(mouseData.GetButtonState(PointerEventData.InputButton.Right).eventData.buttonData); // 右键拖拽处理
            ProcessMousePress(mouseData.GetButtonState(PointerEventData.InputButton.Middle).eventData); // 中键按压处理
            ProcessDrag(mouseData.GetButtonState(PointerEventData.InputButton.Middle).eventData.buttonData); // 中键拖拽处理

            // 判断鼠标滚轮是否有滑动
            if (!Mathf.Approximately(leftButtonData.buttonData.scrollDelta.sqrMagnitude, 0.0f))
            {
                // 搜索处理滚轮事件的组件
                var scrollHandler = ExecuteEvents.GetEventHandler<IScrollHandler>(leftButtonData.buttonData.pointerCurrentRaycast.gameObject);
                // 执行滚轮事件
                ExecuteEvents.ExecuteHierarchy(scrollHandler, leftButtonData.buttonData, ExecuteEvents.scrollHandler);
            }
        }

        /// <summary>
        /// 像选中的对象发送更新事件
        /// </summary>
        /// <returns>事件是否被使用</returns>
        protected bool SendUpdateEventToSelectedObject()
        {
            // 判断是否有当前选中对象
            if (eventSystem.currentSelectedGameObject == null)
                return false;

            // BaseEventData  基础事件数据 ----事件数据的基类和EventSystem配合使用.
            // PointerEventData  指针事件数据 ----鼠标与触摸事件的相关数据.点击,抬起,拖动等.(大部分事件数据类型都是该类型的)
            // AxisEventData 轴向事件数据----手柄和键盘中控制轴向相关的事件数据.(参考InputManager的设置)
            var data = GetBaseEventData();
            // ExecuteEvents.updateSelectedHandler就是事件的回调函数
            ExecuteEvents.Execute(eventSystem.currentSelectedGameObject, data, ExecuteEvents.updateSelectedHandler);
            // 如果事件被成功处理则used为true,否则为False
            return data.used;
        }

        /// <summary>
        /// Process the current mouse press.
        /// 处理鼠标按下事件
        /// </summary>
        protected void ProcessMousePress(MouseButtonEventData data)
        {
            // 获取鼠标事件
            var pointerEvent = data.buttonData;
            // 获取鼠标当前指着的对象
            var currentOverGo = pointerEvent.pointerCurrentRaycast.gameObject;

            // 如果当前帧是鼠标按下的帧
            if (data.PressedThisFrame())
            {
                // 修改鼠标事件的属性
                pointerEvent.eligibleForClick = true;
                pointerEvent.delta = Vector2.zero;
                pointerEvent.dragging = false;
                pointerEvent.useDragThreshold = true;
                pointerEvent.pressPosition = pointerEvent.position;
                pointerEvent.pointerPressRaycast = pointerEvent.pointerCurrentRaycast;

                // 发送鼠标按压事件
                var newPressed = ExecuteEvents.ExecuteHierarchy(currentOverGo, pointerEvent, ExecuteEvents.pointerDownHandler);

                // 如果没有处理函数,则查找鼠标点击处理函数
                if (newPressed == null)
                    newPressed = ExecuteEvents.GetEventHandler<IPointerClickHandler>(currentOverGo);

                // 获取未缩放的事件
                float time = Time.unscaledTime;

                // 判断当前处理函数和之前的处理函数是否相同
                // 然后记录鼠标的点击次数、时间等
                if (newPressed == pointerEvent.lastPress)
                {
                    var diffTime = time - pointerEvent.clickTime;
                    if (diffTime < 0.3f)
                        ++pointerEvent.clickCount;
                    else
                        pointerEvent.clickCount = 1;

                    pointerEvent.clickTime = time;
                }
                else
                {
                    pointerEvent.clickCount = 1;
                }

                pointerEvent.pointerPress = newPressed;
                pointerEvent.rawPointerPress = currentOverGo;

                pointerEvent.clickTime = time;

                // 查找并记录拖拽处理函数
                pointerEvent.pointerDrag = ExecuteEvents.GetEventHandler<IDragHandler>(currentOverGo);

                // 如果存在则执行对应的初始化拖拽函数
                if (pointerEvent.pointerDrag != null)
                    ExecuteEvents.Execute(pointerEvent.pointerDrag, pointerEvent, ExecuteEvents.initializePotentialDrag);
            }

            // 松开按键的帧
            if (data.ReleasedThisFrame())
            {
                // 执行鼠标释放的函数
                ExecuteEvents.Execute(pointerEvent.pointerPress, pointerEvent, ExecuteEvents.pointerUpHandler);

                // 获取按键释放的Handler
                var pointerUpHandler = ExecuteEvents.GetEventHandler<IPointerClickHandler>(currentOverGo);

                // PointerClick and Drop events
                // 如果跟鼠标按下时的Handler是同一个,则执行点击函数
                if (pointerEvent.pointerPress == pointerUpHandler && pointerEvent.eligibleForClick)
                {
                    ExecuteEvents.Execute(pointerEvent.pointerPress, pointerEvent, ExecuteEvents.pointerClickHandler);
                }
                // 否则执行拖拽函数
                else if (pointerEvent.pointerDrag != null && pointerEvent.dragging)
                {
                    ExecuteEvents.ExecuteHierarchy(currentOverGo, pointerEvent, ExecuteEvents.dropHandler);
                }

                pointerEvent.eligibleForClick = false;
                pointerEvent.pointerPress = null;
                pointerEvent.rawPointerPress = null;

                // 结束拖拽函数
                if (pointerEvent.pointerDrag != null && pointerEvent.dragging)
                    ExecuteEvents.Execute(pointerEvent.pointerDrag, pointerEvent, ExecuteEvents.endDragHandler);

                pointerEvent.dragging = false;
                pointerEvent.pointerDrag = null;

                // 如果鼠标按下和释放指向的对象不是同一个,那就替换成currentOverGo
                if (currentOverGo != pointerEvent.pointerEnter)
                {
                    // 这行代码将会触发最后一次指针进入的游戏对象上的 IPointerExitHandler 事件,表示指针已经离开了这个游戏对象。
                    HandlePointerExitAndEnter(pointerEvent, null);
                    // 这行代码将会触发当前指针所在的游戏对象上的 IPointerEnterHandler 事件,表示指针已经进入了这个新的游戏对象。
                    HandlePointerExitAndEnter(pointerEvent, currentOverGo);
                    // 简单来说,就是让最后一次鼠标选中按钮取消选中,然后让新的按钮选中
                }
            }
        }
    }
}
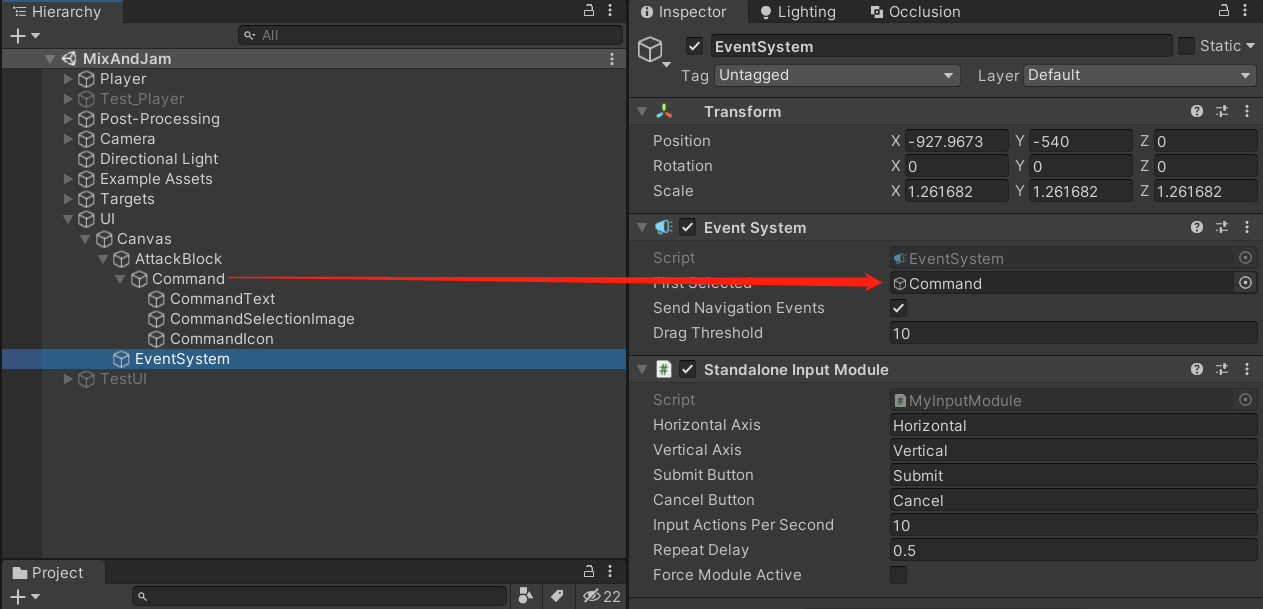
- 上述代码写完后挂载到EventSystem中并设置如下参数(都是默认就不用设置了):
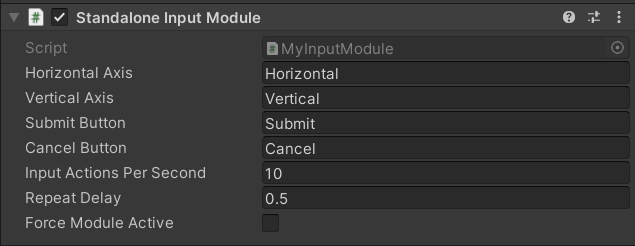
- 如果没有上述代码,你会发现自己重新写一次后,会无法切换UI的选择对象。
逐步实现
- 在基础环境+移动脚本(属于每个项目必备了,不再说明)后,我们就应该能操控主角了,如下所示:
- 为了能让画面更清楚,我去掉了动态模糊的后处理效果(个人无论玩什么游戏都不开这个,也许是眼睛问题)
主角平A
- 这一段逻辑很简单,只要监听左键按下,然后播放攻击动画即可,
TacticalModeScript_Clone.cs代码如下:
using UnityEngine;
using UnityEngine.Events;

public class TacticalModeScript_Clone : MonoBehaviour
{

    public bool usingAbility; // 是否技能施放中
    private Animator anim; // 主角动画

    // Start is called before the first frame update
    void Start()
    {
        anim = GetComponent<Animator>();
    }

    // Update is called once per frame
    void Update()
    {
        // 鼠标左键播放攻击动画
        if ((Input.GetMouseButtonDown(0)))
        {
                anim.SetTrigger("slash");
        }
    }
}
- 当前效果如下:
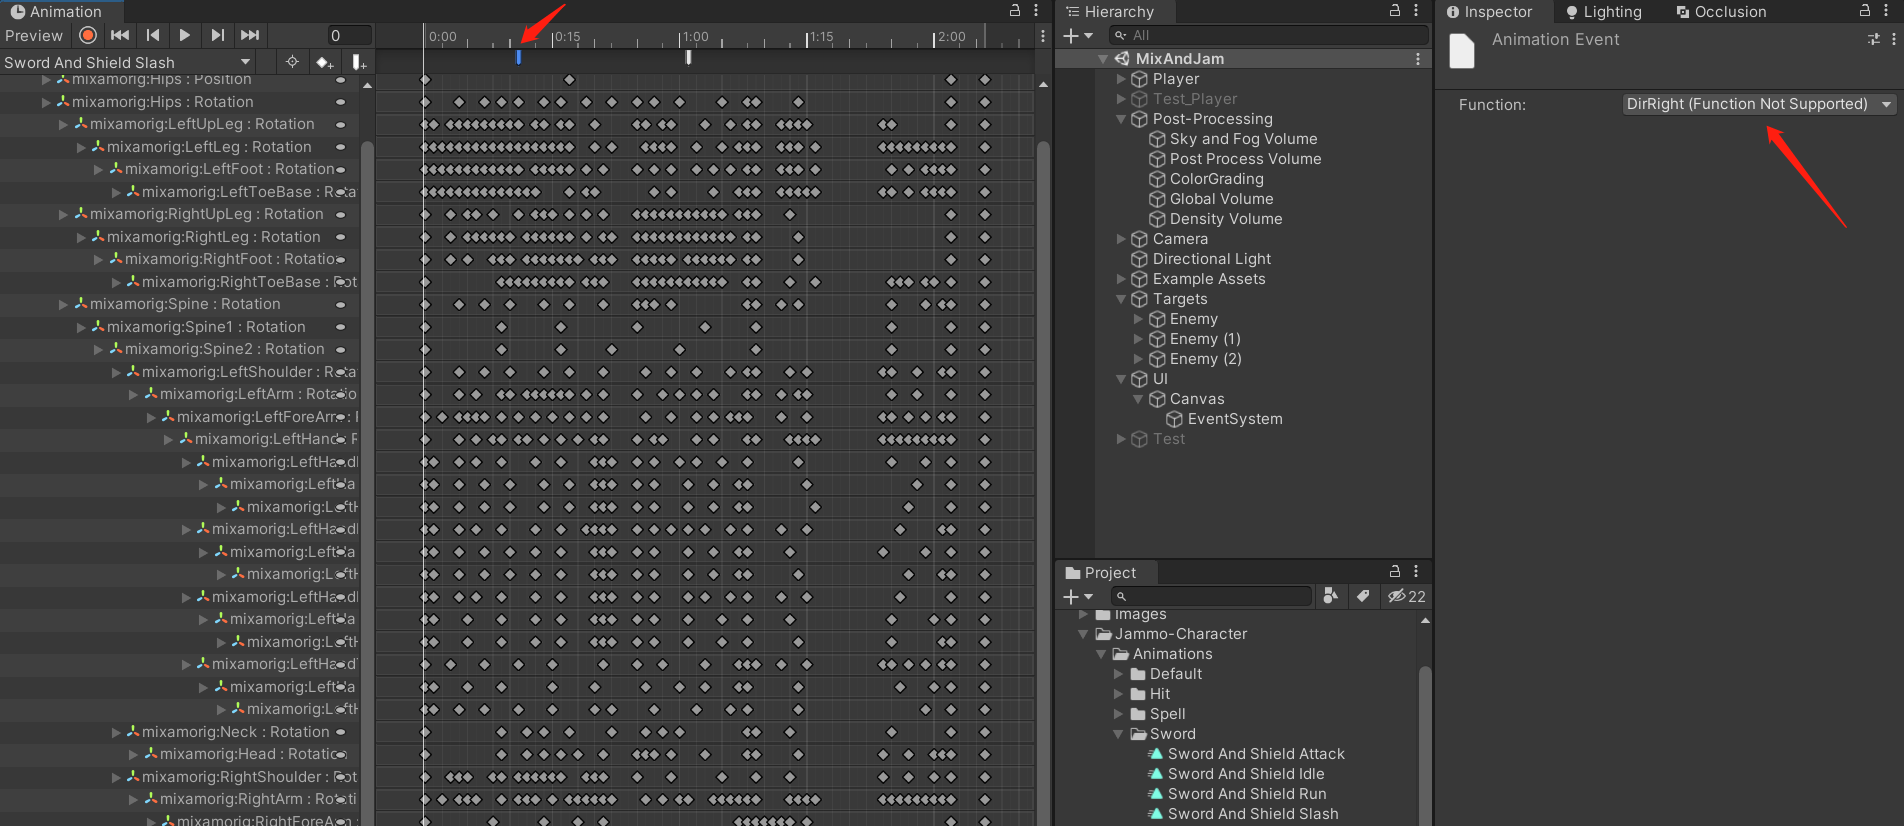
- 顺便补充一点,如果你直接拿工程的模型来运行上述代码,可能会出现如下报错:
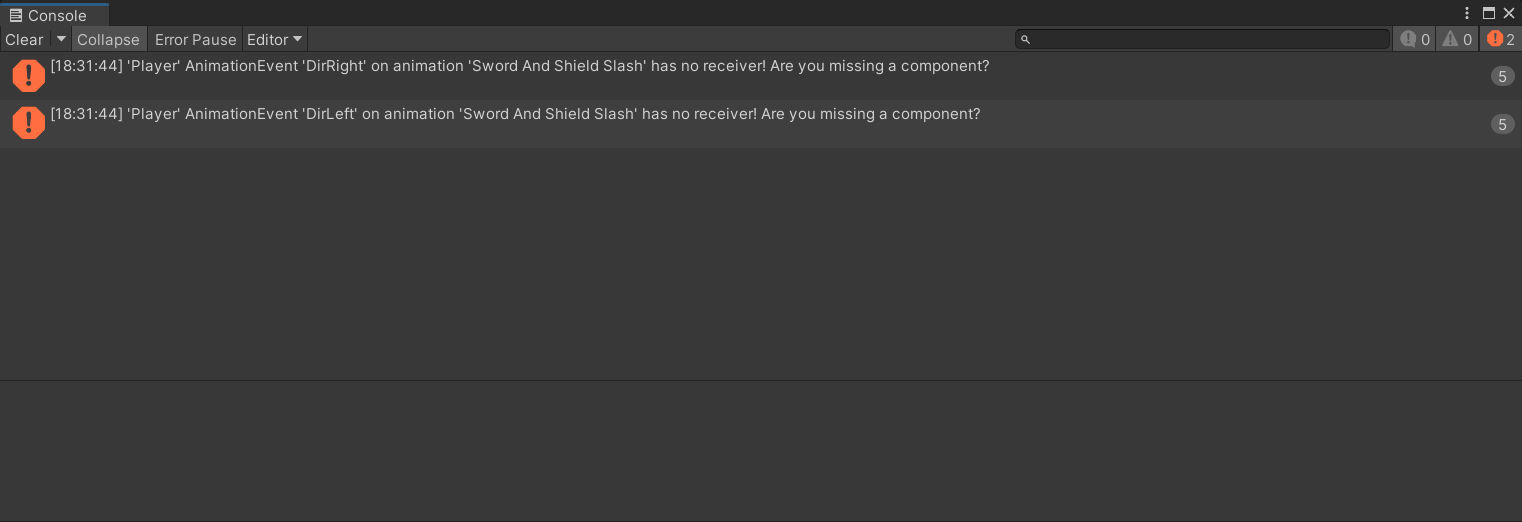
- 这是正常的,因为模型自带的动画中会调用这两个函数,我们暂时不需要管它,后续会补上:
保存敌人List
- 与上次瞬移斩利用摄像机可见回调添加敌人不同,这次使用的Sphere Colider,当敌人进入Sphere Colider是添加到List,离开时删除(也许是这样做可以限定索敌范围)
- 首先我们要添加一个适当大小的Sphere Colider:
TacticalModeScript_Clone.cs中添加如下代码:
    [Header("在Sphere Colider中的敌人")]
    public List<Transform> targets;

        private void OnTriggerEnter(Collider other)
    {
        if (other.CompareTag("Enemy")) // 敌人的Tag设置成Enemy
        {
            targets.Add(other.transform);
        }
    }

    private void OnTriggerExit(Collider other)
    {// 敌人的Tag设置成Enemy
        if (other.CompareTag("Enemy"))
        {
            if (targets.Contains(other.transform))
                targets.Remove(other.transform);
        }
    }
- 运行后,可以看到右侧敌人List正常运作,当敌人在圈圈范围外时删除,进入圈圈范围内时添加:

敌人受击
- 敌人受击则是用Box Colider触发实现,原教程的Box Colider由动画控制,这点在我看来是有点奇怪的,不过也先用着吧:
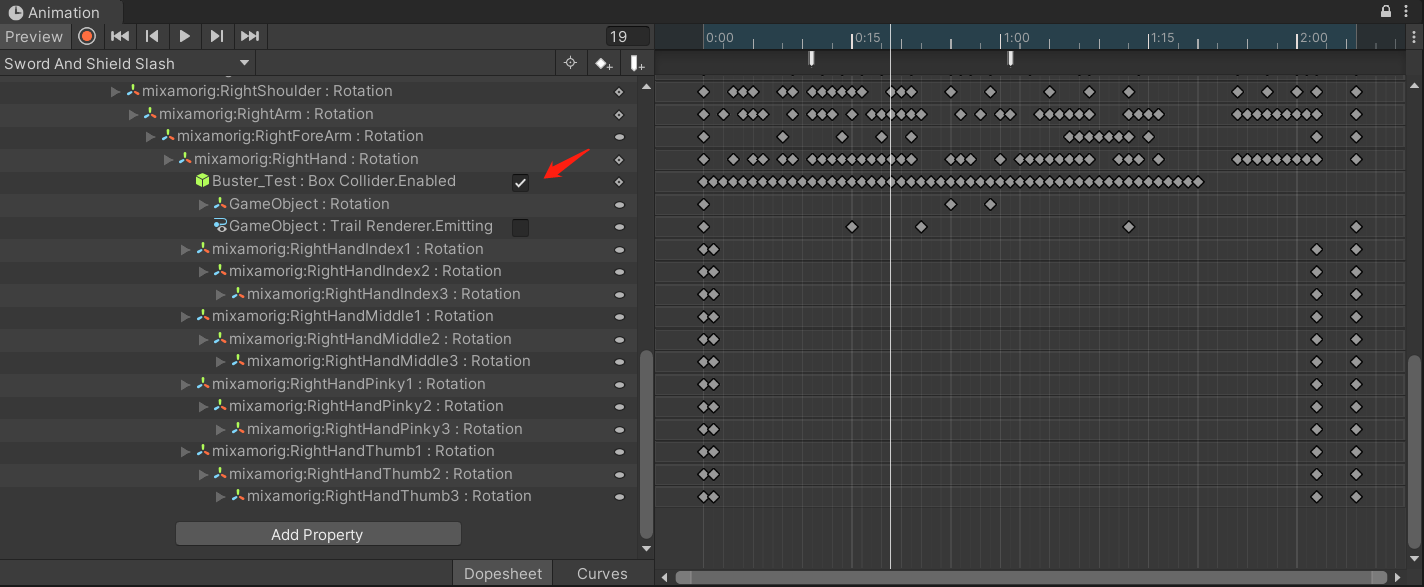
- 接下来就是编写武器Box Colider触发逻辑,这里用到发布/订阅模型,敌人的受击处理实际上还是转移到
TacticalModeScript_Clone中处理了,该脚本挂载到武器模型中:
using System.Collections;
using System.Collections.Generic;
using UnityEngine;
using UnityEngine.Events;

[System.Serializable] public class CollisionEvent : UnityEvent<Transform> { }

public class WeaponCollision : MonoBehaviour
{

    public CollisionEvent onHit;

    private void OnTriggerEnter(Collider other)
    {
        if (other.CompareTag("Enemy"))
        {
            // 广播事件
            onHit.Invoke(other.transform);
        }
    }
}
- 再就是敌人受击的逻辑,包含受击动画和眼睛变化,该脚本挂载到敌人身上:
using System.Collections;
using System.Collections.Generic;
using UnityEngine;

public class EnemyScript : MonoBehaviour
{
    private Animator anim;
    public Renderer eyesRenderer;

    private void Start()
    {
        anim = GetComponent<Animator>();
    }

    /// <summary>
    /// 这里时由TacticalModeScript_Clone调用的
    /// </summary>
    public void GetHit()
    {
        anim.SetTrigger("hit"); // 敌人受击动画
        StopCoroutine(EyeHitSprite());
        StartCoroutine(EyeHitSprite());
    }

    /// <summary>
    /// 受击时的眼睛动画
    /// </summary>
    IEnumerator EyeHitSprite()
    {
        eyesRenderer.material.SetTextureOffset("_BaseColorMap", new Vector2(0, -.33f));
        yield return new WaitForSeconds(.8f);
        eyesRenderer.material.SetTextureOffset("_BaseColorMap", new Vector2(.66f, 0));
    }
}
- 之后就是在
TacticalModeScript_Clone中监听敌人受击事件了,并调用先前写的GetHit函数:
    public WeaponCollision weapon; // 挂载了Box Colider和WeaponCollision的武器模型

    void Start()
    {
        anim = GetComponent<Animator>();
        weapon.onHit.AddListener((target) => HitTarget(target));
    }

    public void HitTarget(Transform x)
    {
        // 敌人受击动画
        if (x.GetComponent<EnemyScript>() != null)
        {
            x.GetComponent<EnemyScript>().GetHit();
        }
    }
- 把武器模型挂载到TacticalModeScript_Clone后,即可看到如下效果:
Unity版本迁移的动画bug
- 上面看着的表现看着很正常,但如果把代码从2019.4.40f1c1迁移到2020或以上的LTS版本(21、22都试过了),就会产生以下的神奇现象(攻击完后武器的Box Colider依旧是激活状态):
- 这可不是代码写出的BUG,原版的完整工程也有这个问题,如下视频所示:
- 这个问题我是不知道Unity官方到底做了什么改动,但大致原因能推测得出来,我们可以先看看动画状态机的变化如何:
- 可以看到上面的攻击状态其实播放时不完全的,那么大概率是收剑的时候过渡时间给得太长了,我们试着改小一点,让动画不要进入到第二段横斩打开Box Colider的状态:
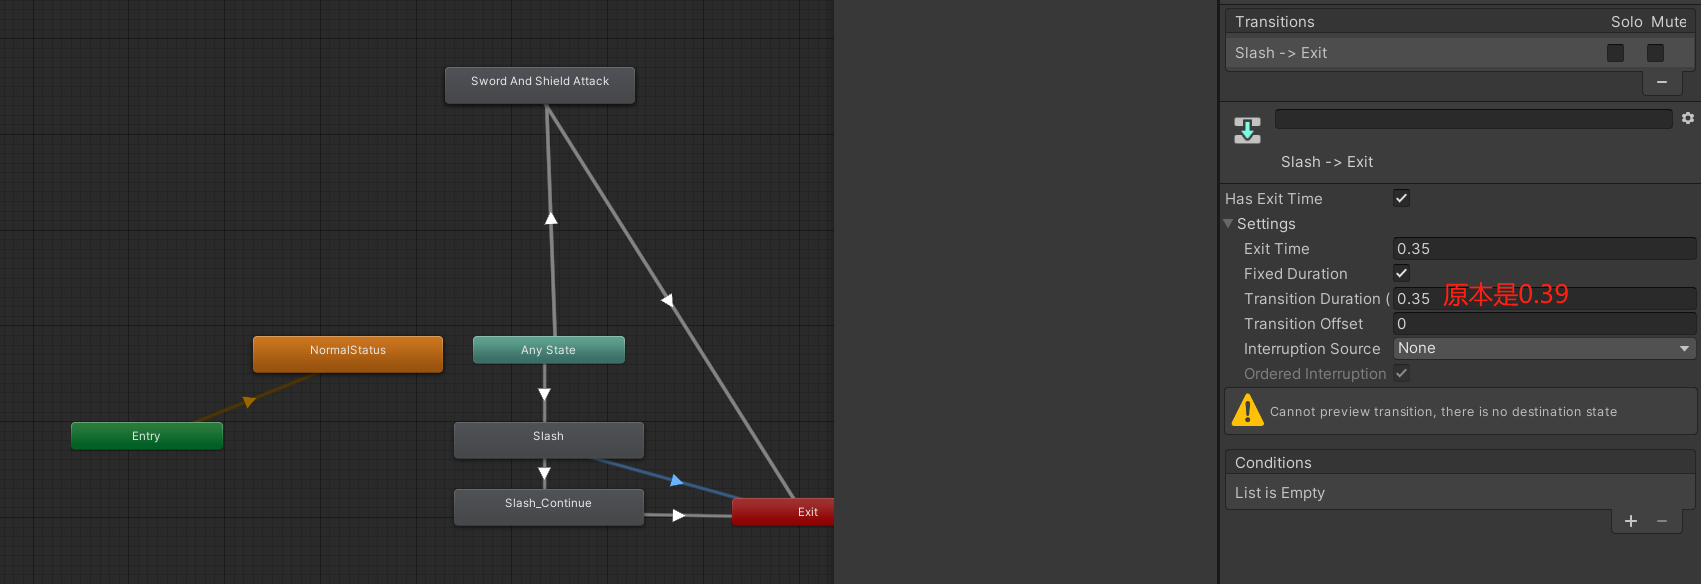
- 虽然没办法debug看看到底是不是这样,不过修改之后问题没有再出现了,应该是没猜错的吧.jpg
- 当然,你也可以尝试其它方式修复,比如动画播放时通过脚本计算帧间隔时间决定打开/关闭的时机
击打特效
- 这部分没啥好说的,只是不像上一篇瞬移斩的粒子使用的是原生的粒子系统,这次换成了VFX实现,把VFX看作一个更高级的粒子系统的ok了
- 首先我们在
TacticalModeScript_Clone中编写控制攻击火花播放+摄像机震动的函数,前面动画缺少的DirRight和DirLeft函数也在这里补上了,实际上就是调整粒子角度而已;最后在HitTarget()中调用即可:
    [Space]
    [Header("VFX")]
    public VisualEffect sparkVFX; // 击中火花特效
    public float VFXDir = 5; // 用来控制火花左右飘的参数
    private CinemachineImpulseSource camImpulseSource;// 控制镜头物理效果的

    void Start()
    {
        // 略....
        camImpulseSource = Camera.main.GetComponent<CinemachineImpulseSource>();
    }

    // 略......
    /// <summary>
    /// 播放VFX特效
    /// </summary>
    /// <param name="visualEffect">VFX对象</param>
    /// <param name="shakeCamera">是否震动相机</param>
    /// <param name="shakeAmplitude">震动幅度(强度)</param>
    /// <param name="shakeFrequency">震动频率</param>
    /// <param name="shakeSustain">震动持续时间</param>
    public void PlayVFX(VisualEffect visualEffect, bool shakeCamera, float shakeAmplitude = 2, float shakeFrequency = 2, float shakeSustain = .2f)
    {
        if(visualEffect == sparkVFX)
            visualEffect.SetFloat("PosX", VFXDir);
        // 开始播放特效
        visualEffect.SendEvent("OnPlay");

        // 震动幅度
        camImpulseSource.m_ImpulseDefinition.m_AmplitudeGain = shakeAmplitude;
        // 震动频率
        camImpulseSource.m_ImpulseDefinition.m_FrequencyGain = shakeFrequency;
        // 持续时间
        camImpulseSource.m_ImpulseDefinition.m_TimeEnvelope.m_SustainTime = shakeSustain;

        // 摄像机震动
        if (shakeCamera)
            camImpulseSource.GenerateImpulse();
    }

    public void DirRight()
    {
        VFXDir = -5;
    }

    public void DirLeft()
    {
        VFXDir = 5;
    }

    public void HitTarget(Transform x)
    {
        // 播放火花特效
        PlayVFX(sparkVFX, true);
        // 略......
    }
- 当前效果如下:
- 看起来已经很ok了,但还有个小小的缺陷,那就是火花明明都飞出来了,但地上却没有光:
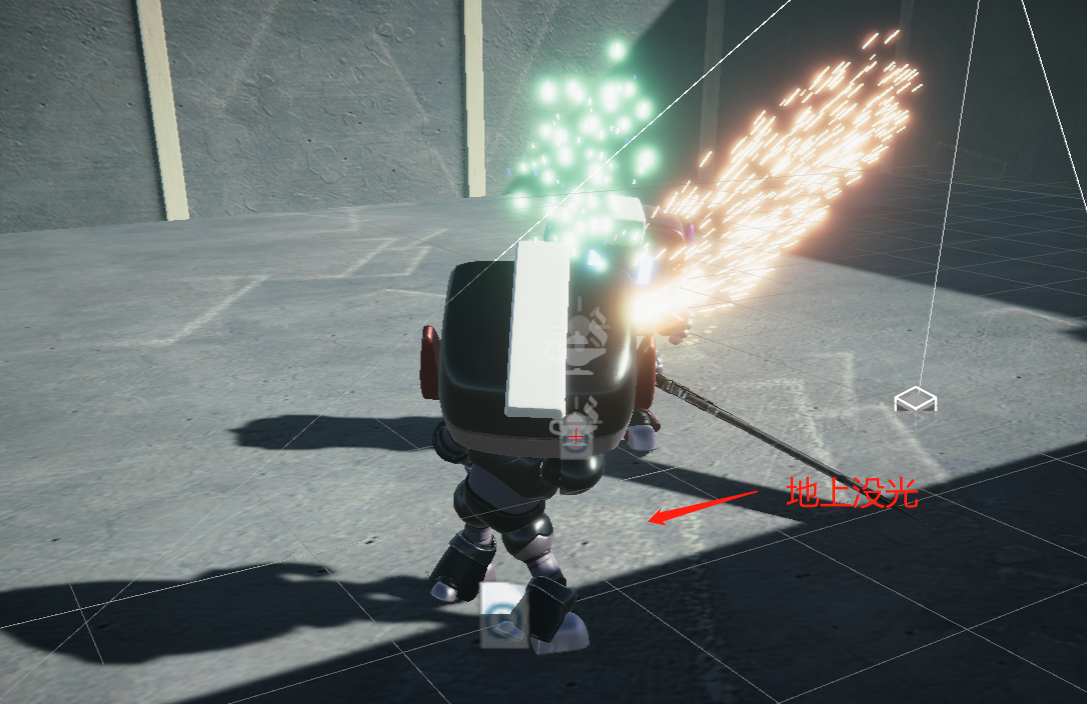
- 我们可以加一个光源进去,并且让其在释放技能的时候闪一下,控制光源的脚本如下:
public Light swordLight;
public Color sparkColor;
/// <summary>
/// 闪光函数
/// </summary>
public void LightColor(Light light, Color color, float time)
{
light.DOColor(color, time).OnComplete(() => light.DOColor(Color.black, time));
}
public void HitTarget(Transform x)
{
// 命中的时候闪一下
LightColor(swordLight, sparkColor, .1f);
// 略......
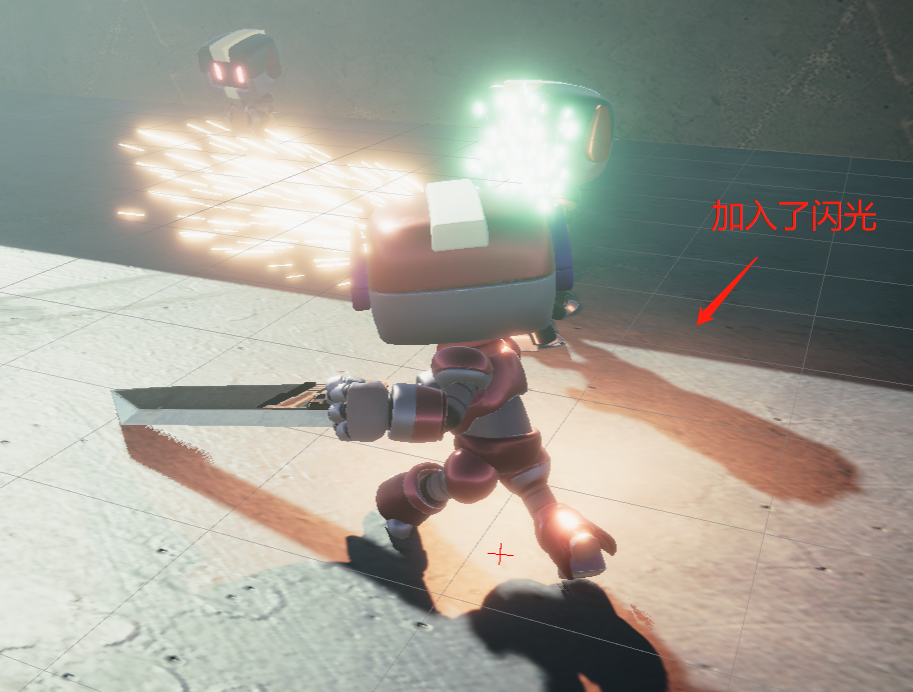
}
- 之后就有了如下效果:
UI-攻击提示逻辑
- UI怎么画这个就不具体说了,在这里只说一些注意事项
- 首先是攻击提示组件,创建完后不要忘了挂到EventSystem:
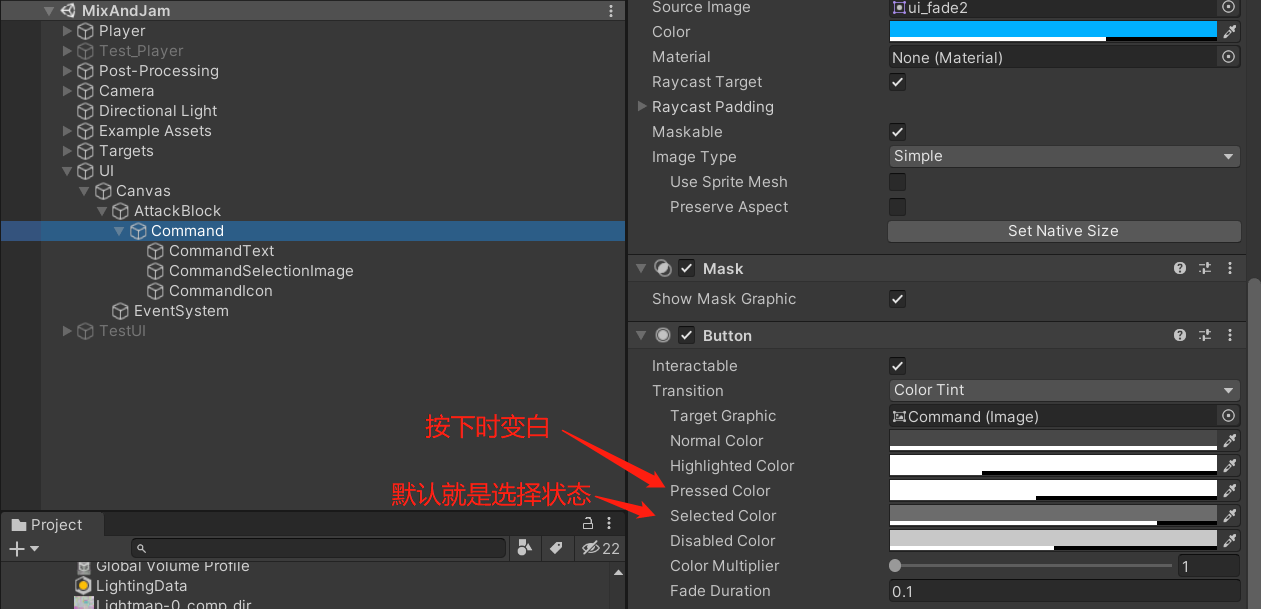
- 同时因为设置了不同状态下的颜色,所以当我们鼠标左键的时候就有一闪一闪的效果:
- 但这里实际上还有个看似BUG,即我们按左键攻击,按空格 or 回车左下角攻击提示也会亮,但此时并没有产生攻击动作,如下所示:
- 这个问题产生的原因也很简单,因为在文章开头的
MyInputModule+InputManager改动导致的(所以这是原教程就有的问题),空格、回车、鼠标左键都会触发Submit事件作用与当前选中的UI对象上,而攻击动作是TacticalModeScript_Clone中通过监听左键按下来触发的 - 说白了就是UI变化监听与攻击动作监听不一致导致的问题,至于修复方式在这里就不多说了,要么在InputModule中也同步上攻击逻辑,要么不同按键换成不同作用。
UI-命中恢复技能条
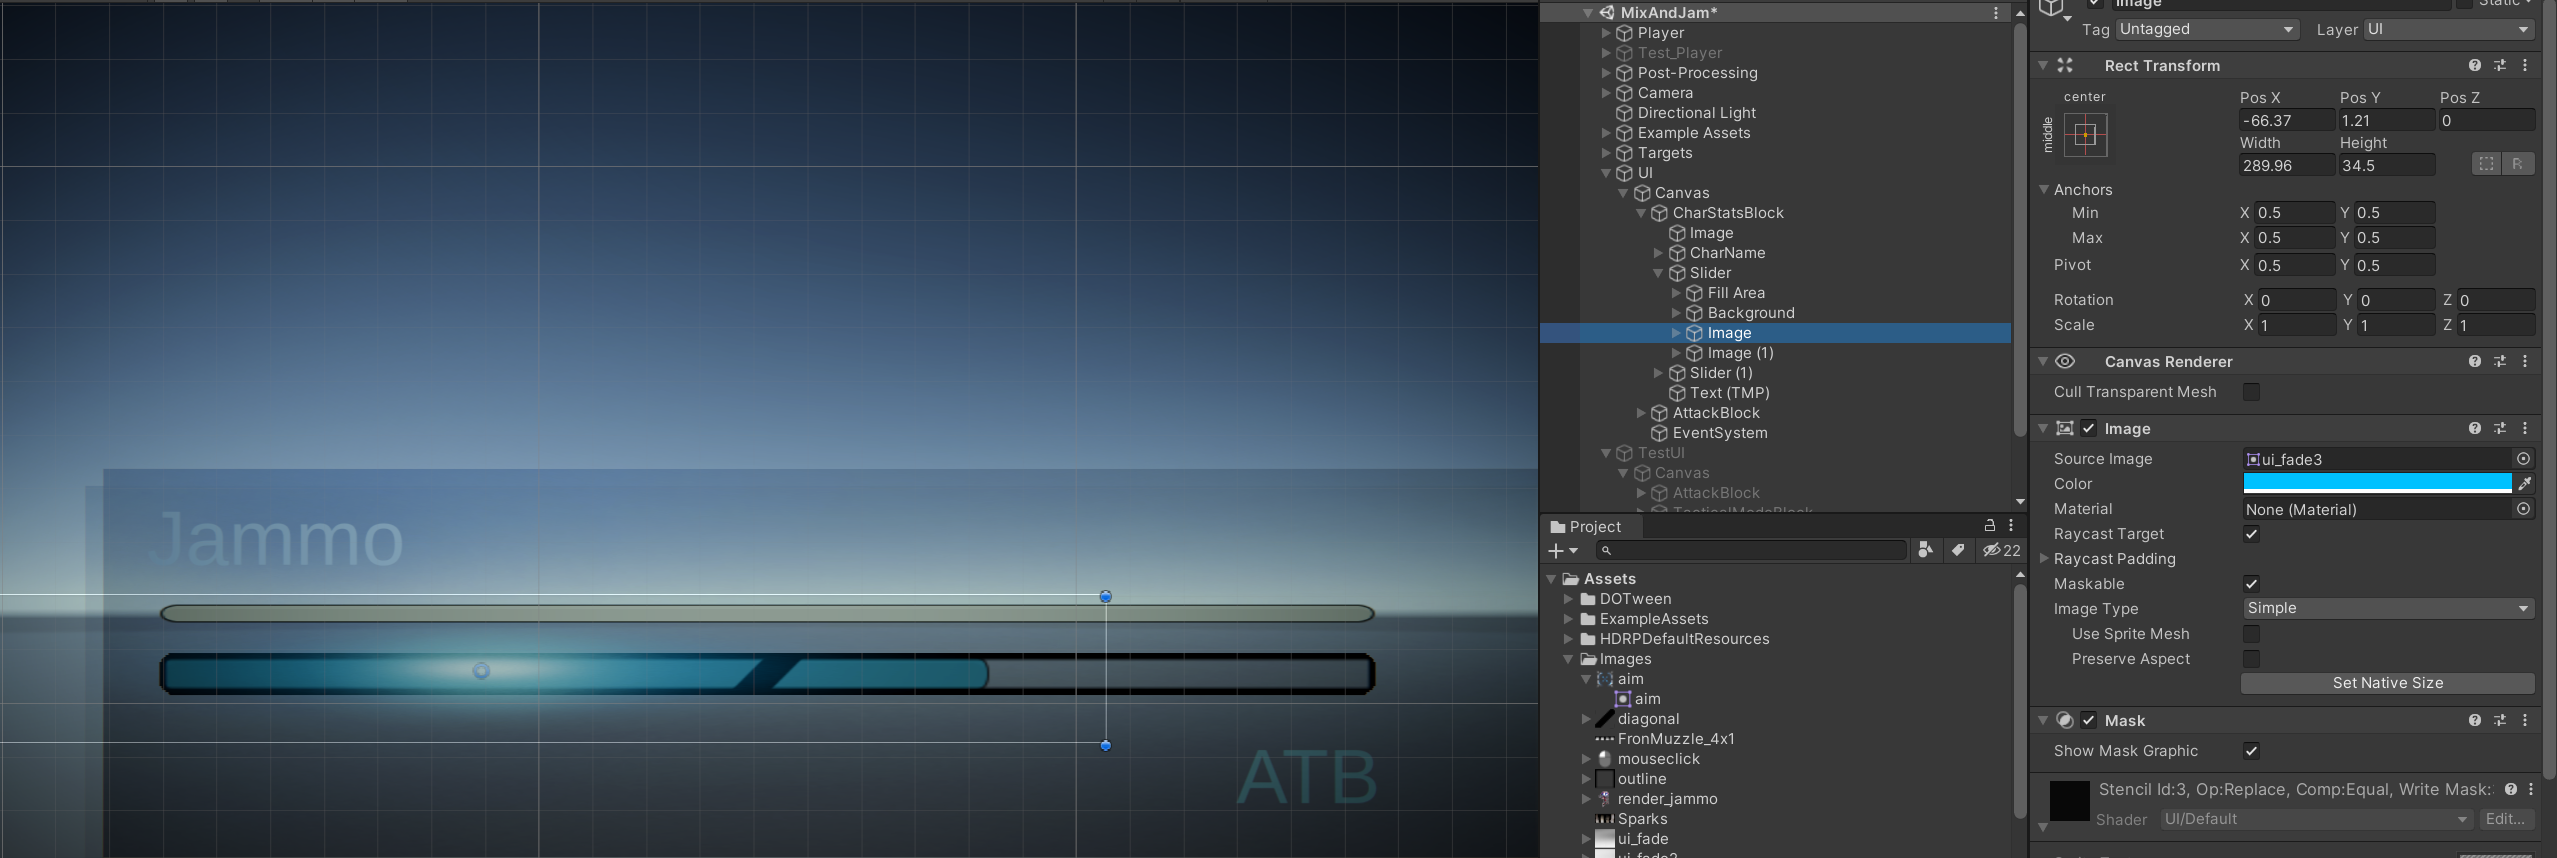
- 技能条用Slider来实现,之后可以通过脚本的Value来设置其变化,如下所示:
- 同时在技能条的左右侧各放置一张,用于制造在一段技能条满了之后亮起来的效果,如下所示:
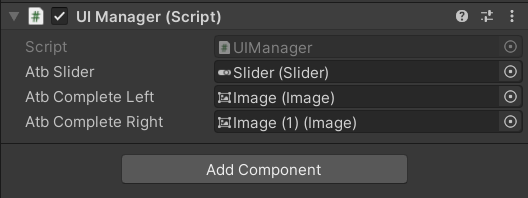
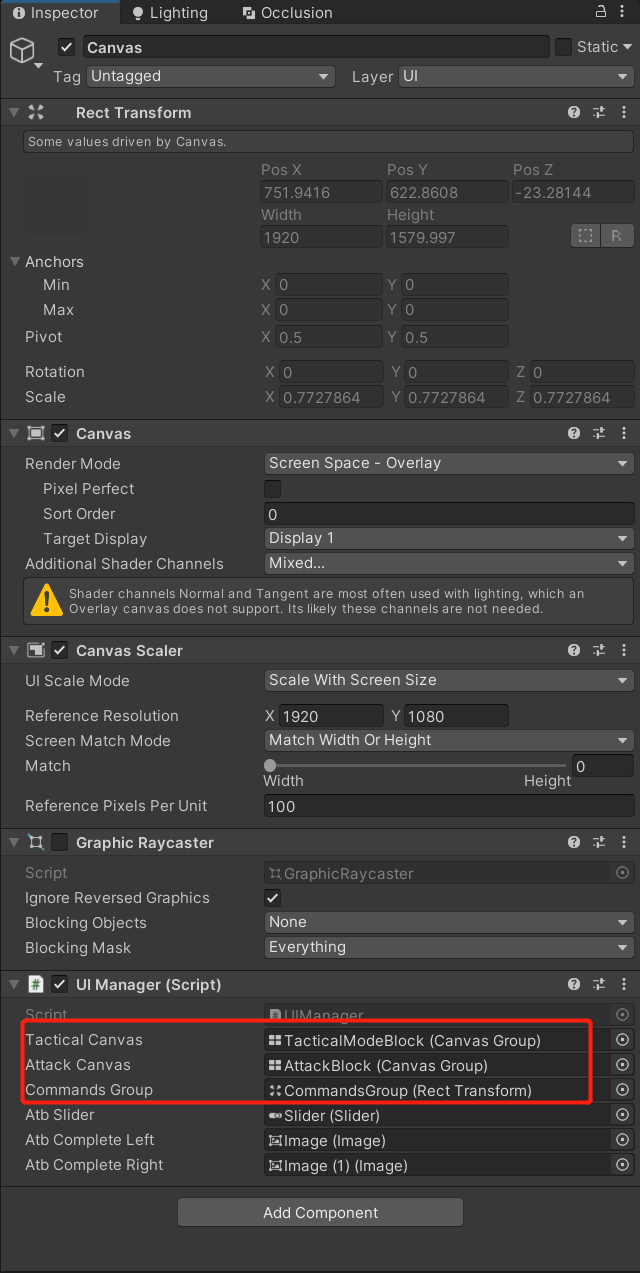
- 接下来就是代码实现了,首先我们需要一个
UIManager.cs脚本去管理UI,先编写这么个脚本并挂载到Canvas上:
using UnityEngine;
using UnityEngine.UI;

public class UIManager : MonoBehaviour
{

    private TacticalModeScript_Clone gameScript;

    public Slider atbSlider; // 技能条Slider
    public Image atbCompleteLeft; // 技能条左侧填充
    public Image atbCompleteRight; // 技能条右侧填充

    void Start()
    {
        gameScript = FindObjectOfType<TacticalModeScript_Clone>();
    }
- 由于技能条的增加必须要在命中敌人之后才产生,且之后释放技能是按技能可释放次数判断的,所以我们要在
TacticalModeScript_Clone中增加调度:
    [Space]
    [Header("ATB Data")]
    public float atbSlider; // 技能值
    public float filledAtbValue = 100; // 多少技能值可以释放1次技能
    public int atbCount; // 当前可释放技能的次数

    public void HitTarget(Transform x)
    {
        // 每击中一下,技能值回复25
        ModifyATB(25);
        // 略......
    }

    /// <summary>
    /// 技能值变化
    /// </summary>
    /// <param name="amount"></param>
    public void ModifyATB(float amount)
    {
        OnModificationATB.Invoke();

        atbSlider += amount;
        atbSlider = Mathf.Clamp(atbSlider, 0, (filledAtbValue * 2));

        if (amount > 0)
        {
            if (atbSlider >= filledAtbValue && atbCount == 0)
                atbCount = 1;
            if (atbSlider >= (filledAtbValue * 2) && atbCount == 1)
                atbCount = 2;
        }
        else
        {
            if (atbSlider <= filledAtbValue)
                atbCount = 0;
            if (atbSlider >= filledAtbValue && atbCount == 0)
                atbCount = 1;
        }

        OnModificationATB.Invoke();
    }
- 上面的脚本中广播了技能值更新的事件,这个事件在
UIManager中监听处理:
    void Start()
    {
        gameScript = FindObjectOfType<TacticalModeScript_Clone>();
        gameScript.OnModificationATB.AddListener(() => UpdateSlider()); // 技能值更新监听
    }

    /// <summary>
    /// 更新技能条
    /// </summary>
    public void UpdateSlider()
    {
        // 立刻完成当前的动画(有用,之前瞬移斩目标转圈的应该可以用这个解决)
        atbSlider.DOComplete();
        // 技能条0.15s过渡
        atbSlider.DOValue(gameScript.atbSlider, .15f);
        // 如果技能条>=100则填充左侧,>=200则填充右侧
        atbCompleteLeft.DOFade(gameScript.atbSlider >= 100 ? 1 : 0, .2f);
        atbCompleteRight.DOFade(gameScript.atbSlider >= 200 ? 1 : 0, .2f);
    }
- 逻辑修改后,技能条随攻击增加的逻辑完成了,现在效果如下:
UI-技能面板
- 当前技能有两个,一个是瞬移斩,一个是回复技能(当前只有动画)
- 首先要看一下技能面板的一些小细节,比如面板切换的时候,我们可以通过Alpha控制渐变消失/显现,通过interactable来控制是否监听输入,如下所示:
- 同样的,我们之后要通过脚本控制它,先在UIManager编写变化的逻辑:
    public CanvasGroup tacticalCanvas; // 技能模式面板组件
    public CanvasGroup attackCanvas; // 攻击提示
    public Transform commandsGroup; // 技能面板中选择技能的按钮组

    /// <summary>
    /// 技能菜单激活
    /// </summary>
    /// <param name="on"></param>
    public void ShowTacticalMenu(bool on)
    {
        // on=true时,激活技能面板
        tacticalCanvas.DOFade(on ? 1 : 0, .15f).SetUpdate(true);
        tacticalCanvas.interactable = on;
        // on=true时,隐藏攻击提示面板
        attackCanvas.DOFade(on ? 0 : 1, .15f).SetUpdate(true);
        attackCanvas.interactable = !on;

        // 清空当前选择的对象
        EventSystem.current.SetSelectedGameObject(null);

        if (on == true)
        {
            // 如果打开技能面板,则当前选中得到对象为技能的第一个
            EventSystem.current.SetSelectedGameObject(tacticalCanvas.transform.GetChild(0).GetChild(0).gameObject);
        }
        else
        {
            // 否则选中攻击面板
            EventSystem.current.SetSelectedGameObject(attackCanvas.transform.GetChild(0).gameObject);

            // commandsGroup没有透明度属性,所以直接操作Active状态
            // 在这里没有关闭tacticalCanvas是因为,关闭技能面板的情况有两种:
            //     1. 一种是从技能模式中退回普通攻击
            //     2. 另一种是选中技能后,再进入继续选择敌人的面板(后续实现)
            // 由于选择敌人的面板也是放在tacticalCanvas,所以这里单独关闭技能选项即可,父面板无需关闭继续复用
            commandsGroup.gameObject.SetActive(!on);
        }
    }
- 我们的技能模式是右键进入的,并且进入技能模式后,鼠标左键会发送Submit事件到技能按钮上,如果时候普通攻击还生效那就有点奇怪了,所以我们还需要增加相应的开关,
TacticalModeScript_Clone的修改如下:
private MovementInput movement; // 移动脚本
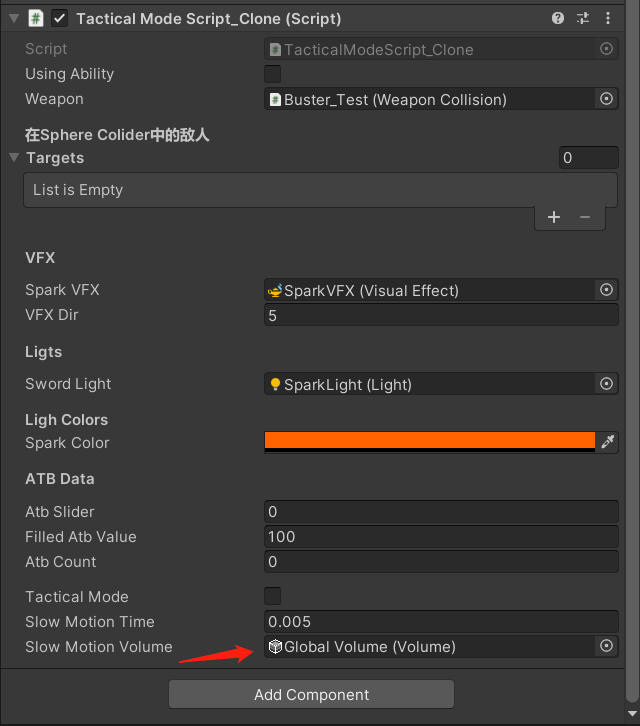
public bool tacticalMode; // 是否处于技能模式
public float slowMotionTime = .005f; // 时间缩放值
public Volume slowMotionVolume; // 后处理
[HideInInspector]
public TacticalModeEvent OnTacticalTrigger;
void Start()
{
movement = GetComponent<MovementInput>();
}
void Update()
{
// 鼠标左键播放攻击动画
if (Input.GetMouseButtonDown(0) && !tacticalMode)
{
anim.SetTrigger("slash");
}
// 右键打开技能模式
if (Input.GetMouseButtonDown(1) && !usingAbility)
{
// 技能释放次数>0 & 不在技能面板
if (atbCount > 0 && !tacticalMode)
// 打开技能面板
SetTacticalMode(true);
}
// Esc返回上一层
if (Input.GetKeyDown(KeyCode.Escape))
{
CancelAction();
}
}
/// <summary>
/// 取消技能状态
/// </summary>
public void CancelAction()
{
SetTacticalMode(false);
}
/// <summary>
/// 技能模式开关
/// </summary>
public void SetTacticalMode(bool on)
{
movement.desiredRotationSpeed = on ? 0 : .3f;
movement.active = !on;
tacticalMode = on;
if (!on)
{
// 激活目标相机
SetAimCamera(false);
}
// 如果不是技能模式,摄像机震动为2
camImpulseSource.m_ImpulseDefinition.m_AmplitudeGain = on ? 0 : 2;
// 控制时间缩放
float time = on ? slowMotionTime : 1;
Time.timeScale = time;
// 后处理效果更新
DOVirtual.Float(on ? 0 : 1, on ? 1 : 0, .3f, SlowmotionPostProcessing).SetUpdate(true);
// 广播技能模式事件,后续由UIManager监听并打开面板
OnTacticalTrigger.Invoke(on);
}
- 写完之后不要忘了挂载对象:
- 上面的脚本主要是控制一些非UI层面的东西,包括时间缩放、后处理、各个开关等,并发送了一个事件,要拉起技能面板则是靠
UIManager监听这个事件并调用前面写好的ShowTacticalMenu函数,UIManager改动如下:
    void Start()
    {
        gameScript = FindObjectOfType<TacticalModeScript_Clone>();
        // 略......
        gameScript.OnTacticalTrigger.AddListener((x) => ShowTacticalMenu(x));
    }
- 当前效果如下(由于技能还没释放,所以当前还没有扣除技能值的逻辑):
回复技能-仅动画
- 在编写攻击技能的锁定技能之前,我们可以先完成回复技能来看看效果,回复技能的改动如下:
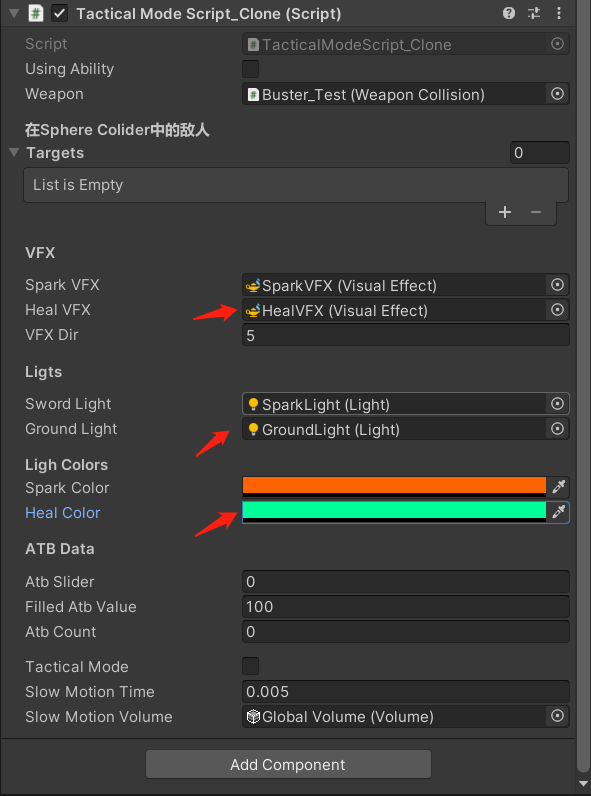
public bool usingAbility; // 是否技能施放中
public VisualEffect healVFX; // 治疗特效
public Light groundLight; // 技能闪光
[Tooltip("治疗光环颜色")]
public Color healColor;
void Update()
{
// 加上usingAbility判断,技能硬直期间不允许这类操作
if ((Input.GetMouseButtonDown(0)) && !tacticalMode && !usingAbility) {略......}
if (Input.GetMouseButtonDown(1) && !usingAbility) {略......}
}
/// <summary>
/// 回复技能
/// </summary>
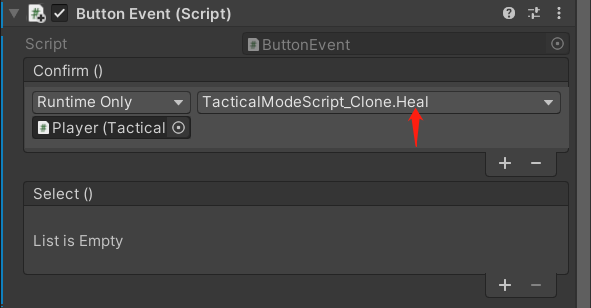
public void Heal()
{
// 扣除技能值
ModifyATB(-100);
// 开始计算技能cd
StartCoroutine(AbilityCooldown());
// 退出技能模式
SetTacticalMode(false);
// 播放治疗动画
anim.SetTrigger("heal");
// 播放治疗的VFX粒子和闪光特效
PlayVFX(healVFX, false);
// 闪光
LightColor(groundLight, healColor, .5f);
}
/// <summary>
/// 技能硬直
/// </summary>
IEnumerator AbilityCooldown()
{
usingAbility = true;
yield return new WaitForSeconds(1f);
usingAbility = false;
}
- 之后挂载好对象+UI按钮函数回调:
- 当前效果如下:
选择敌人+镜头锁定
- 终于来到最后一个功能了,瞄准敌人转镜头这种效果其实在《崩坏:星穹铁道》中也有用到,都是摄像头朝向目标,下面是《崩坏:星穹铁道》中的效果:
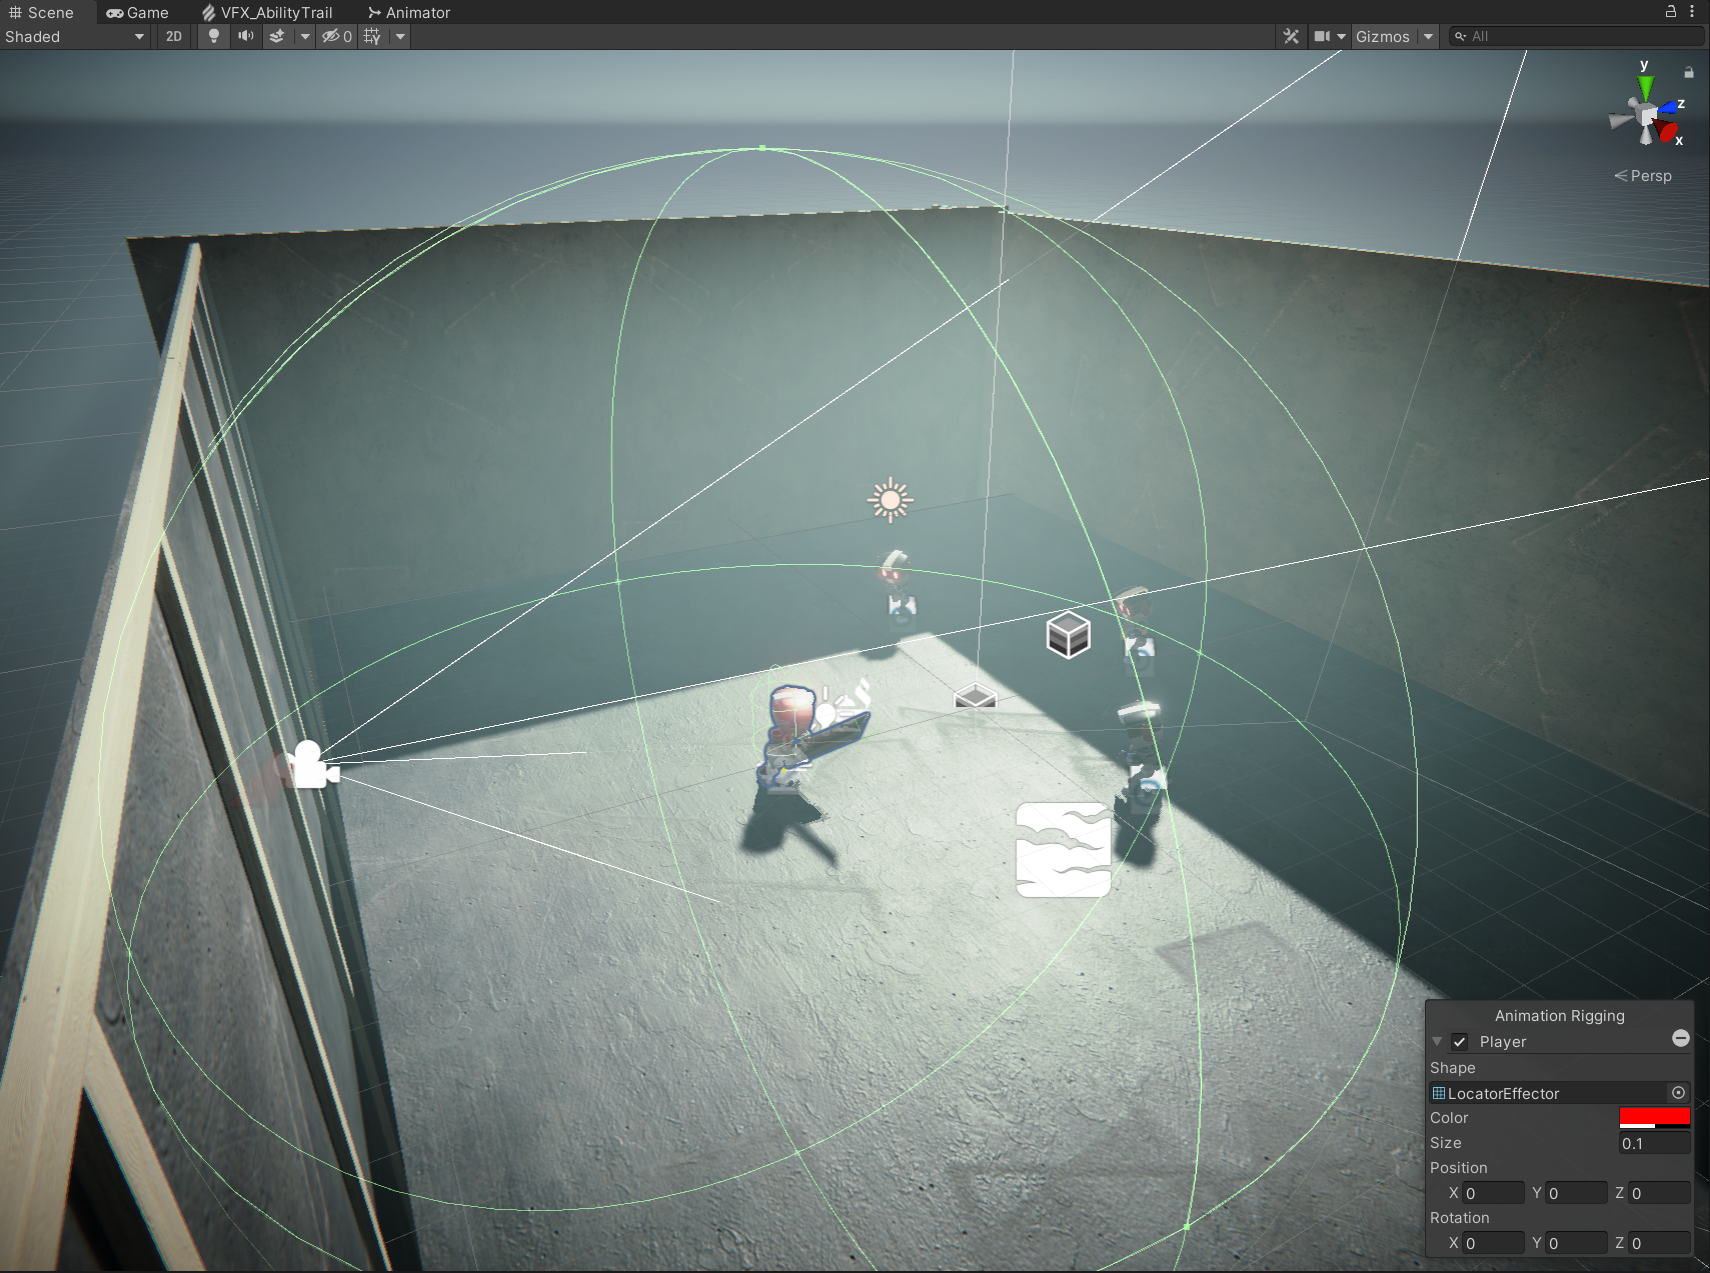
- 首先,加入我们现在已经选定攻击技能了,而这时候要选择攻击的目标,我们可以创建一个虚拟摄像机+主角子对象(获取相对主角旋转的角度,间接控制虚拟相机角度)来实现,手操效果如下:
- 说白了就是虚拟摄像机只要Follow+LookAt主角身上的子对象,那么操控子对象的角度就可以让虚拟摄像机自己转了,而我们脚本要做的事首先就是让子对象面向选中的敌人(技能开启默认情况下选中最近敌人),修改
TacticalModeScript_Clone如下:
    public int targetIndex; // 当前瞄准敌人的index
    public Transform aimObject; // 主角身上的aimObject子对象
    public CinemachineVirtualCamera targetCam; // 技能锁定敌人的虚拟相机

        void Update()
    {
        // 如果Collider内敌数量人>0,不为技能面板状态,不在技能施放期间,则看向距离屏幕中点最近的敌人
        if (targets.Count > 0 && !tacticalMode && !usingAbility)
        {
            targetIndex = NearestTargetToCenter();
            aimObject.LookAt(targets[targetIndex]);
        }
        // 略......
    }

    /// <summary>
    /// 获取距离屏幕中点最近的敌人index
    /// </summary>
    /// <returns></returns>
    int NearestTargetToCenter()
    {
        float[] distances = new float[targets.Count];

        for (int i = 0; i < targets.Count; i++)
        {
            distances[i] = Vector2.Distance(Camera.main.WorldToScreenPoint(targets[i].position), new Vector2(Screen.width / 2, Screen.height / 2));
        }

        float minDistance = Mathf.Min(distances);
        int index = 0;

        for (int i = 0; i < distances.Length; i++)
        {
            if (minDistance == distances[i])
                index = i;
        }
        return index;
    }
- 上面代码改完后记得挂载子对象aimObject,接着我们继续实现按下攻击技能后的选择敌人面板+相机激活+敌人选择等:
    public bool isAiming; // 是否处于瞄准状态

    [HideInInspector]
    public TacticalModeEvent OnTargetSelectTrigger;

    public void SetTacticalMode(bool on)
    {
        if (!on)
        {
            // 关闭技能模式时也关闭锁定
            SetAimCamera(false);
        }
        // 略......
    }

    /// <summary>
    /// 目标摄像机开关
    /// </summary>
    /// <param name="on"></param>
    public void SetAimCamera(bool on)
    {
        if (targets.Count < 1)
            return;

        OnTargetSelectTrigger.Invoke(on);

        targetCam.LookAt = on ? aimObject : null;
        targetCam.Follow = on ? aimObject : null;
        targetCam.gameObject.SetActive(on);
        isAiming = on;
    }

    /// <summary>
    /// 选择目标并且子对象面向目标
    /// </summary>
    /// <param name="index"></param>
    public void SelectTarget(int index)
    {
        targetIndex = index;
        aimObject.DOLookAt(targets[targetIndex].position, .3f).SetUpdate(true);
    }

    /// <summary>
    /// 取消技能和锁定状态
    /// </summary>
    public void CancelAction()
    {
        // 略......
        if (!targetCam.gameObject.activeSelf && tacticalMode)
            SetTacticalMode(false);

        if (targetCam.gameObject.activeSelf)
            SetAimCamera(false);
    }
SelectTarget还要挂载在所有敌人按钮的Select回调上: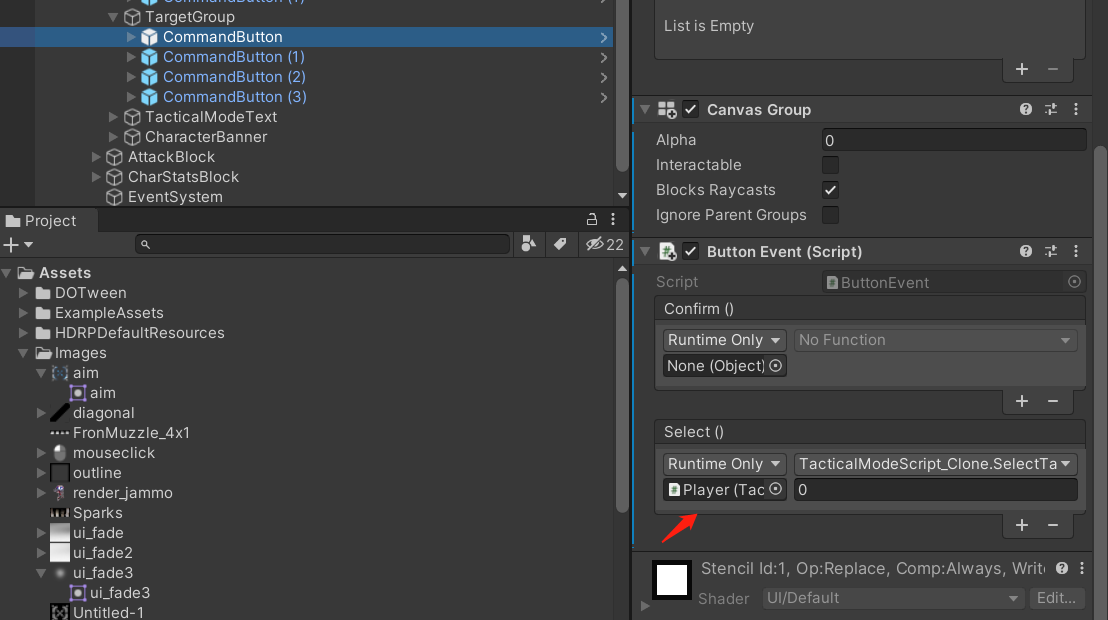
SetAimCamera则要挂载在技能的Confirm回调上: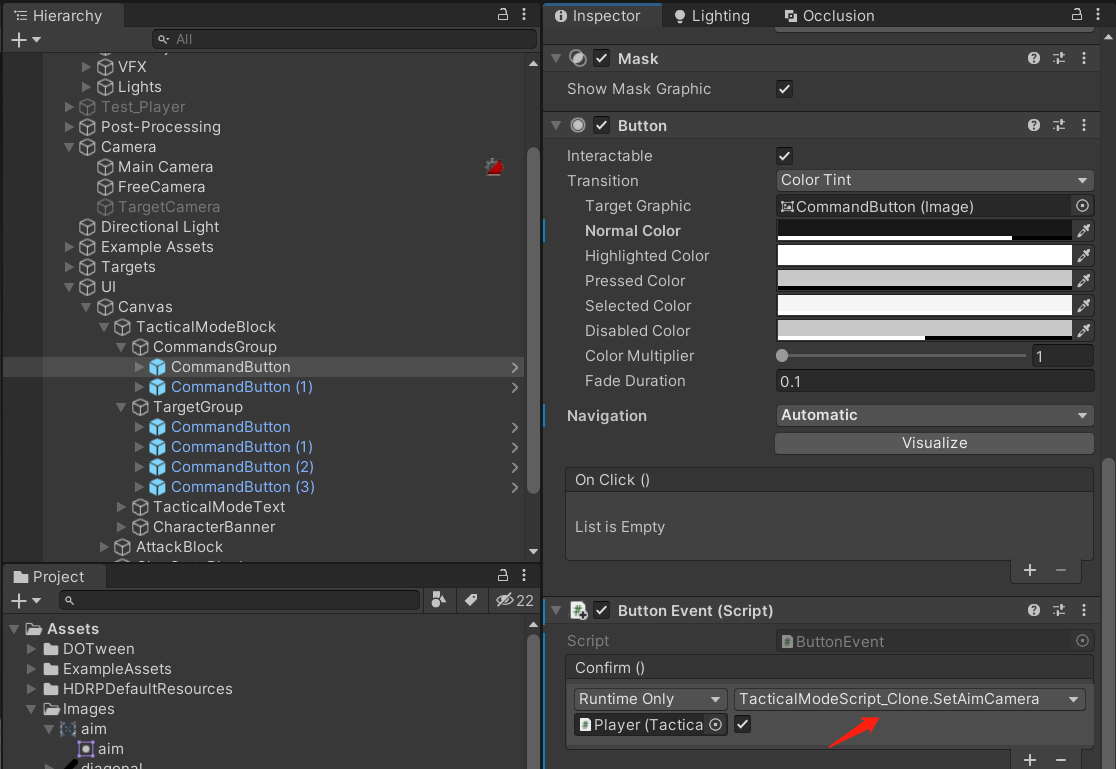
- 接下来需要在
UIManager中监听处理上面发出的OnTargetSelectTrigger事件(改完别忘了赋上资源):
    public Transform targetGroup; // 技能面板中选择敌人的按钮组
    public CanvasGroup aimCanvas; // 锁定目标的图片
    public bool aimAtTarget; // 是否进入锁定模式(确认攻击形技能后,就会为true)

    void Start()
    {
        gameScript = FindObjectOfType<TacticalModeScript_Clone>();
        // 略......
        gameScript.OnTargetSelectTrigger.AddListener((x) => ShowTargetOptions(x));
    }

    private void Update()
    {
        // 如果当前为锁定状态,则把目标图标变更到敌人的位置上
        if (aimAtTarget)
        {
            aimCanvas.transform.position = Camera.main.WorldToScreenPoint(gameScript.targets[gameScript.targetIndex].position + Vector3.up);
        }
    }

    /// <summary>
    /// 选择目标面板开关
    /// </summary>
    /// <param name="on"></param>
    public void ShowTargetOptions(bool on)
    {
        // 清空当前选择对象
        EventSystem.current.SetSelectedGameObject(null);

        aimAtTarget = on;
        aimCanvas.alpha = on ? 1 : 0;

        // on=true为选择敌人时commandsGroup没有透明度属性,所以通过SetActive(false)来
        commandsGroup.gameObject.SetActive(!on);
        // on=true时,敌人选择面板显现
        targetGroup.GetComponent<CanvasGroup>().DOFade(on ? 1 : 0, .1f).SetUpdate(true);
        targetGroup.GetComponent<CanvasGroup>().interactable = on;

        // 如果为on,则从gameScript中获取敌人数据填充到targetGroup上
        if (on)
        {
            for (int i = 0; i < targetGroup.childCount; i++)
            {
                if (gameScript.targets.Count - 1 >= i)
                {
                    targetGroup.GetChild(i).GetComponent<CanvasGroup>().alpha = 1;
                    targetGroup.GetChild(i).GetComponent<CanvasGroup>().interactable = true;
                    targetGroup.GetChild(i).GetComponentInChildren<TextMeshProUGUI>().text = gameScript.targets[i].name;
                }
                else
                {
                    targetGroup.GetChild(i).GetComponent<CanvasGroup>().alpha = 0;
                    targetGroup.GetChild(i).GetComponent<CanvasGroup>().interactable = false;
                }
            }
        }
        // 设置选中的对象
        EventSystem.current.SetSelectedGameObject(on ? targetGroup.GetChild(0).gameObject : commandsGroup.GetChild(0).gameObject);
    }
- okay,现在来看看效果:
- 上面的效果看上去好像没啥问题,原教程的代码也是如此,但实际上这里面有个BUG
- 那就是一开始自动锁定的目标并不是
NearestTargetToCenter获取到离屏幕中点最近的目标,而是敌人List存储的第一个对象,这其实是受到ShowTargetOptions中EventSystem.current.SetSelectedGameObject...的影响了,因为无论之前自动锁定的是哪个对象,在ShowTargetOptions都会重新选择GetChild(0)然后间接触发SelectTarget重新变化当前的targetIndex - 解决的办法也很简单,
ShowTargetOptions的固定成0改成正确的targetIndex即可:
    /// <summary>
    /// 选择目标面板开关
    /// </summary>
    /// <param name="on"></param>
    public void ShowTargetOptions(bool on)
    {
        // 略......
        EventSystem.current.SetSelectedGameObject(on ? targetGroup.GetChild(gameScript.targetIndex).gameObject : commandsGroup.GetChild(0).gameObject);
    }
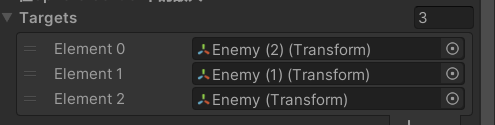
- 现在的敌人List第一个是(2)复制对象,但最近的是没有()的对象(上面的BUG例子也一样):
- 现在我们再试下效果如何:
释放攻击技能
- 锁定完敌人自然就是要释放技能了,到这一步其实已经没有什么难度了,无非就是瞬移+技能动作+一堆特效
- 这里就直接编写
TacticalModeScript_Clone中技能释放函数(写完后记得赋上对象):
    [Tooltip("攻击技能闪光")]
    public Color abilityColor;
    public VisualEffect abilityVFX; // 释放技能时聚合散开的效果
    public bool dashing;

    void Update()
    {
        // 略......
        if ((Input.GetMouseButtonDown(0)) && !tacticalMode && !usingAbility)
        {
            OnAttack.Invoke();
            // 瞬移状态不能释放普通攻击
            if(!dashing)
                anim.SetTrigger("slash");
        }
        // 略......
    }

    /// <summary>
    /// 瞬移斩释放函数
    /// </summary>
    public void SpinAttack()
    {
        // 扣除100点技能值
        ModifyATB(-100);

        // 设置技能硬直
        StartCoroutine(AbilityCooldown());

        // 退出技能模式
        SetTacticalMode(false);

        // 移动到敌人身前
        MoveTowardsTarget(targets[targetIndex]);

        // Animation 播放技能动画(里面似乎不包含Box Collider变化的出发)
        anim.SetTrigger("ability");

        // 播放VFX粒子动画+技能闪光
        PlayVFX(abilityVFX, false);
        LightColor(groundLight, abilityColot, .3f);
    }

    /// <summary>
    /// 移动到敌人面前
    /// </summary>
    /// <param name="target"></param>
    public void MoveTowardsTarget(Transform target)
    {
        if (Vector3.Distance(transform.position, target.position) > 1 && Vector3.Distance(transform.position, target.position) < 10)
        {
            // 闪现硬直
            StartCoroutine(DashCooldown());
            // 渐变移动到目标跟前
            transform.DOMove(TargetOffset(), .5f);
            // 调整视角
            transform.DOLookAt(targets[targetIndex].position, .2f);
        }
    }

    /// <summary>
    /// 闪现冷却
    /// </summary>
    IEnumerator DashCooldown()
    {
        dashing = true;
        yield return new WaitForSeconds(1);
        dashing = false;
    }

    /// <summary>
    /// 获取闪现移动到的位置
    /// </summary>
    public Vector3 TargetOffset()
    {
        Vector3 position;
        position = targets[targetIndex].position;
        // 1.2f可以理解为:敌人位置-主角位置 得到的位置-1.2f,就是到敌人跟前
        return Vector3.MoveTowards(position, transform.position, 1.2f);
    }
- 最后把
SpinAttack挂载到敌人选择按钮的Confirm回调上: 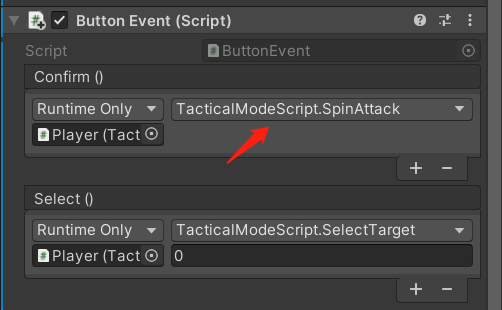
- 到这里终于算是搞定了,接下来再看看完整的效果: