文章目录
前言
本节就来看看Netty中一个很常用的方法:writeAndFlush,来看看源码大致逻辑是什么样的,顺便再编写一个简单的编码器了解一下编码的流程是什么样的。
另外,writeAndFlush方法是一个outbound事件传播,本文不会再对outbound事件传播的机制等再进行讲解,有兴趣的可以参考我以前写过的【outbound事件传播】或【in/outbound理解】。
Netty Version:4.1.6
实验代码
Server.java
import io.netty.bootstrap.ServerBootstrap;
import io.netty.channel.ChannelFuture;
import io.netty.channel.ChannelInitializer;
import io.netty.channel.EventLoopGroup;
import io.netty.channel.nio.NioEventLoopGroup;
import io.netty.channel.socket.SocketChannel;
import io.netty.channel.socket.nio.NioServerSocketChannel;
import io.netty.handler.codec.http.HttpObjectAggregator;
import io.netty.handler.stream.ChunkedWriteHandler;

/**
 * @author cwj
 */
public final class Server {

    public static void main(String[] args) throws Exception {
        EventLoopGroup bossGroup = new NioEventLoopGroup();
        EventLoopGroup workerGroup = new NioEventLoopGroup();

        try {
            ServerBootstrap b = new ServerBootstrap();
            b.group(bossGroup, workerGroup).channel(NioServerSocketChannel.class).childHandler(new ChannelInitializer<SocketChannel>() {
                @Override
                public void initChannel(SocketChannel ch) {
                    ch.pipeline().addLast(new Encoder());
                    ch.pipeline().addLast(new BizHandler());
                }
            });

            ChannelFuture f = b.bind(8888).sync();

            f.channel().closeFuture().sync();
        } finally {
            bossGroup.shutdownGracefully();
            workerGroup.shutdownGracefully();
        }
    }
}
Encoder.java
import io.netty.buffer.ByteBuf;
import io.netty.channel.ChannelHandlerContext;
import io.netty.handler.codec.MessageToByteEncoder;


public class Encoder extends MessageToByteEncoder<User> {
    @Override
    protected void encode(ChannelHandlerContext ctx, User user, ByteBuf out) throws Exception {

        byte[] name = ("name: " +
                user.getName() +
                ", ").getBytes();

        byte[] age = ("age: " +
                user.getAge() +
                ".").getBytes();
        int length = name.length + age.length;
        // 长度域赋值,之后就可以根据长度域解码了
        out.writeInt(length);
        out.writeBytes(name);
        out.writeBytes(age);

        /*
         * 编码后结构如下,其实我们完全可以利用长度域解码器自行解码
         *+--------------------------+
         *|4 bytes |16 bytes|8 bytes |
         *+--------------------------+
         *| length |  name  |   age  |
         *+--------------------------+
         */
    }
}
BizHandler.java
import io.netty.channel.ChannelHandlerContext;
import io.netty.channel.ChannelInboundHandlerAdapter;

/**
 * @author cwj
 */
public class BizHandler extends ChannelInboundHandlerAdapter {
    @Override
    public void channelRead(ChannelHandlerContext ctx, Object msg) throws Exception {
        User user = new User(19, "zhangsan");

        // 不要忘了这是outbound事件
        ctx.channel().writeAndFlush(user);
    }
}
User.java
public class User {
    private int age;
    private String name;

    public User(int age, String name) {

        this.age = age;
        this.name = name;
    }

    public int getAge() {
        return age;
    }

    public void setAge(int age) {
        this.age = age;
    }

    public String getName() {
        return name;
    }

    public void setName(String name) {
        this.name = name;
    }
}
telnet发送任意数据后返回结果:

调试工具
telnet、idea
使用方法自行百度
write和flush分别做了什么
在跟进源码之前,首先得知道write和flush分别做了什么:
- write:将数据写到缓冲区buffer中。
- flush:将缓冲区buffer的数据输出到底层socket,类似于上面返回给telnet。
跟进源码
开始追踪
启动Server.java,然后用telnet连接+发送任意数据,就会触发BizHandler.java的writeFlush方法了,断点怎么打随你自己发挥。
好了,一切就绪后吗,将视角转移到如下实验代码:
com.imooc.netty.ch9.BizHandler#channelRead
    public void channelRead(ChannelHandlerContext ctx, Object msg) throws Exception {
        User user = new User(19, "zhangsan");

        // 不要忘了这是outbound事件
        ctx.channel().writeAndFlush(user);
    }
跟进writeAndFlush方法:
io.netty.channel.AbstractChannel#writeAndFlush(java.lang.Object)
    @Override
    public ChannelFuture writeAndFlush(Object msg) {
        return pipeline.writeAndFlush(msg);
    }
继续跟进writeAndFlush方法:
io.netty.channel.DefaultChannelPipeline#writeAndFlush(java.lang.Object)
    @Override
    public final ChannelFuture writeAndFlush(Object msg) {
        // 从tail倒序传播,outbound事件传播的特性
        return tail.writeAndFlush(msg);
    }
- 忘记outbound特性的话可以看前言中提到的两篇博客。
继续跟进writeAndFlush方法:
io.netty.channel.AbstractChannelHandlerContext#writeAndFlush(java.lang.Object, io.netty.channel.ChannelPromise)
    @Override
    public ChannelFuture writeAndFlush(Object msg) {
        // newPromise()就是拿到绑定的channel和NioEventLoop
        return writeAndFlush(msg, newPromise());
    }
继续跟进writeAndFlush方法,发现是调用熟悉的write方法,只是传进了个true表示要执行flush:
io.netty.channel.AbstractChannelHandlerContext#writeAndFlush(java.lang.Object, io.netty.channel.ChannelPromise)
    @Override
    public ChannelFuture writeAndFlush(Object msg, ChannelPromise promise) {
        if (msg == null) {
            throw new NullPointerException("msg");
        }

        if (!validatePromise(promise, true)) {
            ReferenceCountUtil.release(msg);
            // cancelled
            return promise;
        }

        write(msg, true, promise);

        return promise;
    }
跟进write方法:
io.netty.channel.AbstractChannelHandlerContext#write(java.lang.Object, boolean, io.netty.channel.ChannelPromise)
    private void write(Object msg, boolean flush, ChannelPromise promise) {
        // 获取tail节点的前一outbound节点
        AbstractChannelHandlerContext next = findContextOutbound();
        final Object m = pipeline.touch(msg, next);
        EventExecutor executor = next.executor();
        if (executor.inEventLoop()) {
            if (flush) {
                // 实验代码进入这里,写入内存buffer并刷到socket中去
                next.invokeWriteAndFlush(m, promise);
            } else {
                // 仅写到内存buffer中
                next.invokeWrite(m, promise);
            }
        }
        // 为了线程安全,把要执行的动作方法mpscqueue中执行,总体逻辑跟上面差不多
        else {
            AbstractWriteTask task;
            if (flush) {
                task = WriteAndFlushTask.newInstance(next, m, promise);
            }  else {
                task = WriteTask.newInstance(next, m, promise);
            }
            safeExecute(executor, task, promise, m);
        }
    }
跟进invokeWriteAndFlush方法,此处【坐标1】:
io.netty.channel.AbstractChannelHandlerContext#invokeWriteAndFlush
    private void invokeWriteAndFlush(Object msg, ChannelPromise promise) {
        if (invokeHandler()) {
            // 先write,只是写到内存buffer里面
            invokeWrite0(msg, promise);
            // 再flush,把内存buffer的数据刷到socket,执行完下面这一方法,telnet就能收到返回数据。
            invokeFlush0();
        } else {
            writeAndFlush(msg, promise);
        }
    }
以上代码的invokeWrite0和invokeFlush0方法我们来逐个跟进。
写数据至buffer(write)
先跟进上面代码的invokeWrite0方法,此处【坐标2】:
io.netty.channel.AbstractChannelHandlerContext#invokeWrite0
    private void invokeWrite0(Object msg, ChannelPromise promise) {
        try {
            // write事件传播
            ((ChannelOutboundHandler) handler()).write(this, msg, promise);
        } catch (Throwable t) {
            notifyOutboundHandlerException(t, promise);
        }
    }
- 略过其它无关因素,让当前节点为Encoder实例,之后再分析。
- 调试至handler()返回值如下:

当handler()返回值为Encoder实例后,跟进write方法:
io.netty.handler.codec.MessageToByteEncoder#write
    @Override
    public void write(ChannelHandlerContext ctx, Object msg, ChannelPromise promise) throws Exception {
        ByteBuf buf = null;
        try {
            // 匹配对象类型,不是指定类型则表示不是当前编码器处理
            // 结合实验代码,即匹配传进来的对象是否是在泛型中设置User
            // 若不是,则代表该数据不是由这个编码器处理。
            if (acceptOutboundMessage(msg)) {
                // 强转为泛型中设置的类型
                @SuppressWarnings("unchecked")
                I cast = (I) msg;
                // 分配内存+初始化ByteBuf,之前的博客有记录过
                buf = allocateBuffer(ctx, cast, preferDirect);
                try {
                    // 调用子类实现去编码,结合实验代码即Encoder中的encode方法。
                    // 编码完成后会封装到buf中
                    encode(ctx, cast, buf);
                } finally {
                    // 尝试释放旧对象,如果是ByteBuf则必定会回收
                    // 其它会回收的类型请看接口文档
                    ReferenceCountUtil.release(cast);
                }

                // 若此ByteBuf是可读的
                if (buf.isReadable()) {
                    // 实验代码会进入这里
                    // 相当于编码后继续传播下去
                    ctx.write(buf, promise);
                } else {
                    // 不可读则直接释放
                    buf.release();
                    // 传播特定信息给上一个outbound节点
                    ctx.write(Unpooled.EMPTY_BUFFER, promise);
                }
                buf = null;
            } else {
                // 不是当前编码器处理对象,传播到上一个outbound节点
                ctx.write(msg, promise);
            }
        } catch (EncoderException e) {
            throw e;
        } catch (Throwable e) {
            throw new EncoderException(e);
        } finally {
            if (buf != null) {
                buf.release();
            }
        }
    }
解码后的对象会继续进行传播,持续ctx.write方法(中间过程不再赘述了),最终就会来到HeadContext节点,即如下代码:
io.netty.channel.DefaultChannelPipeline.HeadContext#write
        @Override
        public void write(ChannelHandlerContext ctx, Object msg, ChannelPromise promise) throws Exception {
            unsafe.write(msg, promise);
        }
跟进write方法,这里代码逻辑就比较关键了,此处【坐标3】:
io.netty.channel.AbstractChannel.AbstractUnsafe#write
        @Override
        public final void write(Object msg, ChannelPromise promise) {
            assertEventLoop();

            // buffer,用于缓存写进来的bytebuf
            ChannelOutboundBuffer outboundBuffer = this.outboundBuffer;
            if (outboundBuffer == null) {
                // If the outboundBuffer is null we know the channel was closed and so
                // need to fail the future right away. If it is not null the handling of the rest
                // will be done in flush0()
                // See https://github.com/netty/netty/issues/2362
                safeSetFailure(promise, WRITE_CLOSED_CHANNEL_EXCEPTION);
                // release message now to prevent resource-leak
                ReferenceCountUtil.release(msg);
                return;
            }

            int size;
            try {
                // 如果不是direct内存则转为direct内存(堆外/直接内存)
                msg = filterOutboundMessage(msg);
                size = pipeline.estimatorHandle().size(msg);
                if (size < 0) {
                    size = 0;
                }
            } catch (Throwable t) {
                safeSetFailure(promise, t);
                ReferenceCountUtil.release(msg);
                return;
            }

            // 添加到写队列
            outboundBuffer.addMessage(msg, size, promise);
        }
跟进上面的filterOutboundMessage方法看看是如何将bytebuf对象的内存direct化的:
io.netty.channel.nio.AbstractNioByteChannel#filterOutboundMessage
    @Override
    protected final Object filterOutboundMessage(Object msg) {
        if (msg instanceof ByteBuf) {
            ByteBuf buf = (ByteBuf) msg;
            // 如果本来就是direct内存,那就直接返回。
            if (buf.isDirect()) {
                return msg;
            }

            // 转为direct(堆外/直接)内存
            return newDirectBuffer(buf);
        }

        if (msg instanceof FileRegion) {
            return msg;
        }

        throw new UnsupportedOperationException(
                "unsupported message type: " + StringUtil.simpleClassName(msg) + EXPECTED_TYPES);
    }
继续跟进newDirectBuffer方法:
io.netty.channel.nio.AbstractNioChannel#newDirectBuffer(io.netty.buffer.ByteBuf)
    protected final ByteBuf newDirectBuffer(ByteBuf buf) {
        // 可读字节
        final int readableBytes = buf.readableBytes();
        if (readableBytes == 0) {
            // 若没有东西可读,则回收此bytebuf并返回一个空的bytebuf
            ReferenceCountUtil.safeRelease(buf);
            return Unpooled.EMPTY_BUFFER;
        }

        // bytebuf选择器(创建器)
        final ByteBufAllocator alloc = alloc();
        if (alloc.isDirectBufferPooled()) {
            // 创建direct类型的bytebuf
            ByteBuf directBuf = alloc.directBuffer(readableBytes);
            // 将旧bytebuf的数据写到新的bytebuf上
            directBuf.writeBytes(buf, buf.readerIndex(), readableBytes);
            // 回收旧bytebuf对象及内存
            ReferenceCountUtil.safeRelease(buf);
            return directBuf;
        }

        // 如果上面的选择器不是direct类型的,则创建 或 对象池中复用bytebuf对象并初始化内存
        final ByteBuf directBuf = ByteBufUtil.threadLocalDirectBuffer();
        if (directBuf != null) {
            // 将旧bytebuf的数据写到新的bytebuf上
            directBuf.writeBytes(buf, buf.readerIndex(), readableBytes);
            // 回收旧bytebuf对象及内存
            ReferenceCountUtil.safeRelease(buf);
            return directBuf;
        }

        // Allocating and deallocating an unpooled direct buffer is very expensive; give up.
        return buf;
    }
现在已经了解内存是如何被direct化的了,接下来返回到【坐标3】的write方法:
io.netty.channel.AbstractChannel.AbstractUnsafe#write
        ...(略)
        try {
                // 如果不是direct内存则转为direct内存(堆外/直接内存)
                msg = filterOutboundMessage(msg);
                size = pipeline.estimatorHandle().size(msg);
                if (size < 0) {
                    size = 0;
                }
            } catch (Throwable t) {
                safeSetFailure(promise, t);
                ReferenceCountUtil.release(msg);
                return;
            }

            // 添加到写队列
            outboundBuffer.addMessage(msg, size, promise);
跟进addMessage方法,这里面有几个关键的指针属性:
io.netty.channel.ChannelOutboundBuffer#addMessage
    public void addMessage(Object msg, int size, ChannelPromise promise) {
        // 创建 或 对象池复用指针对象,然后填充指针对象
        Entry entry = Entry.newInstance(msg, size, total(msg), promise);

        // 下面的代码逻辑就是调整三指针,有必要画张图来理解
        if (tailEntry == null) {
            flushedEntry = null;
            tailEntry = entry;
        } else {
            Entry tail = tailEntry;
            tail.next = entry;
            tailEntry = entry;
        }
        if (unflushedEntry == null) {
            unflushedEntry = entry;
        }

        // increment pending bytes after adding message to the unflushed arrays.
        // See https://github.com/netty/netty/issues/1619
        // 统计有多少字节被写入
        incrementPendingOutboundBytes(size, false);
    }
上面的指针都指完后,其实就可以理解为已经把数据写到buffer中了,后面flush的流程其实就是拿到这些指针来遍历然后把数据刷到底层socket通道。
下面画出第一次成功初始化指针后的图:
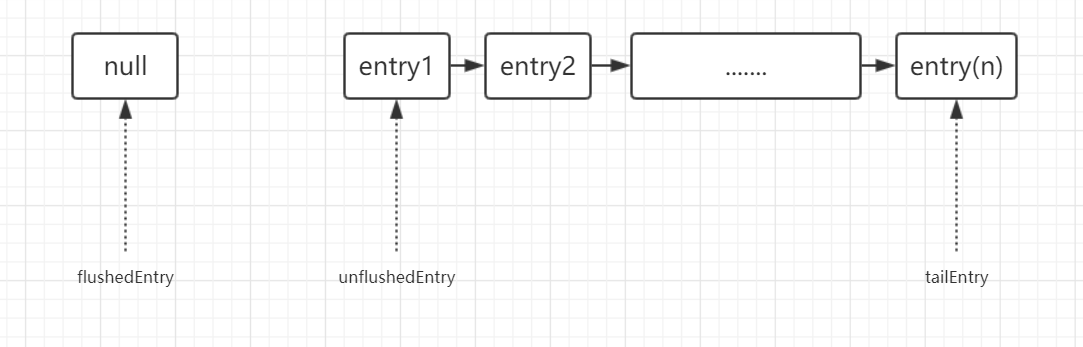
- 注意数据结构是单向链表。
初始化完指针后,incrementPendingOutboundBytes还会做一些统计、校验等操作,跟进去看看:
io.netty.channel.ChannelOutboundBuffer#incrementPendingOutboundBytes(long, boolean)
    private void incrementPendingOutboundBytes(long size, boolean invokeLater) {
        if (size == 0) {
            return;
        }

        // TOTAL_PENDING_SIZE_UPDATER 缓冲区中待写的字节
        // 底层是cas操作更新
        long newWriteBufferSize = TOTAL_PENDING_SIZE_UPDATER.addAndGet(this, size);
        // 如果超过阈值(默认为64 * 1024,也就是64个字节)
        if (newWriteBufferSize > channel.config().getWriteBufferHighWaterMark()) {
            // 设置状态为"不可写"(发起不可写事件传播)
            setUnwritable(invokeLater);
        }
    }
再跟进setUnwritable看看:
io.netty.channel.ChannelOutboundBuffer#setUnwritable
    private void setUnwritable(boolean invokeLater) {
        // 自旋锁
        for (;;) {
            final int oldValue = unwritable;
            final int newValue = oldValue | 1;
            // cas操作,传播是不可写事件
            if (UNWRITABLE_UPDATER.compareAndSet(this, oldValue, newValue)) {
                if (oldValue == 0 && newValue != 0) {
                    fireChannelWritabilityChanged(invokeLater);
                }
                break;
            }
        }
    }
以上就是write将数据“写”至buffer做的所有事了,接下来就是flush方法将buffer的数据刷到底层socket中去了。
刷buffer数据(flush)
好了,现在视角重新回到【坐标1】的代码
io.netty.channel.AbstractChannelHandlerContext#invokeWriteAndFlush
    private void invokeWriteAndFlush(Object msg, ChannelPromise promise) {
        if (invokeHandler()) {
            // 先write,只是写到内存buffer里面
            invokeWrite0(msg, promise);
            // 再flush,把内存buffer的数据刷到socket,执行完下面这一方法,telnet就能收到返回数据。
            invokeFlush0();
        } else {
            writeAndFlush(msg, promise);
        }
    }
跟进invokeFlush0方法:
io.netty.channel.AbstractChannelHandlerContext#invokeFlush0
    private void invokeFlush0() {
        try {
            ((ChannelOutboundHandler) handler()).flush(this);
        } catch (Throwable t) {
            notifyHandlerException(t);
        }
    }
上面的代码依旧是outbound事件传播,最终传到HeadContext节点的flush方法,中间过程我就不一一跟了,直接跳到如下代码:
io.netty.channel.DefaultChannelPipeline.HeadContext#flush
        @Override
        public void flush(ChannelHandlerContext ctx) throws Exception {
            unsafe.flush();
        }
跟进flush方法,此处【坐标4】:
        @Override
        public final void flush() {
            assertEventLoop();

            ChannelOutboundBuffer outboundBuffer = this.outboundBuffer;
            if (outboundBuffer == null) {
                return;
            }

            // 调整指针
            outboundBuffer.addFlush();
            // 刷buffer
            flush0();
        }
先进addFlush方法看看,下面会画个图表示指针的变化:
io.netty.channel.ChannelOutboundBuffer#addFlush
    public void addFlush() {
        // There is no need to process all entries if there was already a flush before and no new messages where added in the meantime.
        //
        // See https://github.com/netty/netty/issues/2577
        // 如果在这之前的write方法中是有数据的,这个指针就不会为null
        Entry entry = unflushedEntry;
        if (entry != null) {
            // 而flushedEntry一般在前面的write方法完了之后都会为null
            if (flushedEntry == null) {
                // there is no flushedEntry yet, so start with the entry
                flushedEntry = entry;
            }
            do {
                // 已flush数量
                flushed ++;
                if (!entry.promise.setUncancellable()) {
                    // Was cancelled so make sure we free up memory and notify about the freed bytes
                    int pending = entry.cancel();
                    // 更新待flush字节、设置写状态
                    decrementPendingOutboundBytes(pending, false, true);
                }
                entry = entry.next;
            } while (entry != null);

            // All flushed so reset unflushedEntry
            unflushedEntry = null;
        }
    }
- decrementPendingOutboundBytes方法跟前面遇到的incrementPendingOutboundBytes相似,有兴趣的可以自己跟下,依旧是统计数量、某阈值一下时传播可写事件等。
结合前面write指针,上面的指针变化如下:

接下来回到【坐标4】的flush方法,持续跟进flush0方法,最终来到以下代码:
io.netty.channel.AbstractChannel.AbstractUnsafe#flush0
        @SuppressWarnings("deprecation")
        protected void flush0() {
            // 如果正在flush,就直接return,避免重复flush
            if (inFlush0) {
                // Avoid re-entrance
                return;
            }

            // 拿到buffer队列
            final ChannelOutboundBuffer outboundBuffer = this.outboundBuffer;
            // 如果buffer队列啥都没有,直接返回
            if (outboundBuffer == null || outboundBuffer.isEmpty()) {
                return;
            }

            // 表示正在flush
            inFlush0 = true;

            // Mark all pending write requests as failure if the channel is inactive.
            // 如果channel失效了,则标记写操作为失败
            if (!isActive()) {
                try {
                    if (isOpen()) {
                        outboundBuffer.failFlushed(FLUSH0_NOT_YET_CONNECTED_EXCEPTION, true);
                    } else {
                        // Do not trigger channelWritabilityChanged because the channel is closed already.
                        outboundBuffer.failFlushed(FLUSH0_CLOSED_CHANNEL_EXCEPTION, false);
                    }
                } finally {
                    inFlush0 = false;
                }
                return;
            }

            try {
                // flush数据至底层socket
                doWrite(outboundBuffer);
            } catch (Throwable t) {
                if (t instanceof IOException && config().isAutoClose()) {
                    close(voidPromise(), t, FLUSH0_CLOSED_CHANNEL_EXCEPTION, false);
                } else {
                    outboundBuffer.failFlushed(t, true);
                }
            } finally {
                inFlush0 = false;
            }
        }
跟进doWrite方法,我们的实验代码就是在这里真正flush数据的:
io.netty.channel.socket.nio.NioSocketChannel#doWrite
    @Override
    protected void doWrite(ChannelOutboundBuffer in) throws Exception {
        for (;;) {
            int size = in.size();
            if (size == 0) {
                // All written so clear OP_WRITE
                clearOpWrite();
                break;
            }
            long writtenBytes = 0;
            boolean done = false;
            boolean setOpWrite = false;

            // Ensure the pending writes are made of ByteBufs only.
            // 根据前面设置的指针,取到要flush的buffer段
            ByteBuffer[] nioBuffers = in.nioBuffers();
            int nioBufferCnt = in.nioBufferCount();
            long expectedWrittenBytes = in.nioBufferSize();
            // 拿到jdk原生channel
            SocketChannel ch = javaChannel();

            // Always us nioBuffers() to workaround data-corruption.
            // See https://github.com/netty/netty/issues/2761
            // 下面三种case最终都是将之前write方法写到缓存队列的数据再写到底层socket
            // 即发送给客户端
            switch (nioBufferCnt) {
                // 若待刷的buffer节点为0
                case 0:
                    // We have something else beside ByteBuffers to write so fallback to normal writes.
                    // 最终还是会调用到case1或default的write方法,只不过是多做了些特殊处理。
                    super.doWrite(in);
                    return;
                // 若待刷buffer节点为1
                // 实验代码是进入这里
                case 1:
                    // Only one ByteBuf so use non-gathering write
                    ByteBuffer nioBuffer = nioBuffers[0];
                    // 自旋,默认自旋16次,建议亲自看下文档
                    for (int i = config().getWriteSpinCount() - 1; i >= 0; i --) {
                        // 向底层socket(channel)输出数据,并返回输出的量,已经是jdk底层的方法了。
                        // 执行完下面这个方法后,我们的telnet就能看到返回结果了。
                        final int localWrittenBytes = ch.write(nioBuffer);
                        if (localWrittenBytes == 0) {
                            setOpWrite = true;
                            break;
                        }
                        expectedWrittenBytes -= localWrittenBytes;
                        writtenBytes += localWrittenBytes;
                        if (expectedWrittenBytes == 0) {
                            done = true;
                            break;
                        }
                    }
                    break;
                // 若待刷buffer为其它情况
                default:
                    for (int i = config().getWriteSpinCount() - 1; i >= 0; i --) {
                        // 同上
                        final long localWrittenBytes = ch.write(nioBuffers, 0, nioBufferCnt);
                        if (localWrittenBytes == 0) {
                            setOpWrite = true;
                            break;
                        }
                        expectedWrittenBytes -= localWrittenBytes;
                        writtenBytes += localWrittenBytes;
                        if (expectedWrittenBytes == 0) {
                            done = true;
                            break;
                        }
                    }
                    break;
            }

            // Release the fully written buffers, and update the indexes of the partially written buffer.
            // 指针复位、清空buffer、元素置空(GC)等操作
            in.removeBytes(writtenBytes);

            if (!done) {
                // Did not write all buffers completely.
                incompleteWrite(setOpWrite);
                break;
            }
        }
    }
至此,实验代码的writeAndFlush流程就走完了,telnet也收到服务器的响应了。