前言
- 这篇也是看完油管教程之后写的,本来看着比较简单是不打算写的,但看着原本的效果还有一些修正空间就还是写一写;另外,这个demo让我确切的感受到帧数可能带来的各种bug,这也是专门写一下的原因。
- 顺便安利下王国之心,其中《王国之心:梦中降生》就是我的在这个系列入坑作,也是我觉得战斗风格+剧情最好看的一部
- 然而这一篇我们做的是第三部的(第三部的战斗风格有点子供向,个人感觉一般般= =
关于shader(写过一篇)、粒子系统、Cinemachine等基础在本文不会涉及
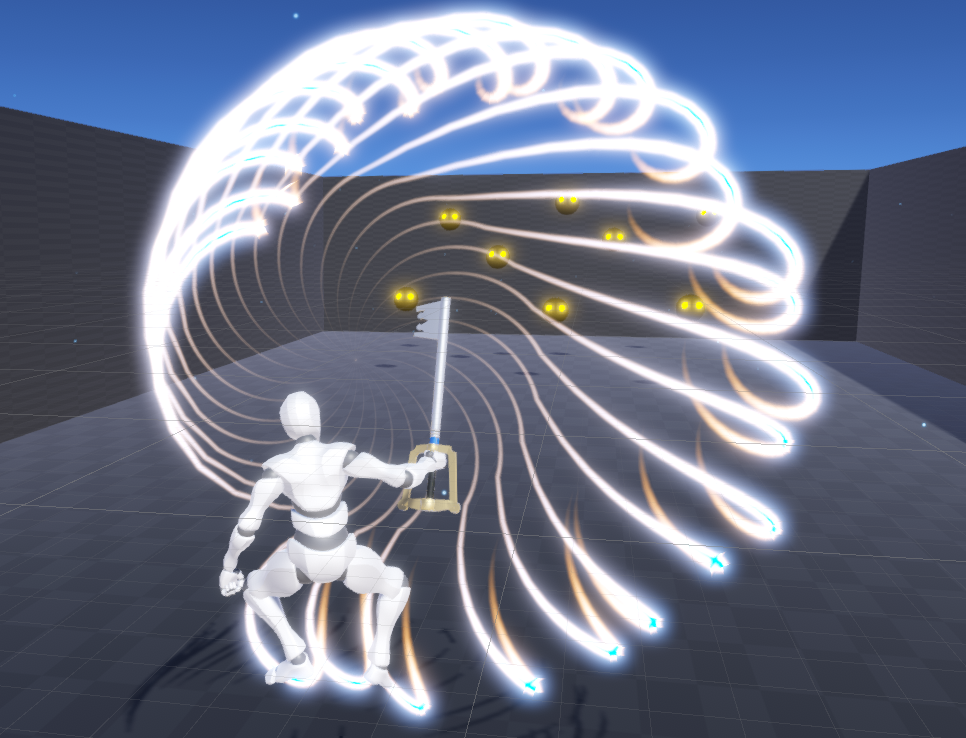
效果预览
- 这次的模仿对象是王国之心3的粒子技能模式,和梦中降生是有区别的
- 另外,本次教程特别说明:注意锁定的帧数,帧数更高或更低是需要额外适配的(原教程估计是锁60帧的,原因之后说)
梦中降生的粒子
王国之心3的粒子
原教程效果(锁60帧)
修正后的效果(锁120帧)
- 修正前后的具体效果差别,等到了具体部分再一一说明
基础环境
- 这次处理基本的场景搭建+移动+相机外,还有个重要的东西叫TimeLine,如果你找一些大招CG的制作教程,那么基本属于必用项,所以在这里也不多解释,不熟的可以参考这个教程
- 当前的TimeLine内容如下:
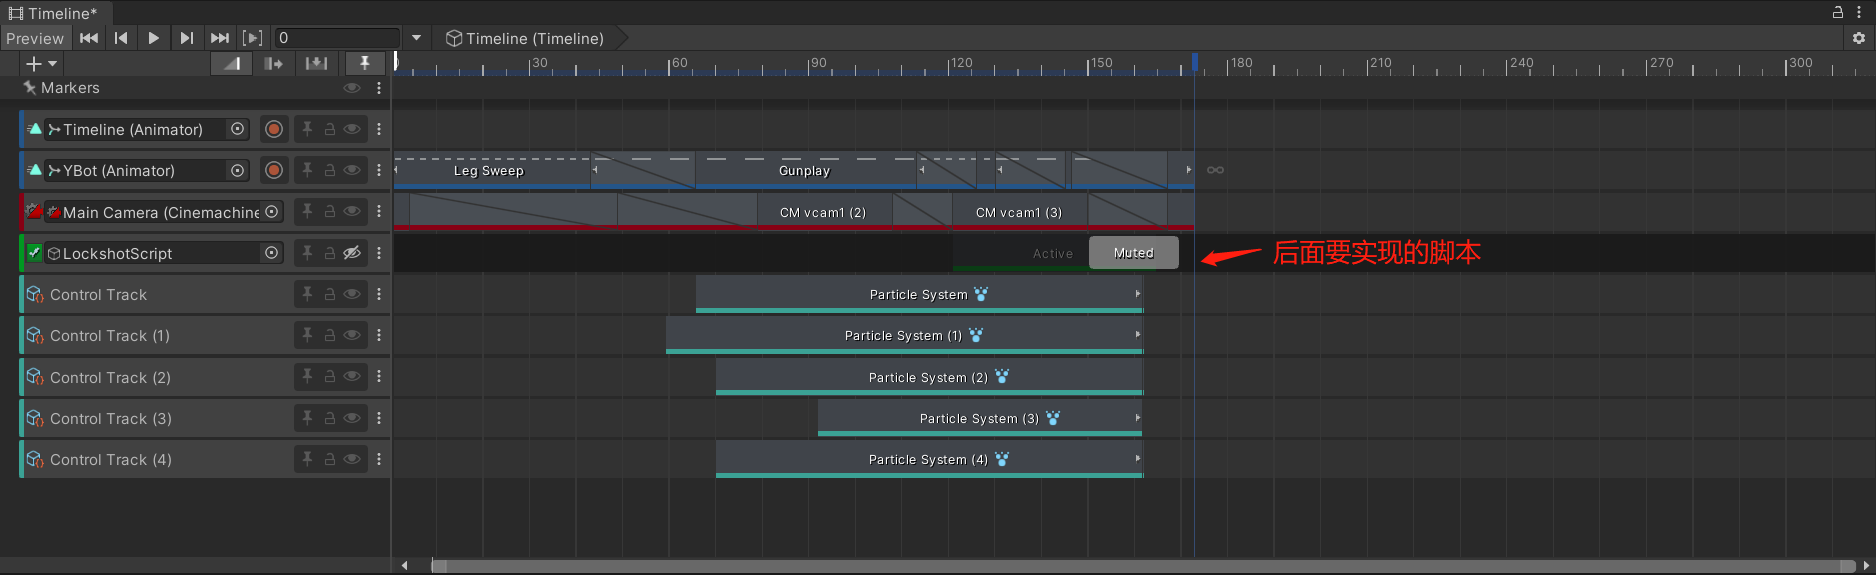
- 当前TimeLine的效果如下,就是一个技能的释放动作:
- 后续只要知道播放TimeLine的时候是播放这个技能动作+调整摄像机偏移即可
- 其余的基础环境如下,一些敌人和可移动的主角:
逐步实现
实现瞄准
- 在实现之前,我们先锁定一些基本参数,如帧数先锁定60(便于看原教程的BUG),创建
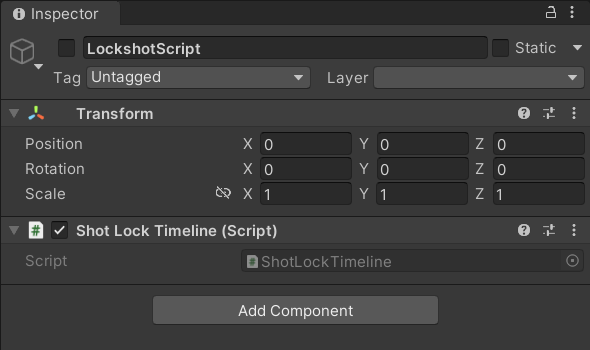
ShotLock_Clone脚本挂载在主角身上,内容如下:
public class ShotLock_Clone : MonoBehaviour
{
    private Animator anim;
    private MovementInput input;
    private PostProcessVolume postVolume;
    private PostProcessProfile postProfile;

    private void Awake()
    {
        QualitySettings.vSyncCount = 0;
        Application.targetFrameRate = 60;
    }

    void Start()
    {
        postVolume = Camera.main.GetComponentInChildren<PostProcessVolume>();
        postProfile = postVolume.profile;
        anim = this.GetComponent<Animator>();
        input = GetComponent<MovementInput>();
    }
}
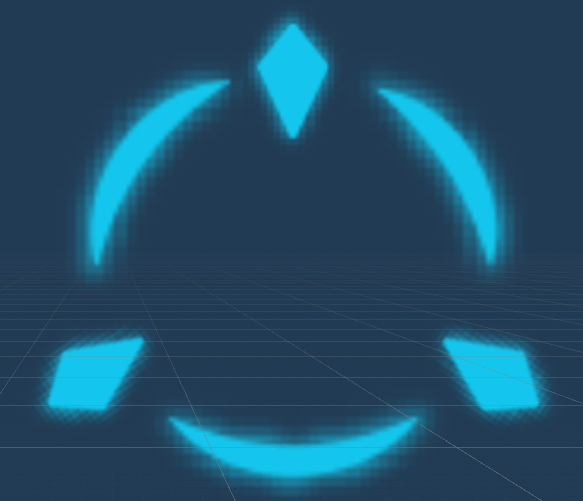
- 首先是瞄准状态的UI,核心就是两个圆环,外层圆环被脚本控制Fill Amount而逐渐消失,效果大致如下:
- 除了圆环的显现外,我们还希望进入瞄准时,镜头视角能进入一种瞄准镜的效果,现
ShotLock_Clone种增加代码如下:
    [Space]
    [Header("Aim and Zoom")]
    public bool aiming; // 是否处于瞄准状态
    public CinemachineFreeLook thirdPersonCamera; // 摄像机
    public float zoomDuration = .3f; // 摄像机动画时间
    private float originalFOV; // 默认FOV
    public float zoomFOV = 13; // 瞄准FOV
    private Vector3 originalCameraOffset; // 默认相机偏移
    public Vector3 zoomCameraOffset = new Vector3(.5f, 1.5f, 0); // 瞄准摄像机偏移
    private InterfaceAnimator ui;

    void Start()
    {
        // 略
        ui = GetComponent<InterfaceAnimator>();
        originalFOV = thirdPersonCamera.m_Lens.FieldOfView;
        originalCameraOffset = thirdPersonCamera.GetRig(1).GetCinemachineComponent<CinemachineComposer>().m_TrackedObjectOffset;
    }
- 再编写上面未定义的
InterfaceAnimator类用来控制瞄准圆环的显现,代码如下(同样挂载在主角身上,记得挂载需要的对象):
public class InterfaceAnimator : MonoBehaviour
{
    public Canvas canvas;
    public CanvasGroup aim;
    public Image ringSlider;

    private void Start()
    {
        aim.alpha = 0;
    }

    public void ShowAim(bool state)
    {
        aim.DOComplete();
        ringSlider.DOComplete();

        float alpha = state ? 1 : 0;
        float fill = state ? 1 : 0;
        float endFill = state ? 0 : 1;
        float time = state ? 8 : 0;

        aim.alpha = alpha;
        ringSlider.fillAmount = fill;
        ringSlider.DOFillAmount(endFill, time);
    }
}
- 再重新回到
ShotLock_Clone脚本中,修改如下:
    void Update()
    {
        // 右键按住进入瞄准模式
        if (Input.GetMouseButtonDown(1))
        {
            DOVirtual.Float(postProfile.GetSetting<Vignette>().intensity.value, .8f, .2f, SetVignette);
            Aim(true);
        }

        // 右键松开退出瞄准模式
        if (Input.GetMouseButtonUp(1))
        {
            DOVirtual.Float(postProfile.GetSetting<Vignette>().intensity.value, 0, .2f, SetVignette);
            Aim(false);
        }
    }

    public void Aim(bool state)
    {
        ui.ShowAim(state);
        if (!state)
        {
            StopAllCoroutines();
        }

        aiming = state;
        float fov = state ? zoomFOV : originalFOV;
        Vector3 offset = state ? zoomCameraOffset : originalCameraOffset;
        float stasisEffect = state ? .4f : 0;

        // 设置相机FOV和偏移
        CinemachineComposer composer = thirdPersonCamera.GetRig(1).GetCinemachineComponent<CinemachineComposer>();
        DOVirtual.Float(thirdPersonCamera.m_Lens.FieldOfView, fov, zoomDuration, SetFieldOfView);
        DOVirtual.Float(composer.m_TrackedObjectOffset.x, offset.x, zoomDuration, SetCameraOffsetX);
        DOVirtual.Float(composer.m_TrackedObjectOffset.y, offset.y, zoomDuration, SetCameraOffsetY);
    }


    void SetFieldOfView(float x)
    {
        thirdPersonCamera.m_Lens.FieldOfView = x;
    }
    void SetCameraOffsetX(float x)
    {
        for (int i = 0; i < 3; i++)
        {
            thirdPersonCamera.GetRig(i).GetCinemachineComponent<CinemachineComposer>().m_TrackedObjectOffset.x = x;
        }
    }
    void SetCameraOffsetY(float y)
    {
        for (int i = 0; i < 3; i++)
        {
            thirdPersonCamera.GetRig(i).GetCinemachineComponent<CinemachineComposer>().m_TrackedObjectOffset.y = y;
        }
    }

    /// <summary>
    /// 后处理效果
    /// </summary>
    void SetVignette(float x)
    {
        postProfile.GetSetting<Vignette>().intensity.value = x;
    }
- 当前效果如下:
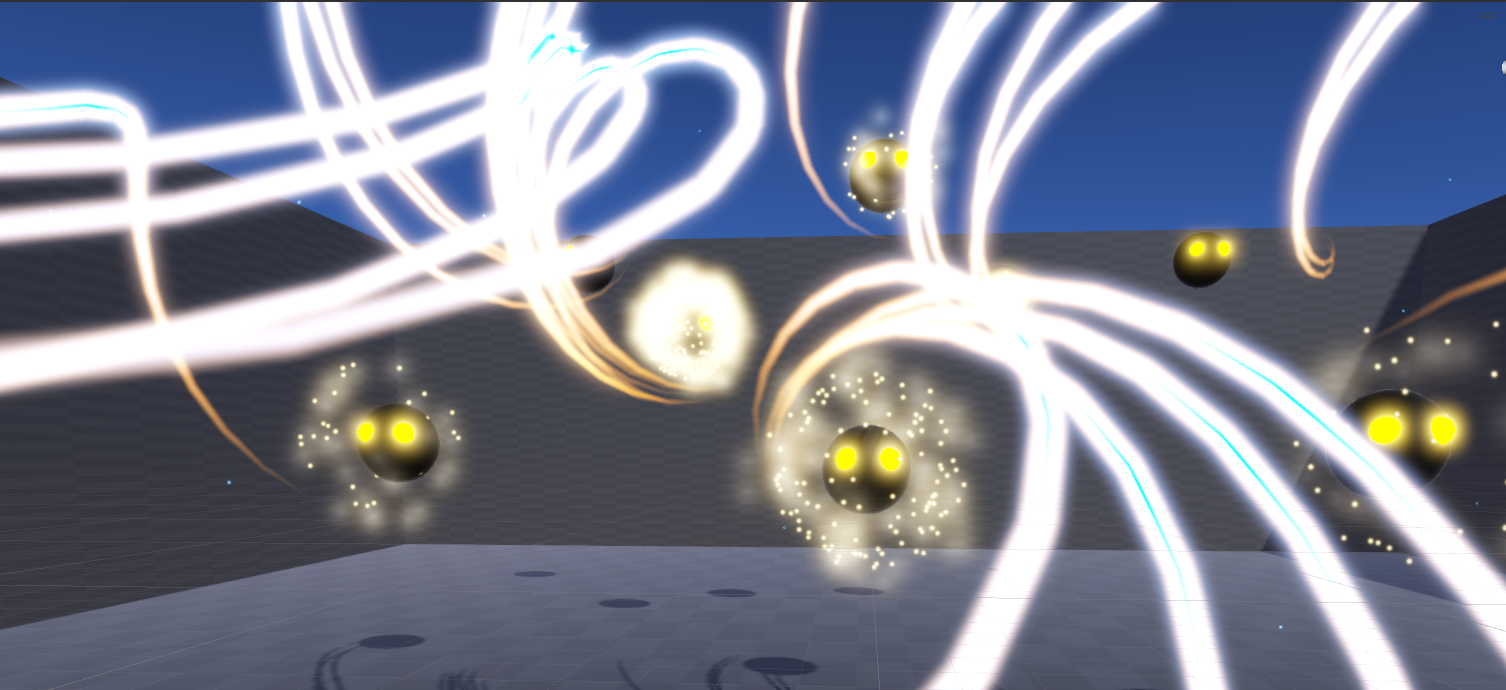
- 之后就是要实现对敌人的处理了,总的来说需要有如下效果:
- 同个一人可多次瞄准,直到弹药消耗完毕
- 敌人被瞄准多少次最终就有多少子弹落在该敌人身上
- 只有在圆环内的敌人才会被瞄准
- 敌人每次被瞄准,锁定图标都会重新落在敌人身上(这里没有做随机偏移,感兴趣的可以自己实现下)
- 锁定的UI样式当前如下:
- 并且该UI还挂载
LockFollowUI脚本用于控制动画效果:
public class LockFollowUI : MonoBehaviour
{
    private RectTransform rect;
    private CanvasGroup canvas;
    public Transform target;

    private void Start()
    {
        canvas = GetComponent<CanvasGroup>();
        rect = transform.GetChild(0).GetComponent<RectTransform>();
        Animate();
    }

    public void Animate()
    {
        // 强制完成先前动画
        canvas.DOComplete();
        rect.DOComplete();
        transform.DOComplete();

        canvas.alpha = 0;
        rect.sizeDelta = new Vector2(500, 500);
        transform.GetChild(0).localScale = Vector3.one * 10;

        rect.DOSizeDelta(new Vector2(100, 100), .2f).SetEase(Ease.InOutSine);
        transform.GetChild(0).DOScale(1, .4f);
        canvas.DOFade(1, .5f);
    }

    void Update()
    {
        if(target!=null)
        transform.position = Camera.main.WorldToScreenPoint(target.position);
    }
}
- 有了UI后,我们还要将瞄准范围内的敌人加入一个List,那么怎么控制瞄准范围呢?这里使用了Capsule Collider跟随视角方向,只要进/出就插入/删除:
- 触发体身上挂载的脚本如下(部分实现ShotLock_Clone补上):
public class TargetDetection : MonoBehaviour
{
    public ShotLock_Clone shotLock;
    private new Collider collider;

    [Space]
    [Header("敌人列表")]
    public List<Transform> targets = new List<Transform>();

    private void Start()
    {
        collider = GetComponent<Collider>();
    }

    public void SetCollider(bool state)
    {
        collider.enabled = state;
    }

    private void OnTriggerEnter(Collider other)
    {
        if (other.CompareTag("Enemy"))
        {
            shotLock.TargetState(other.transform, true);
        }
    }

    private void OnTriggerExit(Collider other)
    {
        if (other.CompareTag("Enemy"))
        {
            shotLock.TargetState(other.transform, false);

        }
    }
ShotLock_Clone中实现目标的管理,当前改动如下:
    public TargetDetection detection; // 记得挂载触发体

    public void TargetState(Transform target, bool state)
    {
        if (!state && detection.targets.Contains(target))
            detection.targets.Remove(target);

        if (state && !detection.targets.Contains(target))
            detection.targets.Add(target);
    }

    public void Aim(bool state)
    {
        //略......
        if (!state)
        {
            // 略......
            detection.targets.Clear();
        }
        detection.SetCollider(state);
        // 略......
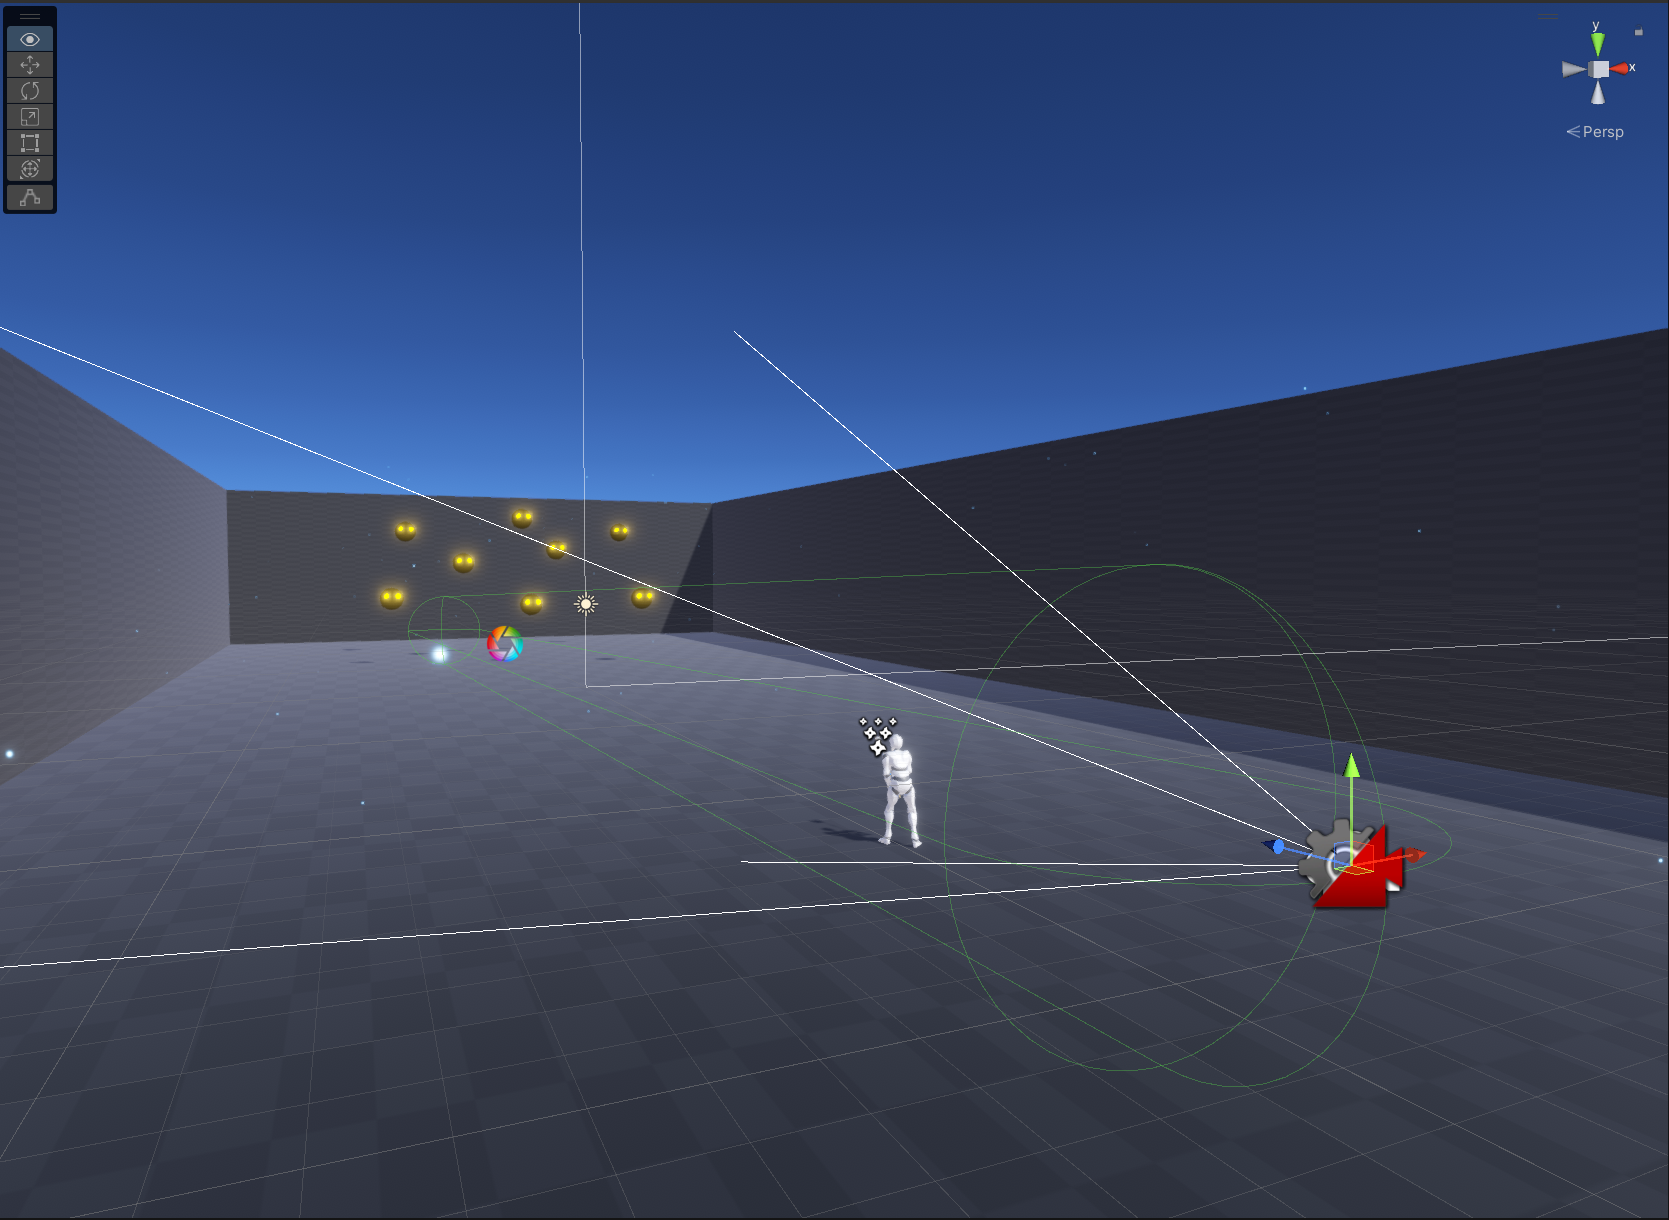
- 当前效果如下:
- 之后要做的事情如下:
- 循环遍历当前触发体内的敌人
- 每遍历到一次的敌人加入一个新的集合,用作子弹飞向的方向
- 每遍历到一次的敌人,重新在它身上播放锁定图标
ShotLock_Clone的修改如下:
    public List<Transform> finalTargets = new List<Transform>();
    private float time;
    private int index = 0;
    private int limit = 25; // 子弹数量上限

    void Update()
    {
        // 略......
        // 右键松开退出瞄准模式
        if (Input.GetMouseButtonUp(1))
        {
            DOVirtual.Float(postProfile.GetSetting<Vignette>().intensity.value, 0, .2f, SetVignette);
            if (finalTargets.Count > 0)
            {
                input.enabled = false;
                // 销毁瞄准图标
                LockFollowUI[] locks = FindObjectsOfType<LockFollowUI>();
                foreach (LockFollowUI l in locks)
                {
                    Destroy(l.gameObject);
                }
            }

            Aim(false);
        }

        if (aiming)
        {
            // 处于瞄准状态,遍历当前触发体内的敌人,并添加到finalTargets中,知道子弹数量消耗完
            if (time >= 5)
            {
                time = 0;

                List<Transform> oldTargets = new List<Transform>();
                oldTargets = detection.targets;

                if (oldTargets.Count > 0 && finalTargets.Count < limit)
                {
                    if (index < oldTargets.Count)
                    {
                        ui.LockTarget(oldTargets[index]); // 下面实现
                        finalTargets.Add(oldTargets[index]);
                    }

                    index = Mathf.Min(oldTargets.Count - 1, index + 1);
                    if (index == oldTargets.Count - 1)
                    {
                        index = 0;
                    }
                }
            }
            else
            {
                time++;
            }
        }
    }
- 遍历和添加到新集合都完成了,接下来就是实现锁定图标的动画函数
LockTarget,InterfaceAnimator的修改如下:
    public GameObject lockPrefab; // 锁定图标,别忘了挂载上预制体

    /// <summary>
    /// 锁定图标控制
    /// </summary>
    public void LockTarget(Transform target)
    {
        Vector3 targetScreenPos = Camera.main.WorldToScreenPoint(target.position);

        LockFollowUI[] locks = FindObjectsOfType<LockFollowUI>();

        // 如果目标已经被锁定了,那只播放一次瞄准图标的动画
        foreach (LockFollowUI l in locks)
        {
            if (l.target == target)
            {
                l.Animate();
                return;
            }
        }

        // 没有被锁定则生成一个icon图标,并且添加到canvas下
        GameObject lockIcon = Instantiate(lockPrefab, targetScreenPos, Quaternion.identity, canvas.transform);
        lockIcon.GetComponent<LockFollowUI>().target = target;
    }
- 当前效果如下:
原教程瞄准的BUG
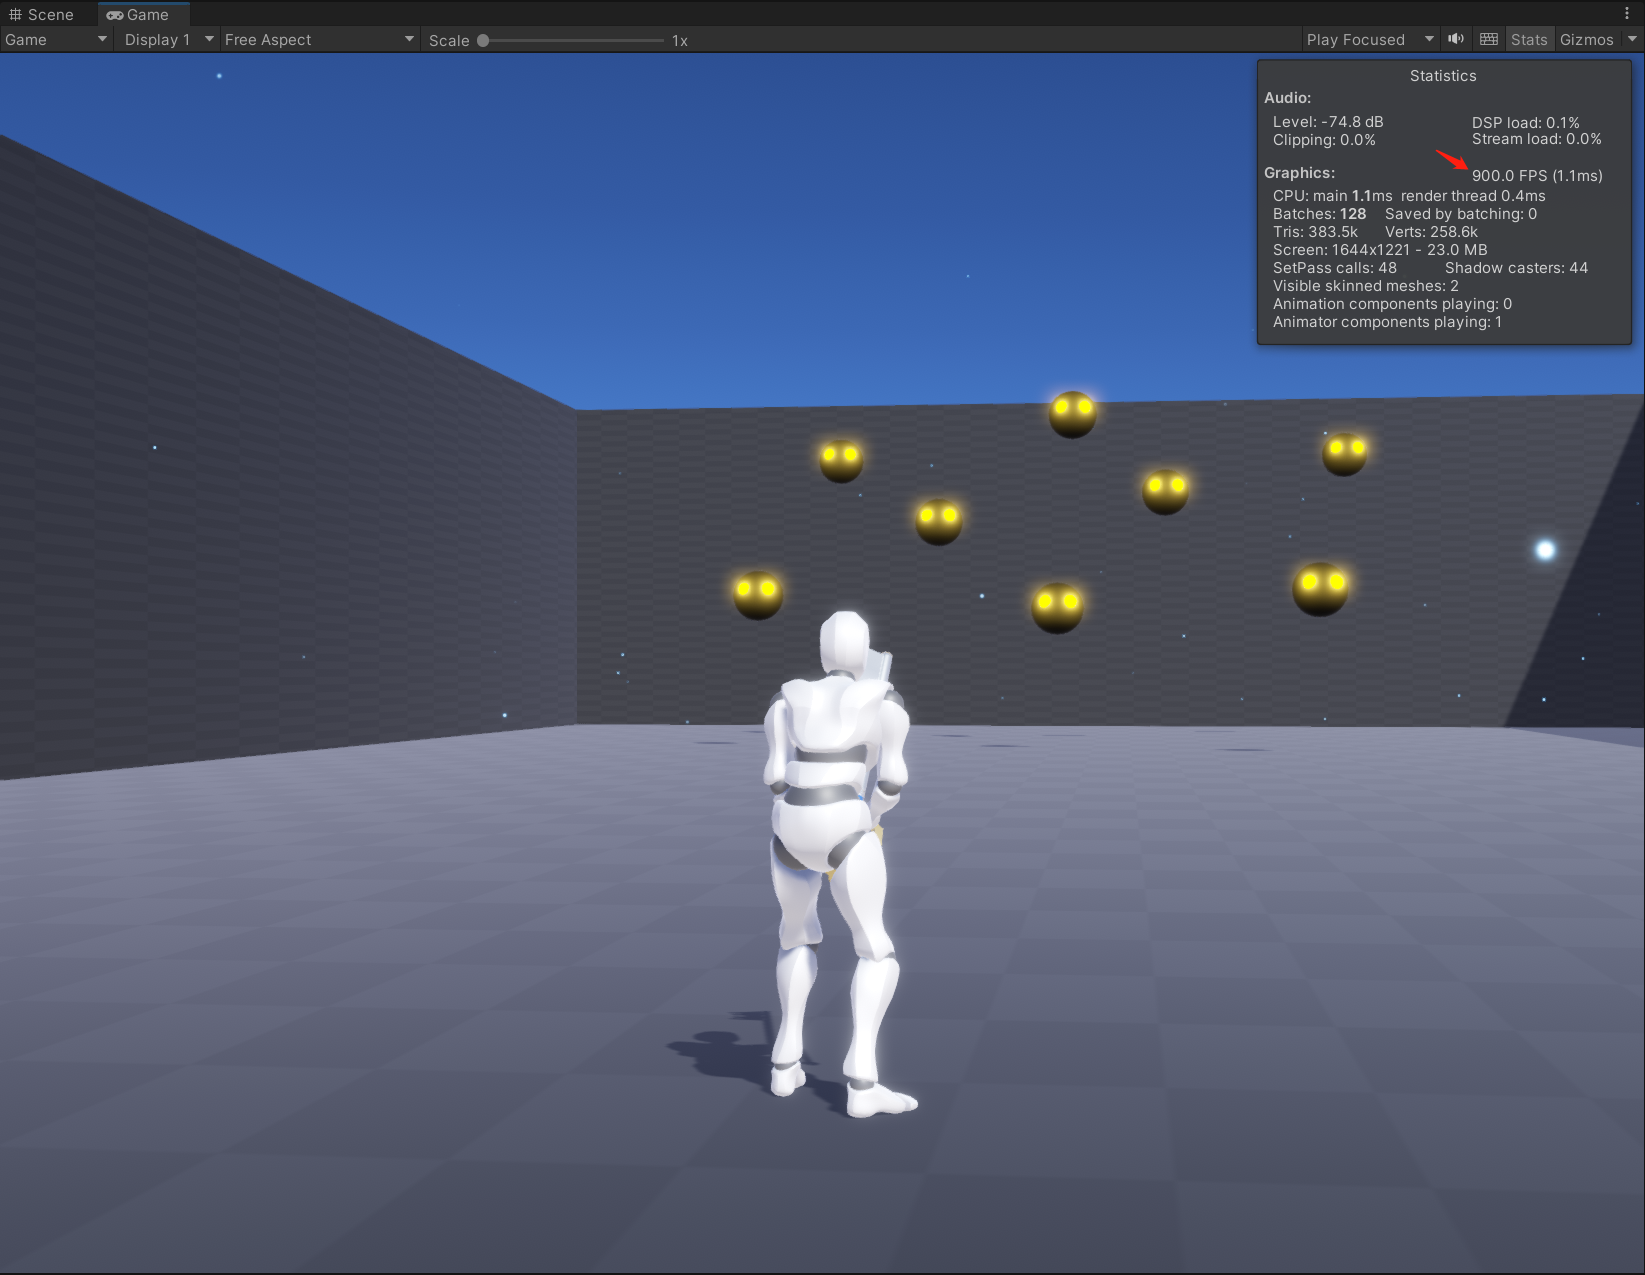
- 上面的代码其实是有问题的,让问题暴露出来很简单,只要把我们一开始锁定60帧的配置注释掉就行
- 事实上原教程的代码、工程配置都没有锁定帧数,因为上面的代码时每5帧一次轮询,所以一但帧数不加限制,比如修改代码如下:
    private void Awake()
    {
        QualitySettings.vSyncCount = 0;
        Application.targetFrameRate = -1;
    }
- 就会导致瞄准在一瞬间就结束了(900FPS):
- 至于修复的方式也很简单,从次数间隔变为时间间隔即可,
ShotLock_Clone的Update函数修改如下:
    void Update()
    {
        // 略......
        // 如果在瞄准状态,则遍历触发体内的敌人添加到finalTargets,知道弹药上限
        if (aiming)
        {

            if (time >= 0.1)
            {
                time = 0;

                List<Transform> oldTargets = new List<Transform>();
                oldTargets = detection.targets;

                if (oldTargets.Count > 0 && finalTargets.Count < limit)
                {
                    // 按顺序给触发体内的敌人设置瞄准图标
                    if (index < oldTargets.Count)
                    {
                        //Debug.Log("index:" + index + ", oldTargets.Count:" + oldTargets.Count);
                        ui.LockTarget(oldTargets[index]);
                        finalTargets.Add(oldTargets[index]);
                    }

                    index = Mathf.Min(oldTargets.Count - 1, index + 1);
                    // 轮询完一次,进行下一轮
                    if (index == oldTargets.Count - 1)
                    {
                        index = 0;
                    }
                }
            }
            else
            {
                //原本的计算方式是固定5帧锁定一次,但这对于高帧率来说,会造成一瞬间就锁定完
                //time++;
                time += Time.deltaTime;
            }
        }
    }
- 修复后,在高帧率效果如下:
- 如果觉得间隔不合适,你自然是可以再调的
- 不过需要注意的是,不合理的帧数不仅仅影响瞄准这一个功能,很多依赖
Time.deltaTime的功能也会出问题(可能这也是为什么大部分游戏只提供几个固定帧率的原因),所以在这之后,我都以固定120帧为标准实现、展示效果:
    private void Awake()
    {
        QualitySettings.vSyncCount = 0;
        Application.targetFrameRate = 120;
    }
子弹生成+技能动画
- 首先是生成子弹,生成的子弹数目跟
finalTargets一致,并且发射角度要根据数量发散 - 实现上述功能,在
ShotLock_Clone中代码变更如下:
    public GameObject projectilePrefab; // 子弹预制体,不要忘了挂载
    public Transform weaponTip; // 粒子特效父对象,技能闪光处,不要忘了挂载

    /// <summary>
    /// 生成子弹的逻辑
    /// </summary>
    public void ActivateShotLock()
    {
        for (int i = 0; i < finalTargets.Count; i++)
        {
            float angle = (360 / finalTargets.Count);
            float z = angle * (i + 1);
            Vector3 cam = Camera.main.transform.eulerAngles;
            GameObject projectile = Instantiate(projectilePrefab, weaponTip.transform.position, Quaternion.Euler(cam.x, cam.y, z));
        }
    }
- 再加上一些动作、播放TimeLine(还是
ShotLock_Clone):
    public PlayableDirector director; // TimeLine,不要忘了挂载
    public bool cinematic; // 是否处于释放技能中

    void Update()
    {
        // 略......
        // 右键松开退出瞄准模式
        if (Input.GetMouseButtonUp(1))
        {
            DOVirtual.Float(postProfile.GetSetting<Vignette>().intensity.value, 0, .2f, SetVignette);=
            if (finalTargets.Count > 0)
            {
                director.Play();
                input.anim.SetFloat("PosY", 1);
                input.enabled = false;
                cinematic = true;
                transform.position += Vector3.up * 3;
                // 略......
            }
            // 略......
        }
    }

    public void Aim(bool state)
    {
        // 略......
        if (!state && !cinematic)
        {
            StopAllCoroutines();
            detection.targets.Clear();
            finalTargets.Clear();
            index = 0;
        }
        // 略......
    }
- 为了控制子弹发射的时机,我们编写一个新的脚本
ShotLockTimeline来调用刚才的ActivateShotLock:
/// <summary>
/// 被TimeLine激活的脚本,激活/失活回调相应逻辑,如利用激活时机发射子弹
/// </summary>
public class ShotLockTimeline : MonoBehaviour
{

    private ShotLock_Clone shotlock;
    private MovementInput movement;

    ///// <summary>
    ///// 在TimeLine中激活
    ///// </summary>
    private void OnEnable()
    {
        shotlock = GetComponentInParent<ShotLock_Clone>();
        movement = FindObjectOfType<MovementInput>();
        shotlock.ActivateShotLock();
        movement.enabled = false;

    }

    private void OnDisable()
    {
        shotlock.cinematic = false;
        shotlock.Aim(false);

        movement.transform.DOMoveY(0, .5f).SetEase(Ease.InSine).OnComplete(() => movement.enabled = true);

    }
}
- 新建一个空物体,默认失活,此脚本挂载上去:
- 然后再TimeLine中以合适的时机激活:
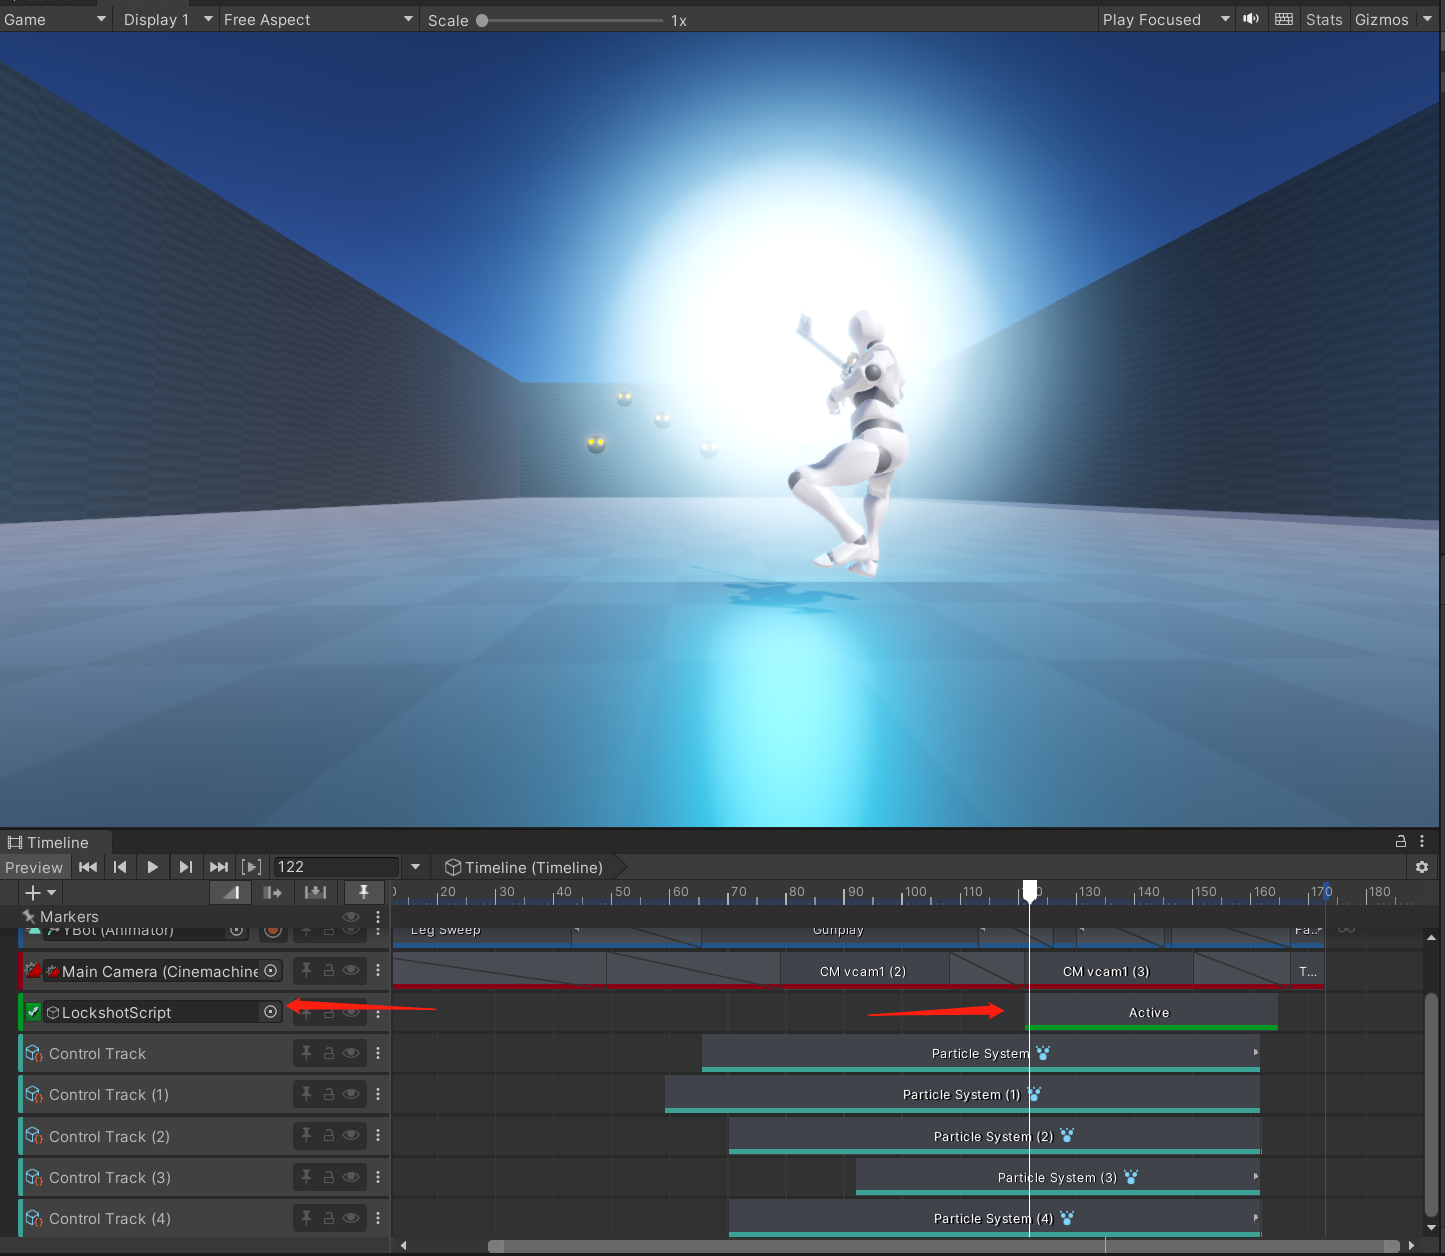
- 当前效果如下(子弹确实生成了,只是飞行逻辑还没编写,所以看不到):
子弹飞行逻辑
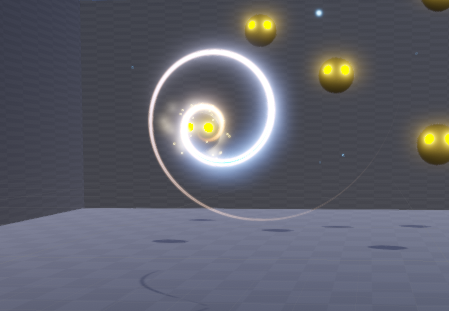
- 子弹的飞行逻辑拆分为两个阶段:
- 初始化阶段,也就是子弹以万花筒的效果飞出:
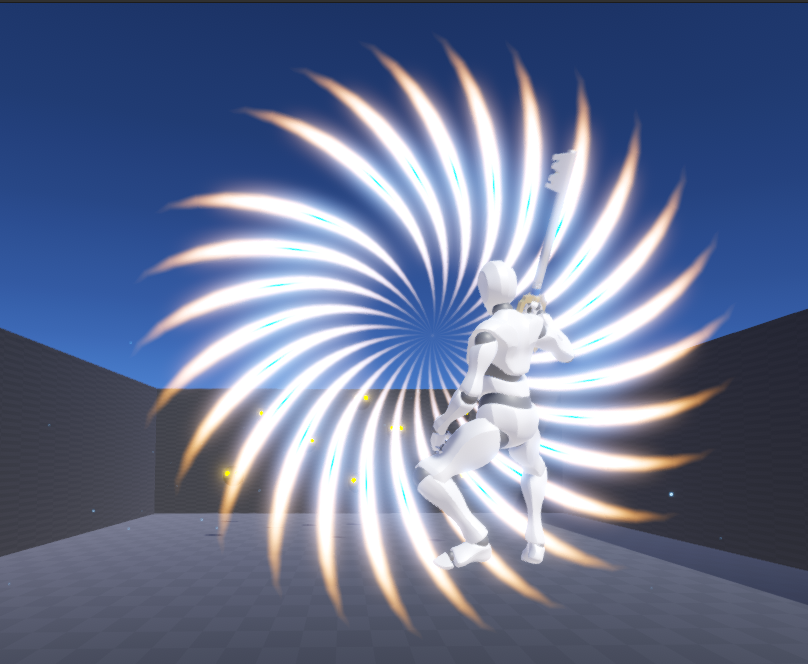
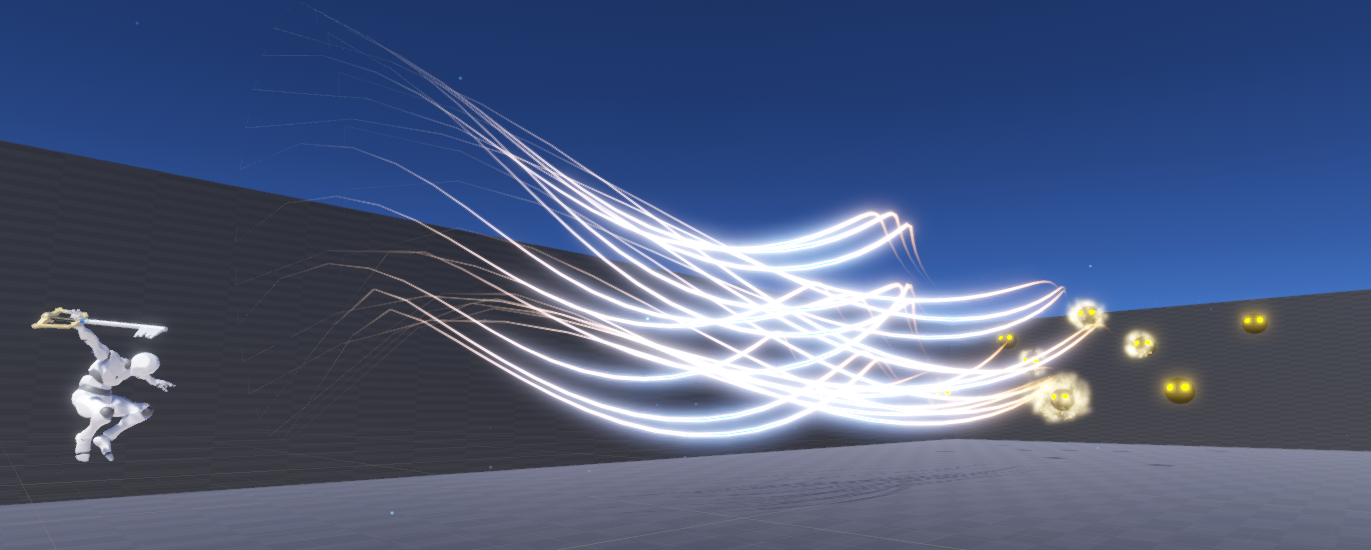
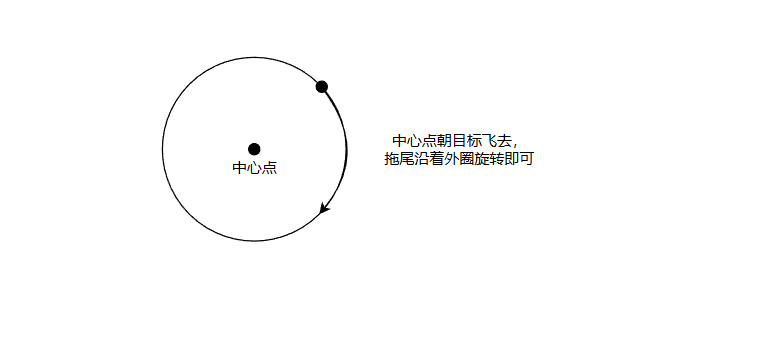
- 飞向敌人阶段,会产生一个螺旋式的轨迹:
- 我们先来实现第一个阶段,首先我们要回忆起
ActivateShotLock子弹生成的方向是与摄像机看向的方向是一致的: 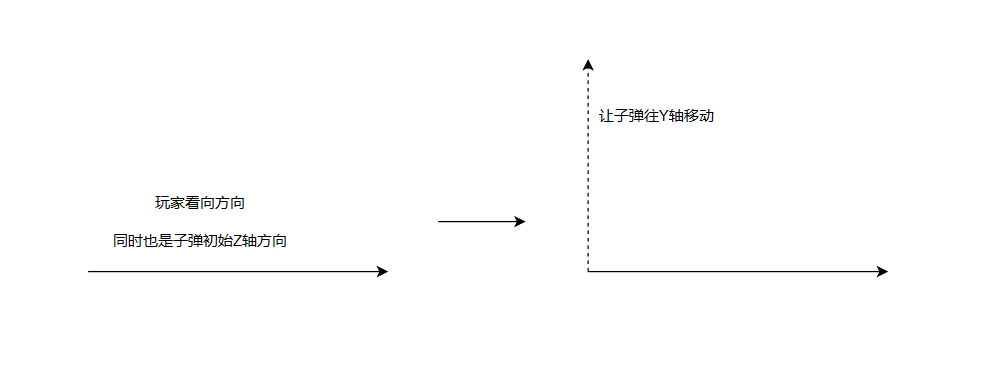
- 在往Y轴移动的过程中,再调整角度就可以达成万花筒的模式,子弹飞行脚本
ProjectileScript_Clone如下:
public class ProjectileScript_Clone : MonoBehaviour
{
    public float rotationSpeed = 400; // 旋转速度
    public float movementSpeed = 35; // 移动速度
    public float initialWait = 0.5f; // 初始化时长
    public bool initial = true; // 是否正在初始化

    // Start is called before the first frame update
    void Start()
    {
        StartCoroutine(InitialWait());
        Destroy(gameObject, 3); // 打不中也消失
    }

    // Update is called once per frame
    void Update()
    {
        if (initial)
        {
            transform.eulerAngles += Vector3.forward * Time.deltaTime * (rotationSpeed / 2);
            transform.position += transform.up * Time.deltaTime * (movementSpeed / 8f);
        }
        else
        {
            // 待实现
        }
    }

    IEnumerator InitialWait()
    {
        yield return new WaitForSeconds(initialWait / 2);
        // 待实现
        yield return new WaitForSeconds(initialWait / 2);
        // 待实现
        initial = false;
    }
}
- 当前效果如下:
- 之后就是要实现子弹螺旋式地飞向敌人,这里实现的思路如下:
- 当前
ProjectileScript_Clone修改代码如下:
    public Transform target; // 要飞向的敌人
    public GameObject hitParticle; // 击中后的爆炸特效,不要忘了挂载
    private float multiplier = 1; // 原本是控制随机速度的,但我随机后不利于调试问题,所以暂时砍掉了

    void Update()
    {
        if (initial)
        {
            // 略......
        }
        else
        {
            var targetRotation = Quaternion.LookRotation(target.transform.position - transform.position);
            transform.rotation = Quaternion.Slerp(transform.rotation, targetRotation, .5f);
            //transform.LookAt(target.position);
            transform.position += transform.forward * Time.deltaTime * (movementSpeed * multiplier);
            transform.GetChild(0).eulerAngles += Vector3.forward * Time.deltaTime * rotationSpeed * 1.5f;
        }
    }

    IEnumerator InitialWait()
    {
        yield return new WaitForSeconds(initialWait / 2);
        transform.GetChild(0).GetChild(0).DOLocalMoveY(1, .2f); // 拖尾移动半径距离
        yield return new WaitForSeconds(initialWait/2);
        DOVirtual.Float(rotationSpeed, rotationSpeed * 1.5f, .3f, SetRotationSpeed);
        initial = false;
    }

    private void SetRotationSpeed(float x)
    {
        rotationSpeed = x;
    }

    // 碰撞到敌人就产生爆炸特效+延迟销毁
    private void OnTriggerEnter(Collider other)
    {
        if (other.name == target.name)
        {
            Instantiate(hitParticle, transform.position, Quaternion.identity);
            Transform trail = transform.GetChild(0).GetChild(0);
            Destroy(trail.gameObject, .8f);
            trail.parent = null;
            Destroy(gameObject);
        }
    }
- 然后在前面
ShotLock_Clone的ActivateShotLock函数中再添加上target:
    public void ActivateShotLock()
    {
        for (int i = 0; i < finalTargets.Count; i++)
        {
            // 略......
            projectile.GetComponent<ProjectileScript_Clone>().target = finalTargets[i];
        }
    }
- 当前效果如下:
- 直到这里,就是原教程的所有内容了,但其实还是有很多看不顺眼的地方,所以我后续又稍微优化了一下。
原教程毛病优化
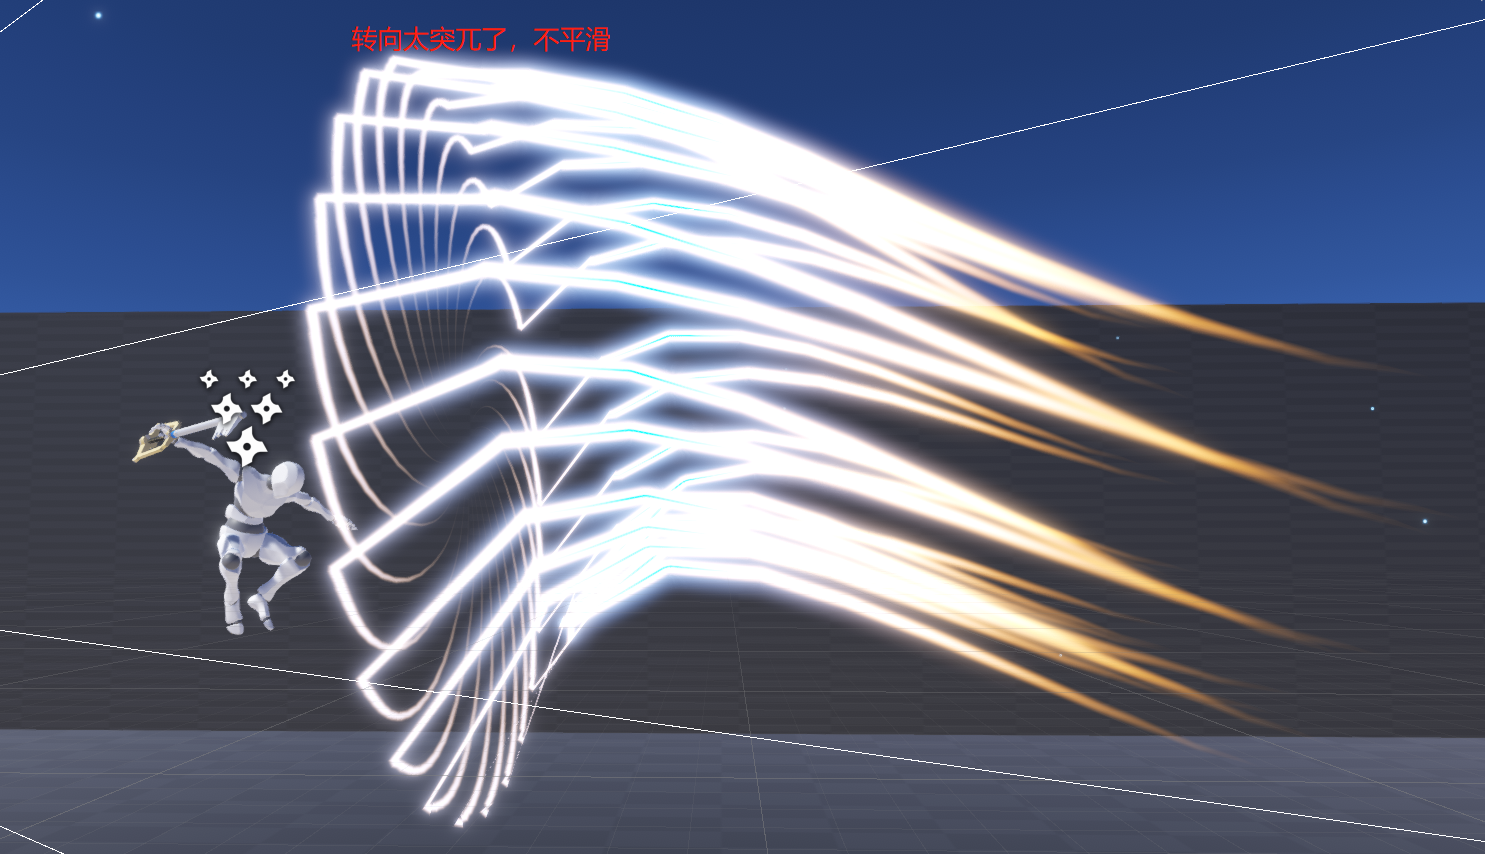
- 毛病1-初始化阶段->飞向敌人的这段过渡非常不平滑(王国之心是很平滑的),如下图所示:
- 毛病2-拖尾在敌人外环处就结束动画了,没有一种击中的感觉,如下图所示:
- 先来说说毛病1,根本原因在于一开始粒子的Z轴为玩家看向的方向,而实现万花筒轨迹的时候是直接往Y轴的方向飞去的
transform.position += transform.up * Time.deltaTime * (movementSpeed / 8f);,而在这个过程中子弹的Z轴还是玩家看向的方向,过程中的子弹Z轴如下图所示(切换至局部坐标系): 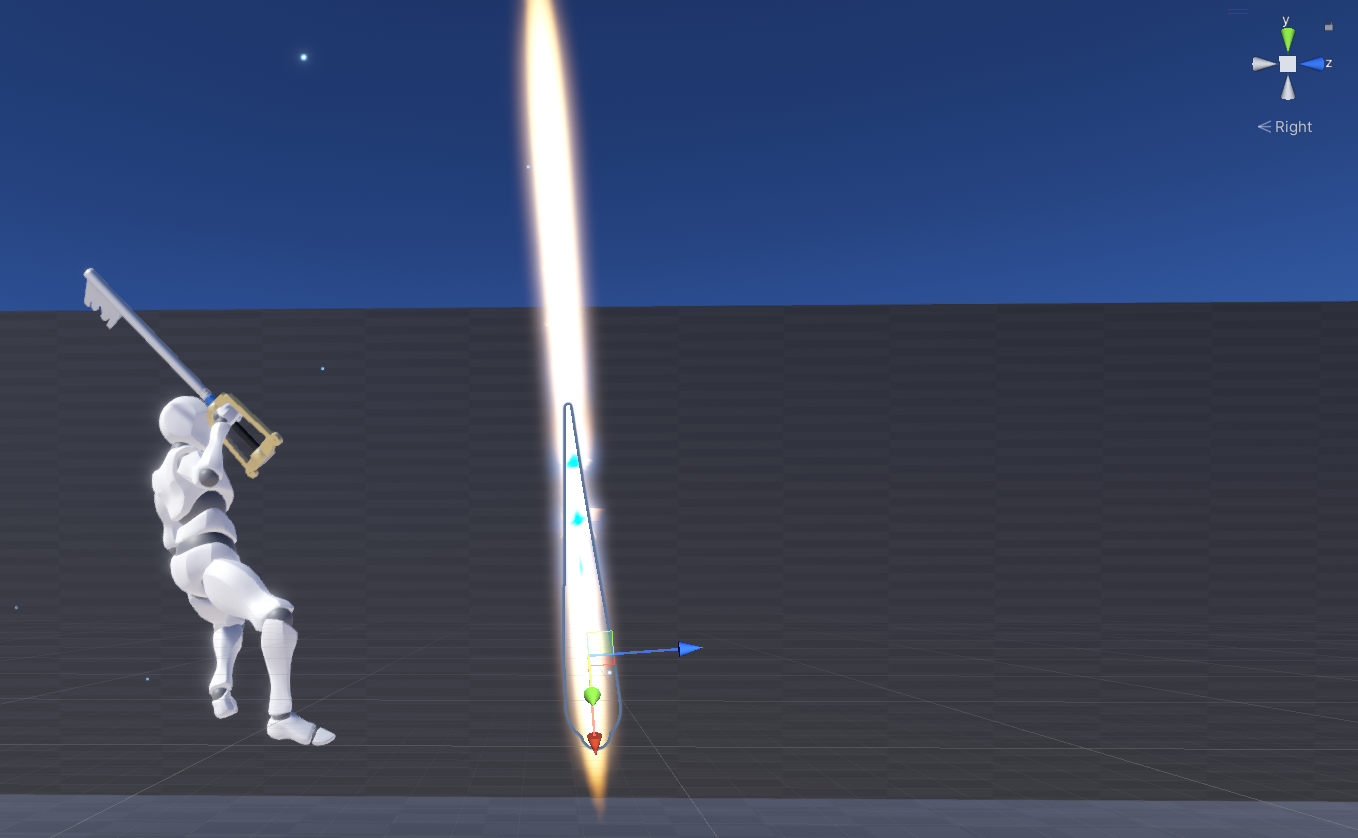
- 而一旦万花筒轨迹阶段结束,又立刻变为朝着Z轴方向移动
transform.position += transform.forward * Time.deltaTime * (movementSpeed * multiplier);,所以造成了轨迹的变化相当不平滑 - 到这里我已经把原因告诉你了,有兴趣可以自己尝试优化,然后再往下看我的实现
- 知道原因后就是优化了,我的优化思路是:让子弹从开始至终都只朝Z轴(transform.forward)飞行,然后过程中操控其角度变化,只要利用好角度变化的插值就可以平滑过渡了
- 所以一开始朝Y轴飞行这个实现也要换掉,我们要让子弹从一开始就朝着原本Y轴的方向,也就是初始角度+90°即可:
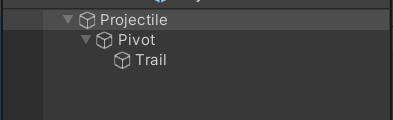
    private Transform trail; // 增加可读性引入的,这里还用不上,不过还是先写了

    void Start()
    {
        StartCoroutine(InitialWait());
        Destroy(gameObject, 3);

        // 沿着y轴旋转90°,这样就能改成沿着视角的垂直方向飞了
        transform.Rotate((Vector3.up * 90), Space.Self);
        trail = transform.GetChild(0).GetChild(0);
    }
- 然后是
InitialWait也要修改,改成初始化阶段不做半径偏移,并且参数化:
    private float radius = 1;
    private float radiusTime = .5f;

    IEnumerator InitialWait()
    {
        yield return new WaitForSeconds(initialWait);
        trail.DOLocalMoveY(radius, radiusTime);
        DOVirtual.Float(rotationSpeed, rotationSpeed * 1.5f, .3f, SetRotationSpeed);
        initial = false;
    }
- 再之后是初始化阶段改造,代码修改如下:
        if (initial)
        {
            transform.Rotate(Vector3.right * Time.deltaTime * (rotationSpeed / 2), Space.Self);
            transform.position += transform.forward * Time.deltaTime * (movementSpeed / 8f);
        }
        else
        { 略...... }
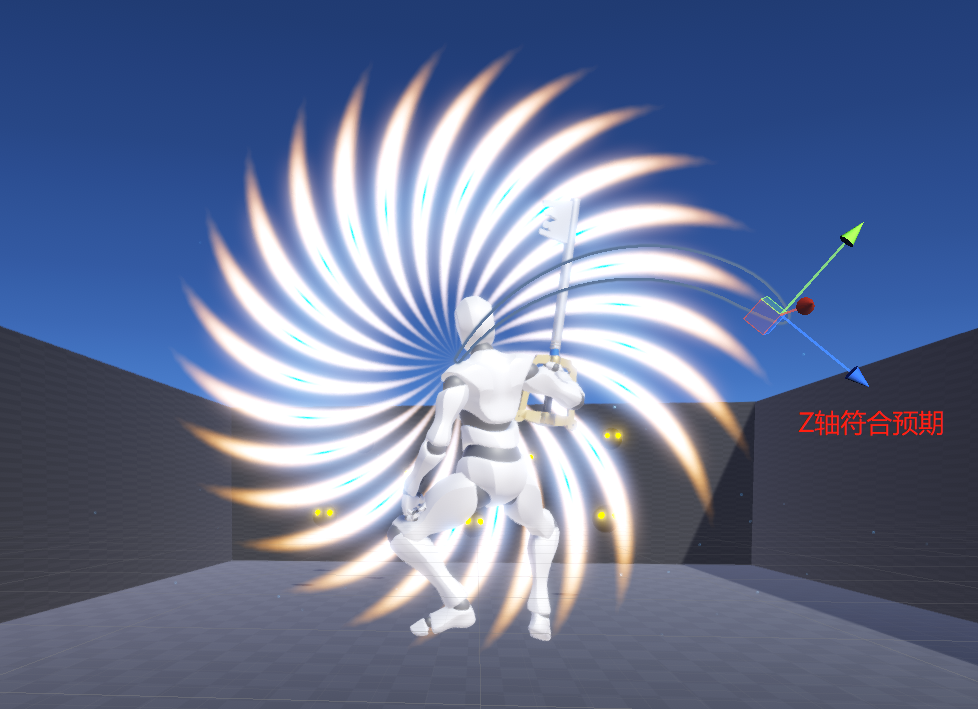
- 到这一步,基本把万花筒重新复刻了,并且Z轴方向也符合预期:
- 但到这里还不算成功,因为初始化后会同时受到
trail.DOLocalMoveY(radius, radiusTime);Y轴偏移+朝向目标方向飞行的影响,依旧会让轨迹变化显得非常突兀,如果让上面的万花筒继续播放下去,就会变成下面这个鬼样: 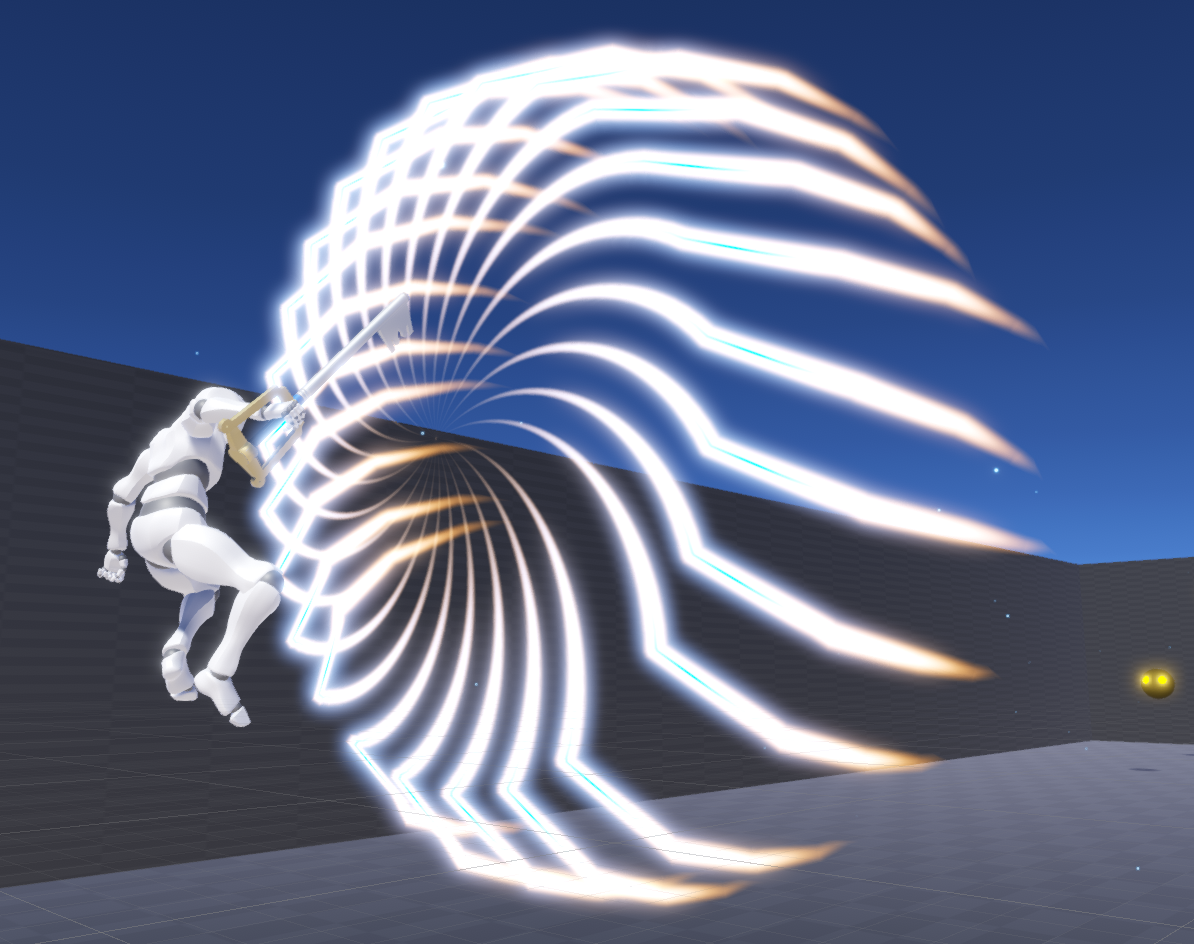
- 这里的解决方式是将初始化后的阶段再拆成两段(这里的分段后面还有别的作用):
- 第一段:拖尾Y轴偏移期间,调整旋转插值至.1f
- 第二段:拖尾Y轴偏移已经完成,调整旋转插值至.2f
ProjectileScript_Clone代码变更如下:
    private float passTime = 0;
    public float initialWait = 0.32f; // 初始化时长,记得修改编辑器的设置

    void Update()
    {
        if (initial)
        {
            transform.Rotate((Vector3.right).normalized * Time.deltaTime * (rotationSpeed / 2) * 2, Space.Self);
            transform.position += transform.forward * Time.deltaTime * (movementSpeed / 8f);
        }
        else
        {
            passTime += Time.deltaTime;
            if (passTime >= radiusTime)
            {
                var targetRotation = Quaternion.LookRotation(target.transform.position - transform.position);
                transform.rotation = Quaternion.Slerp(transform.rotation, targetRotation, .2f);
                transform.position += transform.forward * Time.deltaTime * movementSpeed;
                transform.GetChild(0).eulerAngles -= (Vector3.forward * 2) * Time.deltaTime * rotationSpeed * 1.5f;
            }
            else
            {
                var targetRotation = Quaternion.LookRotation(target.position - transform.position);
                transform.rotation = Quaternion.Slerp(transform.rotation, targetRotation, .1f);
                transform.GetChild(0).eulerAngles -= (Vector3.forward * 2) * Time.deltaTime * rotationSpeed * 1.5f;
                transform.position += (transform.forward).normalized * Time.deltaTime * (movementSpeed);
            }
        }
    }
- 当前效果如下总算是没有那种接近于90°的突变了:
- 剩下的毛病2,其实非常好解决,只要让拖尾原本Y轴的偏移随着子弹与敌人距离的缩短,逐渐归零就好了,并且开始计算距离减少的起点必须是在Y轴偏移完之后(否则冲突),正好我们上面的代码已经分段了,所以
ProjectileScript_Clone修改如下即可:
    private float targetDistance;// 初始距离
    private Vector3 trailOriginalPosition; // 拖尾初始偏移

    void Start()
    {
        // 略......
        trailOriginalPosition = trail.localPosition;
    }

    void Update()
    {
        if (initial)
        { 略...... }
        else
        {
            passTime += Time.deltaTime;
            if (passTime >= radiusTime)
            {
                // 略......
                // 随着距离缩短逐渐复位
                float percent = (Vector3.Distance(target.position, transform.position) / targetDistance);
                trail.localPosition = new Vector3(0, trailOriginalPosition.y + percent * radius, 0);
            }
            else
            {
                // 略......
                // 记录初始化拖尾偏移最后时刻的距离
                targetDistance = Vector3.Distance(target.position, transform.position);
            }
        }
    }
- OK,效果如下,总算是有命中的感觉了,不再是飞到不沾边的地方爆炸:
- 最后,再贴一次开头的慢动作看看整体效果: